

Recently, I've received a few emails asking exactly how I made the roses for my newspaper rose wreath. First, I have to say: darn nifty that people are showing interest in this project since it was one of my very very very very very first blog posts. Second, I have to thank Pinterest for that... Thank you ever so much Pinterest.
Credit was given in that earlier post to the brilliant Alisa Burke whose wreath inspired mine. She shows how she made her flowers and wreath here. My flowers look slightly different from Alisa's however, which is the reason for the inquiries I think. Mine are made of newspaper and they have a loftier silhouette. Yessir. They are tallish.
How do I get them to look like that? A valid question. One which I will endeavour to answer. To the recycling bin!
Tutorial: Newspaper Roses
1. You will need:
- Newspaper
- Pair of scissors
- Glue (PVA)
- Acrylic paints in your choice of colours
- Paint brush
2. Cut your newspaper into wide horizontal strips.
3. Separate the strips.
4. Glue several strips together along their ends making one long strip.

6. Fold in the sides to meet the middle foldline.
7. Fold in half again.
8. You will now have a long sturdy 4-ply paper strip (that looks like bias tape) with which to make your rose.
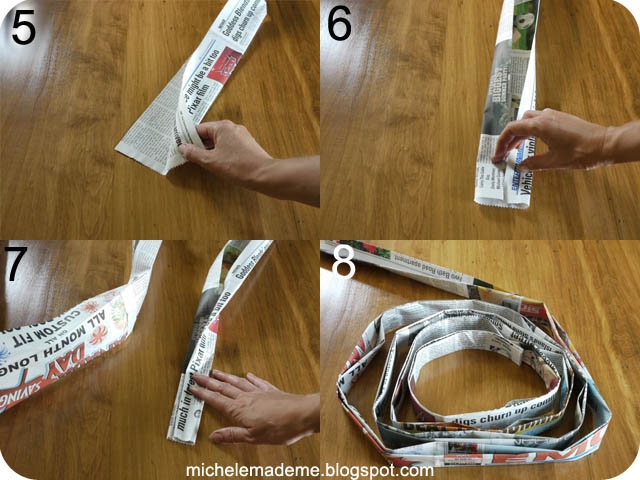
9. Make a bud by scrunching and then coiling the start of the strip.
10. Coil the strip flat around the bud. Every 7 inches (18 cm) or so, gently flip your strip 180°.
11. Continue coiling the strip flat around the flower, flipping gently every so often as in Step 10.
12. Now and then, add a dollop of glue on the inside of the strip to hold the lot together.

14. Glue the end of the strip flat to the bottom.
15. Give your rose the desired shape by squishing it in your hands.
16. Paint away! I used three colours of paint for my roses. I started with my colour of choice, say pink, and covered the flower pretty well with one coat. I let that coat dry a few minutes. I then dry-brushed just a little white onto the rose for dimension. And finally, I dry-brushed a little orangey-brown to age it a little.

And there it is... Your newspaper rose! The key to getting this look, I think, is to keep the strip flat against the body of the rose as you work. Flat. That is the secret. Best of luck to you!

If you have any further burning questions, fire me off an email. Again, to see the completed wreath in all its pastel glory, find it here ages ago back in April 2010.
Have yourself a lovely day, I'll see you soon!
P.S. Here's another paper wreath for you, in case you're interested!
P.S. Here's another paper wreath for you, in case you're interested!
I would have never had guessed the last photo was newspaper. Beautiful!
ReplyDeleteLovely, just lovely! And you can make various decorations with them! Thank you for sharing!
ReplyDeleteWhat a fab tutorial, Michele! I love the final detail about 3 paint colors. Just one of your magician's tricks, SO nice of you to share!
ReplyDeleteWhen my daughter retires from her friendship-bracelet-making sweatshop on the kitchen table, I'm going to suggest this as her next summer project!
ReplyDeletehi! i saw your post and i have to try it.........your roses are sooo beautyfull.......
ReplyDeletemaybe you will see my results......
http://soranis.blogspot.com/2011/07/rosen.html
i think i have to practice many more, to get such one as your´s..;o)
thank you for your tutorial, and i´m sorry for my bad english......
bye nico
Great tutorial and the roses are so pretty. I love the way newspaper looks painted.
ReplyDeleteI saw your post below about your negative commenter. I always wonder what makes someone so miserable that they go out of there way to make someone else miserable. The good thing is they said they're not coming back to your site.
If you ever get a horrible comment again may I recommend listening to Hate On Me (Glee cast version). By the time that song is over you'll feel sorry for the commenter. At least that's how I feel after listening to that song. Also Fighter by Christina Aguilera is a good one.
So lovely! And Alisa is one of my all time fav's - great twist on one of her tutorials.
ReplyDeleteGreat tutorial Michele!
ReplyDeleteI love your little paint palette...ooo could you please do a little post on the inside of your craft cupboard :-D
xxh
You know I love this frame. It is one of my favorites "Michele made me" projects. Thanks for the tutorial. I really need to make one of these to decorate Brittany's room. Wouldn't it look wonderful. Hugs Ariane
ReplyDeleteJust a quick note to let you know that a link to this post will be placed on CraftCrave today [19 Jul 01:00am GMT]. Thanks, Maria
ReplyDeletewaoo..a nice post with a cute recycling idea..its always cool to visit you dear *(*
ReplyDeleteNeatooo! I like all Alisa's wreaths, but I must say, I think I like your tall ones a tiny bit better for this project --they look more like the real thing. And they remind me of cinnamon buns (nom nom nom) :)
ReplyDeleteSomething magical about painting newspaper after it's been shaped and twisted. Hmmm....you have inpired me, I'll have to look into this one!
Very pretty and your instructions made me laugh (in a good way :) - Now, i wonder if kids could make these??
ReplyDeleteThat's great! Wow..i'm following you from now!
ReplyDeleteI love your works!
Happy Sunday! Bye
Made three of these this morning using your tutorial! They turned out so pretty. They look a little different than yours, but I think it depends on how wide you cut your strips and how you twist the paper as you form the rose. Love the process, especially the painting. Thanks for sharing your tutorial. Now, to figure out how I am going to use these for projects . . . so many ideas!
ReplyDeletevery cool blog!
ReplyDeleteLove it! I just featured it on my blog in fact: little-inspirations.blogspot.com. Thanks for the inspiration!
ReplyDeletethis is so neat! i love it. this is going to be my next project.
ReplyDeleteI just finished making my first three roses and kept thinking that they just looked like newspaper balls ... then I painted them and all at once they turned into roses! It was magical. Thanks so much for helping all of us in cyberspace, Lisa
ReplyDeleteI am mixing this frame with another frame I found on Stumble Upon (magnet board for my makeup) and this will be the frame around the board (not painted) but the inside metal will be covered with black fabric with little white flowers. It will match my bathroom perfectly since it is all black and white! I found that when I am on the last strip, if I keep twisting it (instead of only every 7 in or so) it looks fuller and more real though I still can't seem to make gem as pretty as yours
ReplyDeletethat sounds super-pretty and useful Cait! I'd love to see photos!
DeleteSupper idea, my students are making this forothet,day. Thanks for Sharing.
ReplyDeleteI love this! I blogged about it and I am in the process of making some newspaper roses to frame 3 mirrors for my bedroom. Thank you for the inspiration and tutorial!!!
ReplyDeleteBlessings,
Janiene
http://bishopsfamilysite.blogspot.com/2012/05/newspaper-roses.html
I love this!!!! I have had it on my to-do craft list for over 6months now! I finally made it and blogged about it. THANK YOU for the inspiration!!! You are a blessing!
ReplyDeleteJaniene
http://bishopsfamilysite.blogspot.com/2012/06/newspaper-roses-frame.html
Me encantan...they're beautiful!!!!!
ReplyDeletewow they are beautiful..just enchanting.Will be making them to hang in my new home soon.
ReplyDeletethanks for the wonderful work.
wow, wow, WOW! I love this beautiful wreath you have made using common, everyday newspaper! I would have never guessed it if you didn't say.. I just finished a frugal crafts round-up and hope it is okay that I have featured your pretty newspaper wreath. You can see it here:
ReplyDeletehttp://jamiebrock.hubpages.com/hub/Frugal-Crafts-15-Easy-Craft-Ideas
Thank you again for sharing your gorgeous wreath and how to make it. I know so many crafters out there will find this useful!
I absolutely love this! We hosted a wee craft market in our village a couple of weeks back and I made an amended version of this. They were flat, painted white then painted with a tiny bit of bronze. I then stuck them on some blackboards I'd made and was really chuffed with the end result. It helped that I got a bunch of compliments. I've just started making roses for my Christmas wreath. If only I can finish the 127 other projects I've started.....
ReplyDeleteOMG! These roses are beautiful! The last one doesn't even look like paper! Wow! You are Super Talented!
ReplyDeleteI am making and following your Tutorial: Newspaper Roses, I'm a little confused on what you do when you make the 180 turn do you go the same way your are going or do you go the opposite way? I'm doing it but my roses don't look like yours so I was wondering what i was doing wrong. I'm ok that they look a little different :-)
ReplyDeleteLove the tutorial. Will be trying out soon. TFS.
ReplyDeleteNICE FLOWER FROM NEWSPAPER
ReplyDeleteWhat a cute & unusual idea & who doesn't have newspaper around.
ReplyDelete