
Today is Sunday and I am breaking my own rule about not posting on the weekend! And the reason I am breaking my own rule is that I could not possibly fit all the September denim goodness into my regular 3 day/week schedule. So my cup runneth over with the following joy-of-a-post from my sweet and talented friend Krista of Poppyprint. Haven't heard of her? That ends here. And fair warning: you will be hooked. Not saying another word.
***
I didn't think I had an upcycled denim idea in me, but then I found an old jean skirt in my closet a few weeks ago and a lightbulb instantly went off! The back of this straight, ankle-length skirt (read: LOTS of uninterrupted great denim to work with) featured two square pockets that I figured would be entirely useful. For holding my day to day sewing tools.
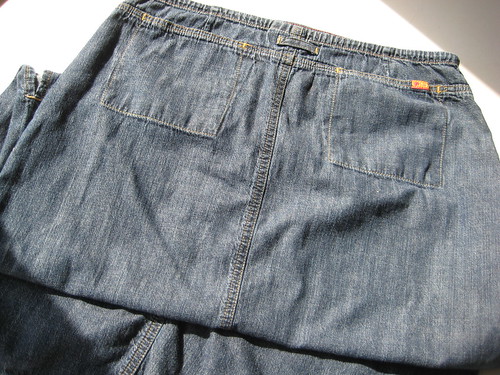
Before - you've served your original purpose with aplomb, but it's time for a makeover
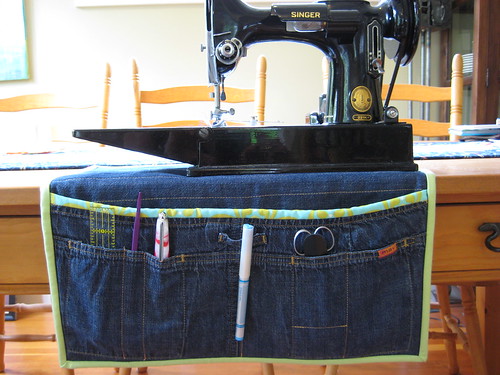
After - look at you now!
That's right, today we're going to make the Upcycled Jean Skirt Sewing Command Centre! Or, if you prefer: a little quilted placemat thingy to put under your sewing machine that has pockets that hang down over your lap, conveniently holding all of your sewing essentials right at your fingertips. I will use this project under my Featherweight machine. My UJSSCC measures 16"W x 17"L.
This tutorial (and I) assume that you have some basic sewing/quilting knowledge. You can always email me with any questions, but I don't want this to become World's Longest Guest Post because Michele might never invite me back {eta: okay, this is officially the World's Longest Guest Post}.
SUPPLIES
- 1 long denim skirt
- 1/2m cotton fabric for backing
- approximately 2 m of double-fold quilt binding (this is a 2 1/4" strip of fabric, folded in half wrong sides along the length) OR one package of double-fold bias tape.
- batting scrap approx. 22" x 12"
- rotary cutting equipment and shears
- sewing machine, jeans/denim needle for your machine & walking foot if you've got one
- coordinating thread (I use Mettler quilting weight cotton in colour #830 to hem all my jeans as it seems to be a close match to the standard yellowish jean thread.)
- ruler, fabric marking pen, safety pins, straight pins
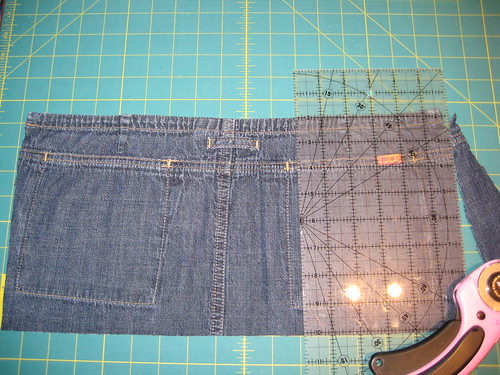
First thing's first. Let's cut up that skirt! Open up the side seams and make a horizontal cut across the back panel at least 1" below the bottom of the pockets. Retain the top hem or waistband (unless the pockets are more than 3" below the waist, in which case you may want to cut a second line about 1" above the top of the pockets, too). Trim sides perpendicular to the bottom/top edges you just cut to form a rectangle with at least 1" of fabric on the left and right of the outer pocket edges.
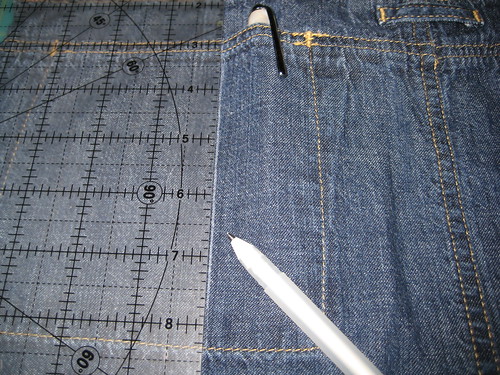
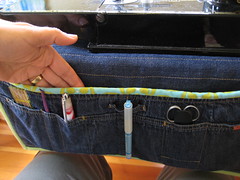
Now grab all of your sewing essentials and place them in the pockets. Draw vertical lines where you'd like to sew narrow slots for your tools like seam ripper, marking pen, hera marker, ruler, turning tool...etc. I also sewed a horizontal line across one slot so my scissors wouldn't disappear too deep into the pocket. Sew along your marked lines backstitching at the top and bottom of the pocket to secure.
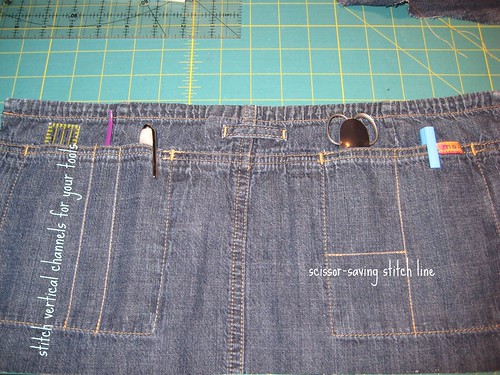
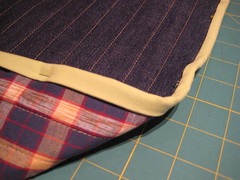
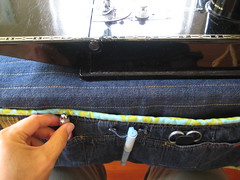
For extra funky factor, sew a strip of binding across the top of your pocket panel with a 1/4" seam allowance, matching raw edges of binding with top edge of panel. Leave about 1" of extra binding hanging off the ends.
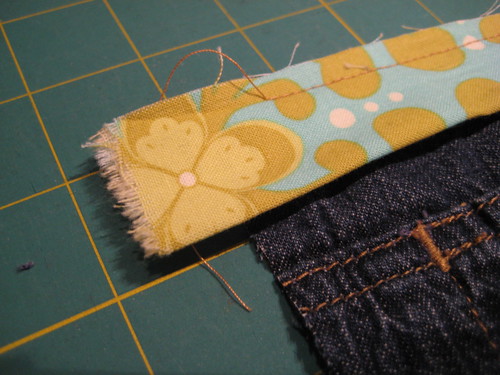
Press the folded binding edge up and over to the back of the panel. Pin in place. Stitch in the ditch along the seam of the binding/panel to secure the binding to the back.

Your pocket panel is complete! Now, we're going to make the small quilt that you'll attach this pocket to.
Ultimately, your quilt will be the same width as your pocket panel, but for now, you want a little wiggle room because things can get a bit distorted with quilting. Measure your Pocket Panel width (PW) and add 1". Now, measure the Depth of your sewing Machine (DM), add the distance you like to have between the front edge of your machine and the edge of your table (TD for Table Distance), add the height of your pocket panel (PH) and add another 3" for wiggle room. Your quilt will be:
(PW + 1" ) X (DM + TD + PH + 3")
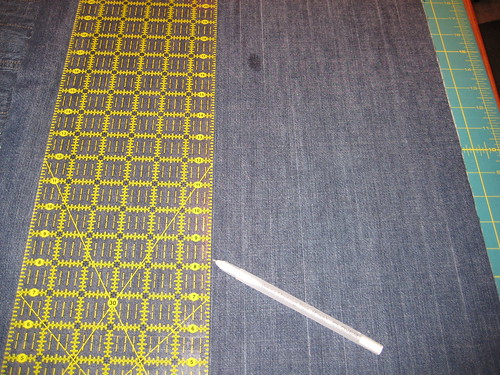
Cut a piece of denim from the front skirt panel to this size. Cut a piece of cotton to the same size. Cut a piece of batting that is (PW + 1") X (DM + TD + 3"). You don't want batting behind your pocket panel. You want the batting to end at the edge of your table, so the pocket hangs neatly down over the edge of your table.
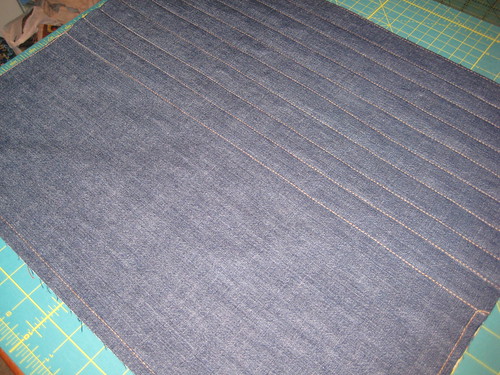
Working on the right side of your denim quilt top, lay the batting on top, matching one long edge. Mark a horizontal line on the denim along the edge of the batting (so this line will be DM + TD + 3" down from the top of your quilt). Take the batting away and mark parallel lines 1" apart from the first line, all the way to the top of the denim piece. In other words, you are only going to mark lines where there will be batting under the denim (roughly the top half of the quilt).
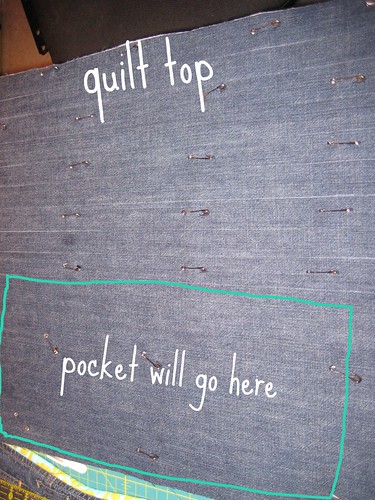
Making your quilt sandwich. Layer as follows, from the bottom up, aligning the top edges. Cotton fabric wrong side up, batting, denim right side up. Pin baste through all 3 layers. Here's what mine looked like at this point (notice there are only faint lines drawn on about 1/2 of the denim quilt top).
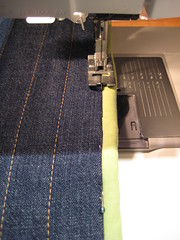
With a slightly longer stitch length (I used 3.5) sew along the marked lines through all three layers using a walking foot. When those lines are complete, baste all around the outside edge of the quilt sandwich with a 1/4" seam allowance.
You're almost there! Now you need to trim your quilt to it's finished size. Trim the edges so that they line up perfectly with the width of your pocket panel. Pin your pocket panel to the bottom 1/2 of your quilt, aligning the sides and bottom raw edges. Hang the pocket off your table edge and place your machine on top of the quilt as you'd like it to be when you would sew. Determine if you want to trim any of the quilt top off (is the quilt taking up too much table space behind your machine? If so, trim it down to where you'd like it).

Baste your pocket to the quilt. Sew a vertical line up the middle of the pocket panel, forming two large pockets. I did this so the panel wouldn't gape open. These two pockets will be great as a thread catcher, or to hold your cell phone. Note that I didn't stitch through that decorative horizontal 'belt loop thingy' - I figured I could hook a pen or my seam ripper in there.

Starting in the middle of the top edge of your quilt, bind your Control Centre as you would a quilt, mitering the corners. If this concept is new to you, there are a gazillion binding tutorials online. I happen to like this one and this one for their clarity. I like to fold my binding to the back and attach by machine stitching in the ditch (like we did on the top edge of the pocket).
Ok, this might very well be the longest post I've ever written. This is really a fairly simple sewing project except for the binding if you've never done that before. Of course, you can make a Sewing Command Centre out of just about any type of fabric. Corduroy would be fun, but a major lint magnet. Ditto velour. I think sticking with cotton would be best. Here are some action shots, demonstrating the handy usefulness of the UJSSCC:
NOTE: If you find your machine is too slidey on the table now that it's sitting on it's very own quilt, you can cut a hunk of non-skid kitchen drawer liner to put under the UJSSCC, or hand tack a rectangle of rubber-dot slipper fabric to the bottom (available at Jo Ann or Fabricland).
If you make your very own, please share in the Drop Dead Denim Flickr Group and I'd love to see it in the Poppyprint Project Group as well!
Edited to add by Michele: Please visit Krista at Poppyprint anytime for her gorgeous quilting and crafting projects, her beautiful writing, and her laugh-out-loud sense of humour.

Okay, just a few more words... Krista!!! You have a knack for making beautiful AND useful things. I could seriously use one of these UJKLMNOP's (okay... I admit I don't actually remember the actual acronym...) for under my sewing machine, notorious misplacer-of-things that I am. Now that we have this extremely well-documented step-by-step, that should NOT be a problem. Thank you so much for putting this baby together. It, like its creator, is most excellent!
For today I'm Diggin' This Denim: Denim Boots by Leila Lamon and Stephan Bruce
Have a fine day! Tomorrow (that's Monday) there's a...
GIVEAWAY!!!
I am so glad that Krista came up with this great idea to share! Nicely done Krista! You look so darn organized now.
ReplyDeleteThis is a fabulous project. I think my sewing machine would be very happy with one of these and me too.
ReplyDeleteGreat project and fantastic tutorial, thanks Krista. Thanks Michele for September of fun projects - Enjoy the rest of your weekend - Hugs Nat
ReplyDeleteFantastic project.... I have been promising myself one of these... no escuses now????
ReplyDeleteHugz
Great idea - wonderful fulfillment!
ReplyDeleteKrista is SEW clever!! Now where did I put those jean that I can no longer fit into??
ReplyDeleteTake care!
Paulette
Oh great. ANOTHER thing on my "must make" list and a new blog to follow. At this rate, I can never die - I've got waaaay too much to do!
ReplyDeleteAwesome tutorial! I'm forever losing my things behind my sewing machine, so it would be great to have something like this for organization. Krista, job well done!
ReplyDeleteI never thought a thousand possibilities of jeans. That's incredible. I'm learning a lot.Thanks!!!
ReplyDeleteWhat a clever idea! Hmm, I'm sure you could make something similar out of another garment, too. Thanks for sharing.
ReplyDeleteThat is really cool. I wish I had a set craft area that I can make organization things like that for. But the hubby and kids get first dibs and my stuff has to be portable.... =/
ReplyDeleteWhat a great project!! The tutorial is funny, easy to read, and plenty of photos make it an award winner in my book!!
ReplyDeleteThanks Krista & Michelle. This would be a very handy gadget for a ditsy sewist like me. No more time spent hunting for my stuff!
ReplyDeleteThis is genius! (with the size of my butt I will be able to store everything!!!) Thanks!
ReplyDeletehttp://sipsfromthefirehydrant.blogspot.com/
What a great denim project!!! Thanks Krista!!! Love your tutorial!!! It's not too long, it's just perfect to explain every step!!! Love it!!!!!
ReplyDeleteI'm stealing, um borrowing, a pair of my hubby's old jeans. I l-o-v-e this storage pocket.
ReplyDeleteCarolyn
What a smashing machine-mat-mate! Thanks for the tutorial!
ReplyDeleteFantastic project. I have a smaller version by my sewing machine and it's so useful. Love this idea.
ReplyDelete