
And just like that... we're here! At the end of our Drop-Dead Denim road... Wow! My heartfelt thanks to my amazing guest-blogger-friends, to the Flickr group contributors, to the generous giveaway sponsors, to all commenters and readers, to all those denim artists out there, and of course, to denim itself. You've made this month a real highlight for me! I just have one last little post left for you... Enjoy!
♥ M
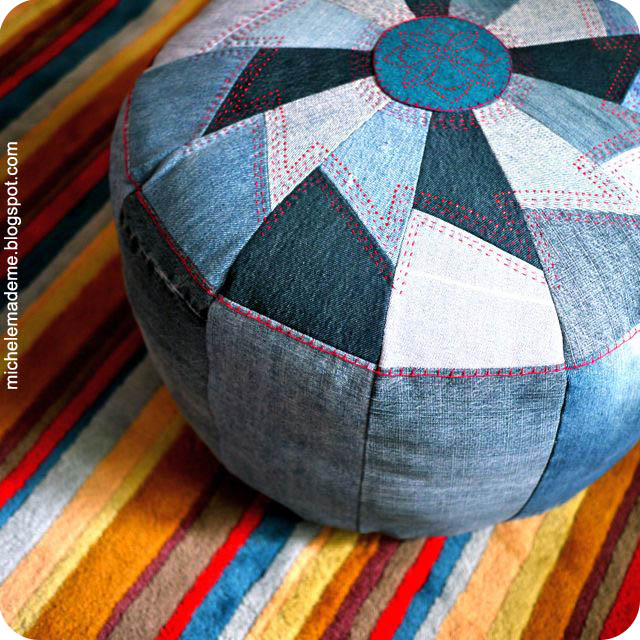
I hadn't made any denimy goodness for the boy this September, bad me, and I felt I needed to rectify that. What fun thing could I make him? I decided to go with a pouf for his room. I've been planning one of these for, like, ever. And you know what? It has been a HUGE hit. I didn't have the slightest clue that he would love it the way he does. He lugs it about. He rolls it around. He hugs it. He jumps on it. He beats it. And I let him. It is one tough pouf!
Tutorial: One Tough Pouf
I kinda made this up as I went along. Here's my attempt to explain my process.
You will need:
- Denim scraps in different shades
- 18" round template (I used a large plastic platter rescued from the recycling bin.)
- 5" round template
- paper templates as drawn out in #2 below
- Pair of scissors
- Sewing machine
- Ruler and pencil
- straight pins
- needle and thread
- stuffing (I used the stuffing from 2 large cushions that we rarely used)
- Optional: embroidery thread and dimensional fabric paint
1. On a large piece of paper, draw out a circle using your 18 inch circle template. Find the center of your circle. You want to figure out how big a 1/12th wedge of the circle is. The angle of the resulting wedge will measure: 360°/12 = 30°.
2. So from your circle, you will pick out one 30° wedge and then add a 10 inch long rectangle to the bottom of this wedge. Divide the wedge from the bottom rectangle with a straight line. Now divide the wedge into two sections as in #2. Cut off about 1 inch of the uppermost apex of the wedge. On a separate sheet of paper draw out the individual resulting shapes. Add 1/4 inch seam allowance to every side of each shape. Cut out your shapes. These are your pouf templates.
3. For each pouf template, cut out 4 each of 3 different shades of denim. I did light, medium and dark as best I could.

4. To prepare for sewing, pin top wedge pieces right-sides together as shown in Photo #4, mixing shades of denim as you go.
5. To ensure that the edges of your wedge pieces line up, intersect the pieces as shown in #5. Sew the pieces together with a 1/4 inch seam allowance.
6. Once you unfold the wedge at the seam, the edges of the two pieces should match.
7. Sew the wedge to the rectangle right-sides together using a 1/4 inch seam allowance.

8. When unfolded, this will give you a house shape as shown in #8. You need 12 house shapes to make the pouf. Repeat steps 4 through 8 until you have all 12 house shapes.
9. Pin two house shapes right sides together. When pinning the house shapes together it is IMPERATIVE to align the joint between the wedges and rectangle pieces. Otherwise the whole pouf will be askew. Stitch along one side of the house shape with a 1/4 inch seam allowance.
10. Press the seams once sewn. Notice that the two house shapes sewn together no longer lie flat. That's good. Add the next house shape to the set of two as in #9.
11. Repeat Steps #9 and #10 until you have sewn all the house shapes together. Join the two end house shapes, pinning and then stitching them right sides together. Press all seams.

12. To finish the top of the pouf, cut out two 5 inch circles, one out of denim and one out of another fabric scrap.
13. Pin the circles right sides together.
14. Stitch circles together with a 1/2 inch seam allowance leaving a few inches open for turning. Cut tiny wedges out of the circle's seam allowance avoiding the opening. Turn the circle inside out. Press.
15. Pin the circle, denim side up, to the center top of the pouf. Stitch in place.

16. Adding a 1/2 inch seam allowance prior to cutting, cut out a denim circle with the help of the 18 inch circle template.
17. Using pins, mark the location of 12 evenly-spaced points along the edge of the denim circle. To do this, start by folding the circle in half. Mark the halves with pins at the edges.
18. Fold the half circle into sixths. Use a ruler to get matching measurements. Mark the sixths with pins on the top and bottom.
19. Fold the sixths in half to find the twelfths. Mark with pins along the edges.

20. Join the denim circle to the pouf right sides together.
21. The pins of the circle should meet the joints of the pouf.
22. Once all of these points are joined, add several pins to the outer edge. Stitch with a 1/2 inch seam allowance. Leave an opening for turning.
23. Snip the seam allowance all the way around except at the opening.

24. Stuff your pouf. I used the stuffing from two large cushions to stuff it. This makes a relatively firm pouf.
25. Sew the opening shut.
26. Optional: Add decorative stitching or dimensional paint to make your pouf one-of-a-kind. I added red embroidery details and little dots of red fabric paint to our pouf because that's the boy's favourite-most colour.

And we are there. We have made one tough pouf, yay and yippee!


Thank you again for joining me this September. A great time was had by me, I can tell you!

And I think we now have definitive proof.

Creativity IS in your jeans.

Now go have yourself a fantastic weekend. I'll see you in October!
P.S. The lucky giveaway winners were announced in the previous post!
You saved the best post to close up a lovely month of drop dead denim! That pouf for The Boy is gorgeous! Thanks for all the denim love!
ReplyDeleteisn't that great..... lovely month of seeing some great projects...
ReplyDeleteHugz
My girls would love a pouf or two. This turned out so great, Michele. I love the embroidery details you added. Great end to a great series.
ReplyDeleteOK WOW. What a way to wrap up this series.
ReplyDeleteWhat a gorgeous poof!!! I love it!!! Thanks for sharing it!!!
ReplyDeleteThis is fabulous. I LOVE the hand sewn details most of all.
ReplyDeleteI can understand your boy! I love the tough puff too! The pattern of the denim with the red stichting looks beautiful! :)
ReplyDeleteFabulous job on that Michele! It must have taken significant time. I hope it holds up well to all he can dish out.
ReplyDeleteI love it!!Especially the embroidered part!
ReplyDeleteYou make it look so easy Michele!
It's wonderful! What a great way to use denim.
ReplyDeleteWow! Incredible!
ReplyDeleteOh my gosh, Michele. SO COOL. Quite boy-appropriate, too!
ReplyDeleteFantastic Michele! I too have been wanting to make one of these for like ages! This makes me want to save all those worn out, too small jeans!! Thanks for all the great recycled denim projects this past September Michele!
ReplyDeleteMichele, this is AWESOME!!! I made a denim bean bag chair (but out of new, cheap yardage). I love the different tones of blue in this, plus your fabulous hand stitches. Gorgeous!
ReplyDeleteThis is really GREAT!!! I've been up-cycling denim this month, making aprons, & Xmas stockings...now I think I might wanna try this! :)
ReplyDeletethis is my favorite denim post!
ReplyDeleteI love it! Thanks a lot for sharing this idea! When I'll be better with sewing I want to make it for my son.
ReplyDeleteLove from Italy
I love this, thankyou...the anticipation for every drop of denim, fantastic finish... I knew i had saved my husband changing uniforms for something special. A pouf and maybe a couch cover. cheers and great work. Tamsin
ReplyDeleteI LOVE THIS!!!! I pinned it on my pinterest! (wink) Hope you get a lot of people on here to see it....it is amazing!
ReplyDeleteAwesome tutorial! I'm so impressed and not surprised that he love it so much. Great work!
ReplyDeleteThe pouf is incredible, just a work of art! Thanks for hosting the most amazing month of fun, Michele! Better make it an annual event.
ReplyDeleteI made one for my little fella and he loves it. Thanks for the great inspiration, I made mine 19'' across (because my dustbin lid measured that) and it was a great size too. Thanks again for sharing :)
ReplyDeletenice tutorial i love it thank you
ReplyDeleteThis is really fantastic. Great job.
ReplyDeleteI finished making one for my 2 year old daughter yesterday and she loves it! She sits on it, rolls it around, punches it, lies on her stomach on it and see saws...I'm so glad she likes it... a very big thank you for such a detailed tutorial! I love your tutorials and this was the best of them!
ReplyDeletehi! i am a girl (12 yers old) from bilbao (spain) i like it a lot your inventions!! the one that i like it alot is the heart tthat you make it weth baloons and that special thing like glue!!
ReplyDeletethanks marina, you're very kind!
DeleteSorry...if I comment a lot but really I like this cushion. I want make it someday. Do you have a shop to sell or you only make those creatives things for yourself?
ReplyDeletethis is beautiful! i am going to make a simple pouf...but i love the use of denim here and your piecing. wonderful job!
ReplyDeleteThanks for the great tutorial, 5 minutes after it was finished it was being tackled and flopped on by my 17month old -awesome!! Thanks again:)
ReplyDeleteHi, I'm trying to make this pouf and am getting stuck on step 4. Can you explain where I'm supposed to fold? Thanks!
ReplyDeleteHi Calli,
DeleteFor step 4, you're just taking the two pieces that you've cut out for the top wedge (those two little triangles) and sewing them together. This will create one big wedge. And you'll repeat that step 12 times to make 12 wedges for the top.
I hope that clears it up for you.
Good luck, Calli!
I had this problem too...for anyone reading this now I thought I would try and help clear it up! If you line the the two pieces and pin along the 1/4" line, you'll see that when you fold it up the edges of the wedge don't line up. You need to move it down along the other edge by a 1/4". If you look at picture #5 you can see that this leaves a little triangle of the bottom piece (the bottom of the wedge) visible.
DeleteI love this! The twirly design of the denim patches is really cool. I have a ton of denim laying around from fixing people's jeans, cutting them off etc...I thought I would share with you an idea I saw on the Green Renaissance website. Under Upcycle/Recycle there is a pouf made out of 37 empty soda bottles all bundled together and then padded with puffy stuff. It's pretty cool. Glad you shared your design with us!
ReplyDeleteLove this! Thinking - potential Christmas gift. Managed to miss it last year, and all the other denim awesomeness.. Congratulations on your magazine feature, very cool! I'm off to peruse all the other denim projects now, keeping my eye out for any other potential Christmas gifts along the way ;)
ReplyDeleteThis is gorgeous. Great work, too!
ReplyDeleteFound this post just as I was cleaning out my closet and deciding what to do with all my old denim. Awesome tutorial!! I was wondering if the pouf is washable? (or if/how you wash it?) Thanks!
ReplyDeleteHi - Is there some trick to printing the article out? I printed it and the advertising etc on the side and the instructions are printed over the top of each other!
ReplyDeleteI think I will be able to work it out - but just wondered if there is a secret to it.
The Pouf looks great. thanks for the pattern.
Kay
Thank you for producing such a brilliant innovative blog on denim. I had so many off cuts from old jeans that I had been storing and needed a reason to use them. I made my pouffe so quickly thanks to your instructions and spent a good hour with my mum finding old clothes to stuff it with. The perfect solution to help clear out a wardrobe and it's super comfortable to sit on. I'm in love. Will definitely make another in the future as I believe mum is in love with it too. Thanks again!
ReplyDeleteThis is so cute and easy to make. I did mine (my daughter's) in a purple suede cloth with the top stitching. It looks great (she said so). Thank you for the tutorial!
ReplyDeleteLove this! Made one from an old denim curtain and a lovely lime printed upholstery fabric. It's great contrast. The instructions were wonderful and the project came off without a hitch. Thank you.
ReplyDeleteLoved, doing it. looks the same, almost - except it is a bean bag, need to stuff more. ha ha. superb tutorial.
ReplyDeleteThis is a really great design. Well done. I'm putting this on my To Do list.
ReplyDeleteThis is a great idea. Will make one fr leftover apron denim projects. Thank u for tutorial. Michele S
ReplyDeleteHi I love this ! I am going to make one bigger ... some thing like a foot stool.....I brought jeans from second hand stores thanks so much for the info !...happy sewing!
ReplyDeleteHow do I get the pattern?
ReplyDeleteThe idea is that you create your own pattern on a piece of paper according to the directions given. Happy sewing to you!
DeleteFinished mine and it's fabulous! See more here ... www.bernimakesthings.wordpress.com
ReplyDelete