Showing posts with label Christmas tree. Show all posts

Friday, December 12, 2014

Cornstarch Packing Peanut Snow Crafts


You know those cornstarch packing peanuts? The ones that are used for protecting fragile things people send in the mail? Well, guess what. I have a giant bag of them... Uh huh. Yet another thing I collect. Sigh... 'Bout time I use the darn things, don't ya think? 

Yeah, me too.

Ok, so here's what you do...

And what you get when you're done is a snowy packing peanut Christmas tree! Seriously, this is so easy and all you need is a tiny bit of water. NO glue, man! Amazing.

Nice, eh? Almost as pretty as the real thing if I do say so myself.

Okay so... what else can you make with these packing-peanutty things? Hmm, well The Boy made this Hill of Snow Lantern with his packing peanuts.

Here it is, all lit up with a Sylvania DOT-it LED light. I love his so much I tried to make one of my own.


My attempt at the Hill of Snow Lantern was less successful than his. Mine kinda looks a giant baby bottle nipple. Not exactly what I was going for... But you know what they say...


No two hills of snow are exactly the same. That's right my friend.

♥M

Disclosure: The link contained herein is an affiliate link. I will benefit financially if you opt to purchase the associated product.

Monday, July 22, 2013

Tutorial: Berry Basket Christmas-in-July Tree Ornament


Hi.

How are you doing? Well, I hope.

I've got a quiet little tutorial for you today. My yearly Christmas-in-July offering, hee hee. Here she is now...


And then make a few more...


Easy breezy beautiful?
I say.
Merry Christmas-in-July to you!

♥M

View my other Christmas ornaments right HERE!

Tuesday, November 20, 2012

Have Yourself a Merry Little Christmas Ornament #4


The above two tree ornaments come to you courtesy of The Boy. He designed and made them on Friday, and I just had to include them in the ornament series! I'm big-time in love with them. They're so simple, beautiful, innocent. It's the kid thing. Those little fingers do magic, I tell you.

He made them from a cereal box, paint, pistachio nutshells, junkmail confetti, string, scissors and glue.


The pistachio shells, I'd painted a while back, so when it came time to decorate his trees, the shells were there for the taking. In fact, if you plan to do a collage craft like this with your kids, it's a very good idea to prepare all the decorative bits ahead of time. That way, there's no waiting and they can dig right in!

The shells need a generous amount of glue if they are to stay put. He applied a goodly blob to each before attaching them to the trees. Those little guys are there for the duration, methinks.

The confetti was punched from Christmas-flavoured junkmail, a favourite in these parts.


But who am I kidding? There was no way I was going to let him have all the fun. Nuh-huh, I just could not do it. I had to make one of my own too, right? Here's mine below.


And here's the tree-some...


I'm thinking of asking The Boy to make me a whole grove of them. Wouldn't that be great? I wonder if he'd go for it... Do you think?

♥M

Previous installments in this little ornament series: here, here and here.

Saturday, July 14, 2012

Tutorial: Toilet Paper Roll Christmas Trees in July


There's a heat wave outside in case you hadn't melted yet.

And it's the middle of July.

Which can only mean one thing...

It's time for some cool Christmas-in-July craftiness! I'm thinkin' cold and winter and snow and glacial winds blowing through none other than evergreen Christmas trees. See what I mean? Okay then. Let's craft our boiling heads off.

Tutorial: Toilet Paper Roll Christmas Trees

You will need:

- 6 TP rolls
- acrylic paint in many colours  (I used red, aqua, and 4 shades of green)
- gesso (or white acrylic paint)
- an old picture frame [the opening of my little frame measures 4"x 6" (10cm x 15cm)]
- paper
- pencil
- paintbrush
- ruler
- glue (white/PVA)
- clothespins

Start by coating the 6 TP rolls with a layer of gesso. Allow it to dry nicely. Now paint each of your rolls in a different colour. Choose any colours you'd like. These are your Christmas trees after all! Allow the paint to dry thoroughly. Don't worry. In this heat, it won't take but a minute.

Now flatten the TP rolls and cut each in half lengthwise.


In the meantime, give your picture frame a light sanding, remove any dust, and then freshen it up with a few coats of paint. Allow the paint to dry.

Measure the height of the opening. Try to be as exact as possible. Now transfer that measurement to each half-TP roll. Trim the half-TP rolls along that measurement on the short side.


Check each half to make sure it fits nicely within your frame.


You will now divide your 12 half-TP rolls into 3 groups of 4. Divide your colours so that there will be some contrast in each group.

Start with the 1st group of 4 half-TP rolls. They will be cut according to the following diagram. The first (bottom) layer is left intact. The 2nd layer is cut on the right side only. The 3rd and 4th layers are cut on both sides.


Here's how you create the trees:

Make a small Christmas tree template as shown. Take a sheet of paper. Fold it in half. Draw out half a Christmas tree on the fold. The half Christmas tree should measure about 3-1/2 inches (9cm) tall by 1-1/4 inches (3cm) wide (at the bottom bough). Cut out the tree shape. Open up your template and transfer one half of the tree shape to either one OR both long edges of a half-TP roll. Cut out the tree shape(s) from the half-TP roll.

Note: When you cut your upper layer Christmas trees, use the same template but make your cuts a little deeper with each layer.


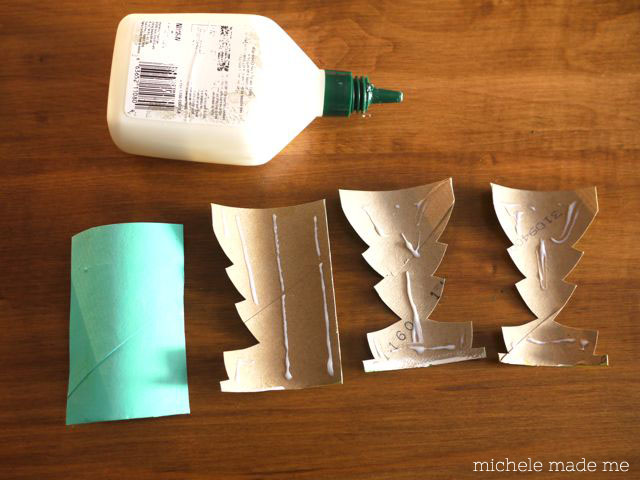
Apply glue to the cut shapes as shown below. Layer them one on top of the other with the uncut half-TP roll on the bottom and the others on top in the order shown below from left to right.


Clamp the layers together with clothespins. Allow the glue to dry.


Repeat the cutting and layering for the remaining 2 groups of 4 half-TP rolls. The following photo shows the component parts of each section in terms of colour and cuts.


Place all three completed sections in your frame. I didn't glue them into the frame. I simply placed them in there. They are held in the frame under their own compression.


There you are then... Sweet TP roll Christmas trees with a little three dimensional appeal, eh?

Are you feeling a teensy bit cooler now? Maybe a little? Hope so.

I wish you a fine weekend. And may the gentle breezes blow your way.

♥M

This post linked to Made by You Monday!

Friday, July 29, 2011

Twiggy Christmas Trees in July!


I wish you a Merry Christmas in July!
Sing it with me!
I wish you a Merry Christmas in July!
Are you singing?
I wish you a Merry Christmas in July!
I can't hear youuuuu!
And a Happy New... um... cough...er... DAYYYY!!!...
Lovely. Very nice.

Let's make some trees, man.


Tutorial: Twiggy Christmas Trees

You will need:
  • a few twigs
  • handsaw
  • drill with small bit
  • ribbon
  • scissors
  • large needle
  • sandpaper
  • liquid acrylic paints (optional)
1. Using the handsaw, cut your twigs into progressively smaller pieces. No need to be exact. Trust yourself and just wing it. Also cut several stubby bead-like pieces for the branch spacers.
2. Place them as in Photo #2 to make sure they all look good together. Trim any pieces that may be too long.
3. With the drill, drill holes into the centers of the twigs. Try to find the center of balance of each piece before you drill to ensure that both sides are balanced. For the bottom-most trunk piece, drill a hole down into the heart of the piece.
4. Sand all the ends with fine sandpaper.


5. Cut a piece of ribbon that is 1-1/2 times the height of your tree. Thread the ribbon into your needle. Starting with the bottom trunk, thread the ribbon through all the tree pieces leaving a tail hanging out the bottom.
6. Back at the top, turn that needle around and head back down the top three pieces leaving a loop at the top.
7. Making sure you have a nice long loop at the top, pull the end of the ribbon out between the third and fourth pieces and tie a knot as in Photo #7. Trim the excess ribbon end at the knot.
8. Nudge all wooden pieces together, slipping the knot inside one of the pieces to hide it. Make a large knot at the bottom end. Trim the excess ribbon.


9. (Optional) If you're a fan of colour, beautify your trees with paint! Before assembling your tree (which starts at #5 by the way), paint all the twiggy pieces using liquid acrylic paints. I chose to go nuts with the stripes and polkadots but you can paint yours however you like. Get creative and make them one-of-a-kind spectacular!


See? Here's the pretty polkadotted one!


But you may like it "au naturel" if that's the sort of thing you go for...


Me?... I'll take one of each please!


Merry Christmas in July! So glad you could celebrate with me. Now have yourself a restful weekend!

Edited to Add: Visit Be Different Act Normal today! I have the distinct pleasure of guest-posting. Thanks so much for having me Lori!

LinkWithin

Related Posts Plugin for WordPress, Blogger...