Showing posts with label creative reuse. Show all posts

Saturday, April 25, 2015

Look What I Found!


Disclosure: This post contains an affiliate link. If you click it and make a purchase, I will benefit financially.

Guess what I snagged on the side of the road with a free sign on it... That's right, this metal cart. It was a sad little thing when I found it. It was dirty, dated, and rusty too. But nothin' some steel wool, a generous dose of elbow grease, and a little love couldn't help, eh?


I pulled off the wood veneer tape that covered all the metal bits. Scraped off the ugly glue that the tape left behind. Sanded off all that rust with the steel wool. Washed it down. Polished it up. Covered the two wooden planks with this pretty paper: 


Get a load of her now... She's shining from the inside she's so happy to be loved again. And those old casters roll around like they're on clouds.


She makes an ideal resting place for our pillows and blankets, doncha think?

♥M

Thursday, December 18, 2014

Pretty Junk Mail Gift Bows


My goal for today is to get some of our gifts wrapped. I've gone back in the archives and made some lovely junk mail gift bows. Remember these? HERE's the tutorial, just in case you'd like to give 'em a whirl!


Happy wrapping!

♥M


Friday, December 12, 2014

Cornstarch Packing Peanut Snow Crafts


You know those cornstarch packing peanuts? The ones that are used for protecting fragile things people send in the mail? Well, guess what. I have a giant bag of them... Uh huh. Yet another thing I collect. Sigh... 'Bout time I use the darn things, don't ya think? 

Yeah, me too.

Ok, so here's what you do...

And what you get when you're done is a snowy packing peanut Christmas tree! Seriously, this is so easy and all you need is a tiny bit of water. NO glue, man! Amazing.

Nice, eh? Almost as pretty as the real thing if I do say so myself.

Okay so... what else can you make with these packing-peanutty things? Hmm, well The Boy made this Hill of Snow Lantern with his packing peanuts.

Here it is, all lit up with a Sylvania DOT-it LED light. I love his so much I tried to make one of my own.


My attempt at the Hill of Snow Lantern was less successful than his. Mine kinda looks a giant baby bottle nipple. Not exactly what I was going for... But you know what they say...


No two hills of snow are exactly the same. That's right my friend.

♥M

Disclosure: The link contained herein is an affiliate link. I will benefit financially if you opt to purchase the associated product.

Thursday, November 20, 2014

Tutorial: Toilet Paper Roll Trivet


It was destiny, plain and simple. You knew the toilet paper roll would show up here again. You knew I couldn't resist its curves and papery good looks much longer. You knew I'd dream up another something with it sooner or later.

You knew it, you wily thing.

So I made a trivet for holding hot things like pots and such. For instance, here is my TP roll trivet actively saving my table from the scalding teapot.


Nothing short of heroic, I'd say.

Would you like to see how I made it? Here I go.


Pretty self-explanatory, eh? You get the drift, I'm sure. But on the off-chance that you were wondering, you do need to cut up more than one TP roll to make a single trivet.  4 or 5 TP rolls cut into 1/4-inch (6mm) sections will do the trick for a one-layer trivet. Optionally, if you'd like to try a 2-layer trivet like the one pictured below, you'll need twice the amount of TP rolls and glue.


Note that I added cardboard circles to my trivets for strength. That is because they were hilariously floppy without them. I heartily suggest you support your trivet with a cardboard circle.


Isn't it nice to see the TP roll put to some practical use for a change? Yessiree, very practical indeed. I knew you had it in you, TP roll.

♥M

Friday, October 24, 2014

Space Invader Juice Lid Headboard

So Lo, the love of my life, comes into the bedroom, sees our new headboard for the very first time, laughs out loud and promptly exclaims: "A Space Invader headboard!!! It's awesome!"


Really? Space Invaders? Space Invaders?!!!

And then he says: "Now we'll never have to worry about alien abduction."

Honestly, down deep inside, I am less than impressed by these comments. Not exactly what I was going for. I feel they make fun of my brilliant/amazing/unique/wonderful work-of-art-headboard. I mean, I know it's made of metal juice lids which I've furiously collected over the past ten years and all... And, yes, okay, a metal juice lid headboard may be a little bit out there. So what was I expecting, eh?


I guess I want him to love it.

The thing is, he's dead on. It does look like Space Invaders. It looks exactly like frickin' Space Invaders.

So then I sit back to consider this turn of events. Okay sure. I made a Space Invader headboard for our grownup master bedroom. But so what? My husband, Lo, loved playing Space Invaders when he was a kid. He loooved it! So I'm going to take his COMMENT and turn it into a COM-pli-MENT.

That's right, I've decided to love my Space Invader headboard too.

So there.

♥M

Friday, November 15, 2013

Question: What do you do with a glaringly blank wall...

.... and an irrepressible urge to cover it?


Answer: Take your foam trays collected over the last three and half years and a roll of masking tape. And stick it up there.


Obviously.

♥M

Thursday, June 6, 2013

You Guest It: Hectanooga

Welcome welcome! It's time for You Guest It! I just love this sweet series, you know? And not just because I get to be all lazy and slothful either - but also because I get to meet some really cool folks who make some pretty neat stuff. And then of course, there's the part where I get to share it all with you. That's pretty nifty too! 

Today's guest is Emi from Hectanooga. Let us see what this seriously busy woman has in store for us today...

***

Video Tutorial: Stacked Paper Bead Necklace by Hectanooga


Hello! My name is Emi from Hectanooga and I’m passionate about crafting, designing, and recycling! And when I can do all three at the same time, I’m very happy! These stacked paper beads were inspired by a necklace I saw someone wearing on television. The necklace was similar in design - it was black metal - and I immediately thought: “Hey, I bet I could make that from paper!” These beads would look lovely painted black as well, but the print is a great conversation starter, and painting them would hide their origin!

Want to know how I make them? Here's the video that shows you how. Enjoy!


There are several reasons why I like to recycle. Here are a few:
  1. Supplies are readily available, and there's no wasting gas going out to buy supplies! 
  2. It’s free. No expense for the supplies themselves! 
  3. It’s green. Making something useful from throw-aways is always a good thing! 
  4. It’s a challenge. Thinking up ways to use these things is always fun! 
  5. Middle-of-the-night crafting is possible. You can always find something to manipulate into something else! 
  6. It’s eco-friendly. It keeps things out of the land-fill. 
  7. It’s very rewarding! Making something from virtually nothing is a thrill!
    ***
    Such a simple and pretty concept, Emi. Your choice to leave them au naturel is lovely too, and what a nice complement for the black beads! Thanks so much for joining me on the blog today and sharing your tutorial with us. 

     As I mentioned up top, Emi is a do-er and a dedicated one at that. Her specialties include crochet, jewelry-making, and recycling - a woman after my own heart, eh? I don't like to compare myself to others but, honestly, I'm feeling somewhat sheepish in comparison. Not only does she have a blog, and three Etsy shops (Hectanooga, M.E.H. Art Gallery and Hat and Scarf Patterns), but her Hectanooga YouTube site boasts... you won't believe this... 595 videos. That's 5-9-5! Is that not amazing? I thought I was doing well with 3. I have some serious catching up to do apparently. So go on now and pay her a visit, won't you? I'll see you back here in 3 years.

    ♥M

    P.S. Have an idea for an eco-craft? Consider submitting a guest-post idea to Michele Made Me's "You Guest It"! Check out the details HERE.

    Thursday, May 30, 2013

    Foam Tray Landscape


    The foam tray etching and painting experiment continues... I couldn't help myself. HAD to try another one. Gobs and gobs of fun, hee heeeeee...


    Find the original instructions HERE.

    ♥M


    Friday, May 24, 2013

    Tutorial: Foam Tray Sign


    Yes, indeed. It's a sign made from a foam veggie-slash-meat tray! The kids might even like to join in on this one 'cause it's quick, it's easy, it's messy, and fun as pumpkins.

    Tutorial: Foam Tray Sign


    Step 1: Gather supplies. For this craft you will need: a clean foam tray, pair of scissors, pencil, ruler, ball-point pen, paper, tracing paper, paint, paintbrushes and a toothbrush.
    Step 2: Cut off the raised edges of the meat tray.
    Step 3: Use your pen and ruler to draw a rectangle on the remaining foam rectangle. Cut along the lines to create a lovely squared-up rectangle.
    Step 4: On a piece of paper, draw yourself a sign design. It can be a reminder, a short inspirational message, a name plate, or any crazy word or expression that takes your fancy! Fill the area around the word with a filler design. Anything from cross-hatching (as I've done), wavy lines, zig zags, loops, a pattern of dots... etcetera... will work!


    Step 5: Transfer your finished design onto a sheet of tracing paper. Place the tracing paper over the foam rectangle, and then gently re-trace your design so that it is transferred to the foam tray. Once you've transferred the entire design, remove the tracing paper from the foam rectangle. Re-trace your entire design directly on the foam rectangle with the ball-point pen. Firmly re-trace around the main lettering, and gently re-trace the filler design.
    Step 6: Now you're ready to paint! Choose a bright, saturated colour for the bottom layer of paint. Fill your brush and apply the paint while holding your brush almost horizontally. This way you'll avoid filling in all the grooves with paint allowing the tray colour to show through. Allow the first layer of paint to dry completely. Apply a lighter second colour of paint in the same exact way. You don't have to completely cover the bottom layer of paint. Let some of it to show through for a nifty contrasting effect. Let this layer dry as well. Now go over your letters only with a third bright paint colour. And finally, age your sign with a little spatter-painting using a toothbrush and some watered-down black paint. 

    Well lookee there, you have signage!


    Go ahead now... Be bold and try it yourself!

    ♥M

    Prior and future versions of this craft live here and here.


    Wednesday, May 15, 2013

    Video Tutorial: Egg Carton Gift Bow


    Hi there.

    How've you been?

    Me?

    Oh good.

    I took a bloggy break there eh? I've literally been away from this little place for a whole seven days... It went by like the wind. Been busy. I'm riding a learning curve the last little while. Learning all kinds of good stuff. Over the last week I've been focussing on video editing. In the not-too-distant future, my hope is to offer a mini-online class. The ability to edit video will go a long way in making that a reality, so I've been practicing practicing practicing like a little fiend.

    Below is my very first 100%-Michele-made video! (Lo pretty much edited the first two. I pretty much just plied him with coffee...) This time, though, it was ALL me. Granted, it's not as polished as a Lo-made video, but you know what? That's okay. I'm a beginner right? Stephen Spielberg needn't fear for his job just yet. Still, I'm pleased with my maiden effort. The notion that I have the skills (sorta) to make a movie from start to finish is a little bit exhilarating, you know? Movies! I can make movies!!!

    Anyway, blabber blabber blabber... Just show the darn video Michele.

    Okay, okay. Here it is: My "Egg Carton Gift Bow Video Tutorial"!


    Kinda similar to the last video, eh? I'm making a gift bow video series apparently, tee hee. If you're fond of recycled gift bow ideas there are a few more here, here and here. For a slew of other egg carton crafts, click here.


    Have a lovely day now, won't you? See you in two shakes...

    ♥M

    Saturday, May 4, 2013

    Junkmail Puzzle Wall Art


    I think "the facilities" is an interesting choice of words for the household bathroom, don't you? Because if we're honest here, is there really anything "facile" about it? I say no. In fact, facile is probably the last word I would have chosen to describe the room where we go to do our business. I think maybe the word-people hoped to send us psychic messages of relaxation when they picked that one. Not surprising then, that they called it the "facile-at-ease". "The loo" on the other hand is a great term for it because no one is quite sure where is comes from. Consequently "the loo" has no discernible baggage and is perfectly harmless. It causes zero anxiety. It puts one under zero pressure to perform or to be in any way competent whilst in that room. It's even a little bit humorous when you say it out loud, hee heeee... The loo. The loo... It sounds like a song and I like it.


    Now, say you've come over for a cup of tea, and nature suddenly calls. You will require the use of the loo and, at our house, that will take you by way of the stairs. Along the way you'll encounter a few things: a landing, an ugly boat painting, naked windows, a ragtag rock collection. And when you've almost reached your destination, you'll see in front of you what seems to be a framed rectangle of white nothingness. "Strange to frame a bit of wall like that," you might think to yourself, examining the nothingness. And I would agree with you wholeheartedly.


    That is why I took it upon myself to change the framed-rectangle-of-white-nothingness (which, by the way, is the access to the loo's plumbing). I mod-podged it with my junkmail puzzle from back here, and embellished it with black marker and little daubs of dimensional paint.

    This is a much pleasanter prelude to your forthcoming loo appointment than the framed-rectangle-of-white-nothingness, wouldn't you say? Indeedy.

    ♥M

    For other junkmail craftiness, click HERE!

    Thursday, May 2, 2013

    You Guest It: Craftypod's Sister Diane


    It's the first Thursday of the month and you know what that means, don't ya? Right. "You Guest It", a post that is created just for you by a wonderfully crafty human that isn't me. Today's offering comes to you courtesy of the unstoppable Sister Diane Gilleland of the Craftypod. Take it away Diane!
    ***

    New Life for Old Quilt Blocks: The Octagon Tote
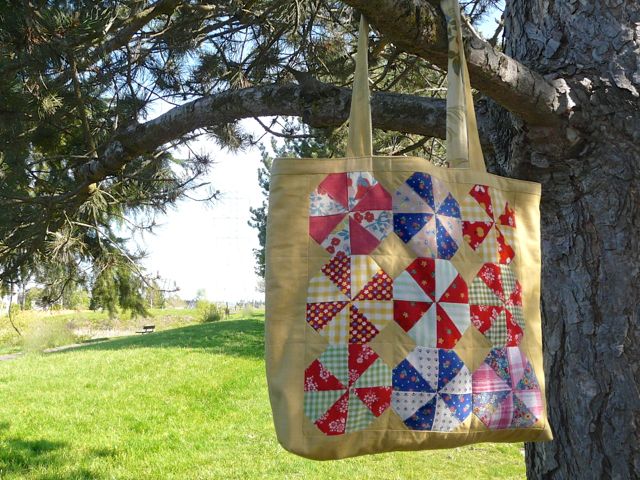
    VQB-tote-finished3

    Hi, everyone! It's so cool to be hanging out with you today on one of my very favorite blogs. I'll try to do justice to Michele's recycling genius by sharing one of my favorite upcycled sewing projects ever.
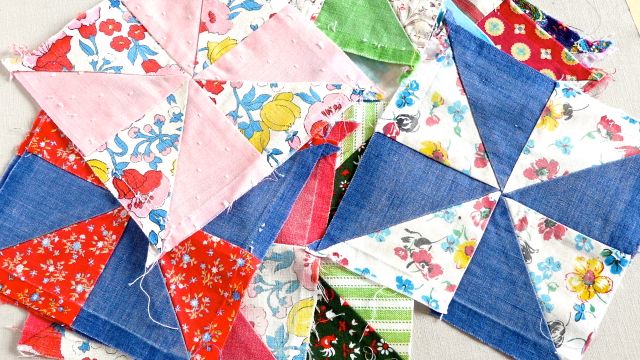
    VQB-tote-blocks

    The whole thing started when I found a stack of quilt blocks at a thrift shop – the product of someone having taken a seam ripper to a pretty groovy old pinwheel quilt. These blocks were full of nifty vintage fabrics, sun-faded to the prettiest mellow colors. I snapped them up with grand plans to return them to quilt form.

    Well… rookie mistake. I didn't notice until I got them home, but many of the blocks had been torn right along the seam line when they were taken apart. So, I couldn't simply sew them back together. Then I thought I'd just cut them down to a smaller size and add some sashing. That's when I discovered that the piecing was just inconsistent enough that cutting the blocks down only made them look very wonky.

    Sigh. I put the whole mess in my stash. Four years went by. You know how that goes.
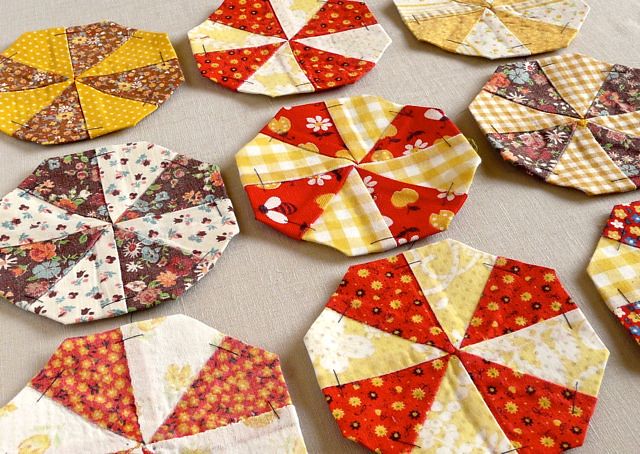
    VQB-tote-patches

    Anyway, during that time, I got interested in English paper piecing, which you've seen in action with Michele's beautiful hexie quilt. It finally occurred to me that maybe I could use this technique with my blocks. Since the pinwheel design of the block has eight sections, I thought an octagon shape might just fit the bill.
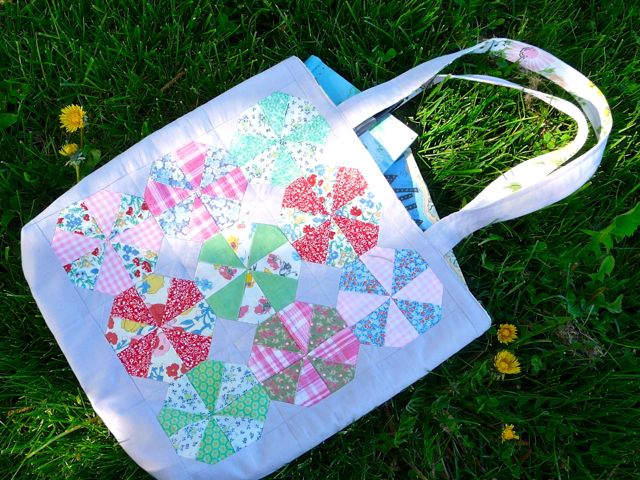
    VQB-tote-finished2

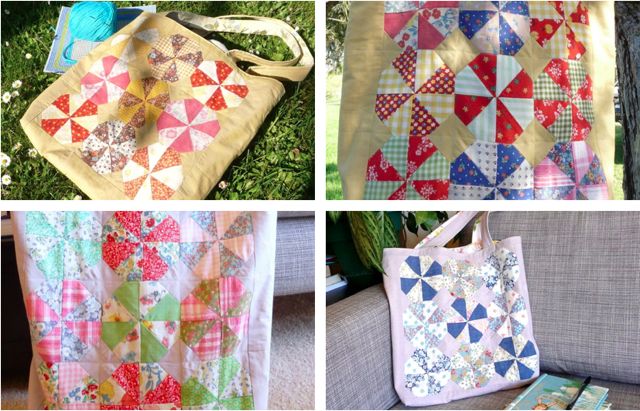
    And you know what? It did! So here's how I rescued my quilt blocks and turned them into two pretty tote bags (and enough left over for coasters).

    VQB-Diagram

    The Plan

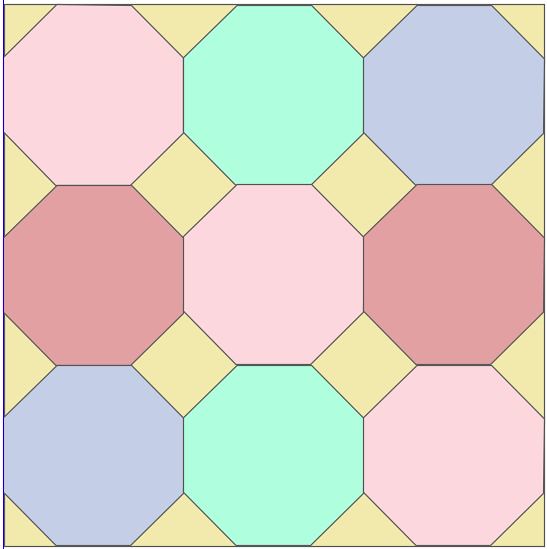
    I didn't get too crazy with the measuring when I designed my tote. I knew I could get octagons measuring 4 ¼" across out of my quilt blocks, so I worked from that.

    I decided that nine octagons this size would make a reasonable-sized tote panel, and I decided that, once I'd pieced together the octagon parts, I'd add some strips of solid fabric around the edges. So I used ¾ yard of solid to flesh out the rest of the tote's outside, and ¾ yard of a thrift-store sheet I had in stash for lining.

    My finished totes measure 15" x 15", with 25" long handles. But the beauty of this kind of project is that you can end up with any size and shape you like.
    VQB-tote-supplies

    Part 1: Make the Octagon Patches

    If you've never English paper pieced before, there are so many good tutorials online. My all-time favorite is this one from Sunshine's Creations.

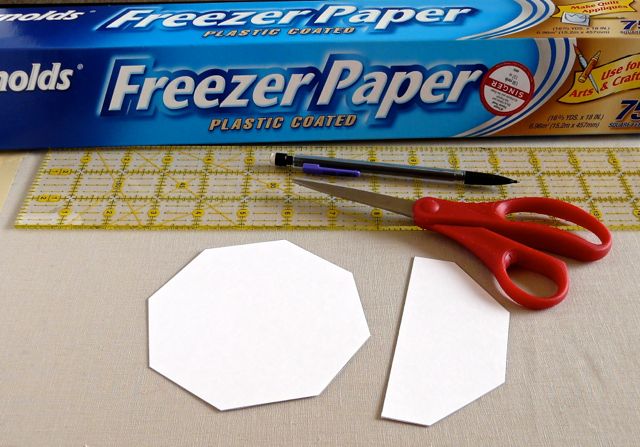
    I used freezer paper to make my octagons because I wanted to be very sure the paper wouldn't move while I was basting the fabric to it. So I drew an octagon using a drawing program on my computer (Google Drive's Drawing tool is a dandy free option). I printed two of them onto card stock, cut them out, and cut one of them precisely in half. (I'll explain why in a moment.)
    VQB-tote-tracing

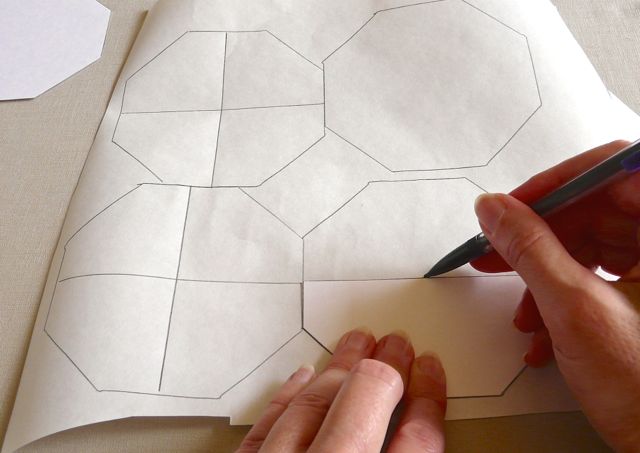
    Then I traced the octagon onto the dull side of the freezer paper 18 times (I needed nine octagons for each side of my tote). I used that half-octagon to trace myself some registration lines across the middle of each octagon in both directions. Then I carefully cut them all out.
    VQB-Composite-1-2

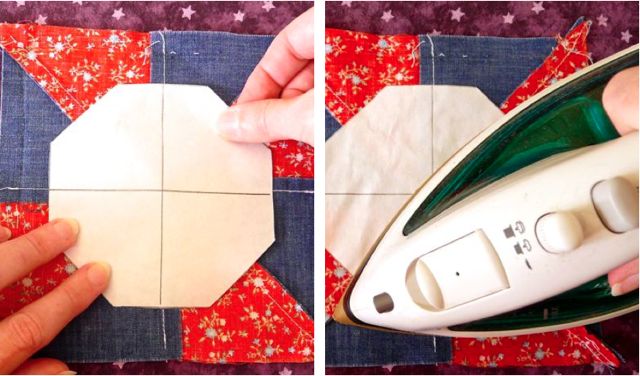
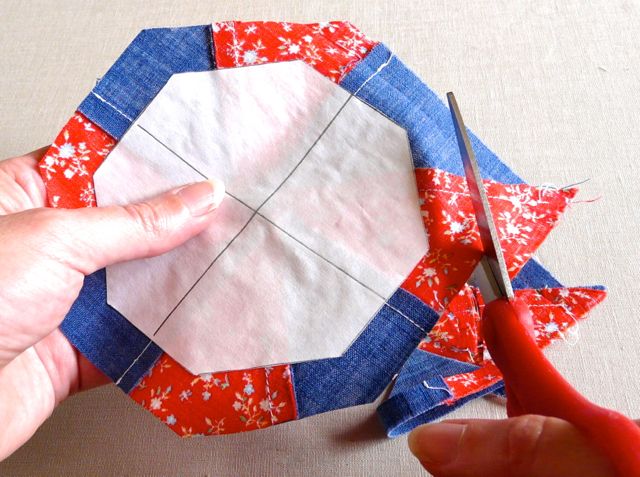
    Next, I placed the freezer paper over the wrong side of the fabric, shiny side down, and I used those registration lines to match up with the seams in the quilt block. (Not every block was a perfect match, but those lines helped me get very close.) I pressed the paper with a hot iron, which lightly fused it to the back of the block. Now I was ready to baste!
    VQB-tote-3

    From this point, making octagons is a lot like making hexagons. I trimmed the quilt block to a generous 3/8" outside the edges of the paper. Then I threaded a needle with some contrasting thread, so my basting stitches would be easy to see and remove later.
    VQB-Composite-5-6

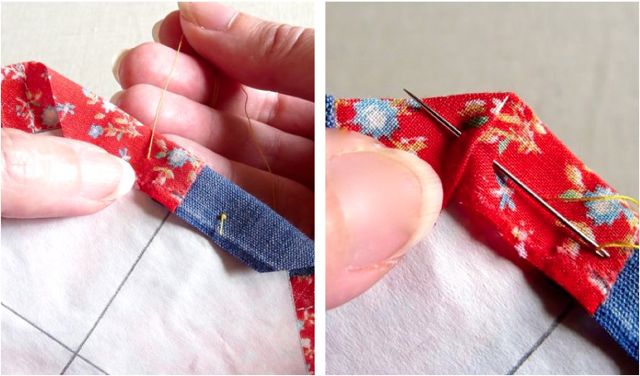
    Here's how I baste a patch this size: I start by taking a large-ish stitch in the middle of one side, sewing through both the paper and fabric. Then, I fold the next side down over that one, and I take a little tack stitch, just through the fabric at the fold point. I alternate those two stitches as I make my way around the octagon.
    VQB-tote-8

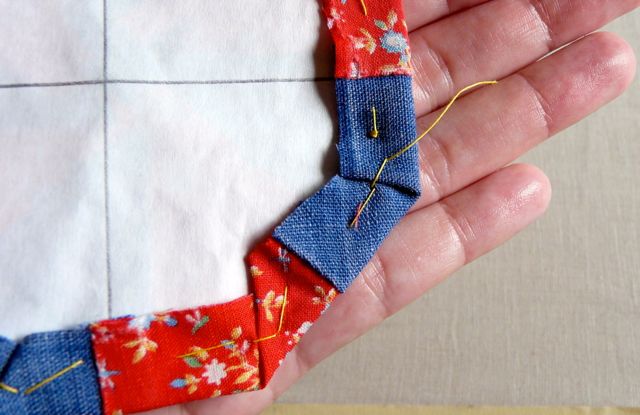
    When I get back to where I started, I leave a couple inches of thread hanging from my last stitch, but I don't tie a knot. Your basting will stay in place just fine with this method, and be much easier to remove later. (You can see this whole process in action in this video of mine.)
    VQB-tote-13

    Part 2: Making Square and Triangle Patches

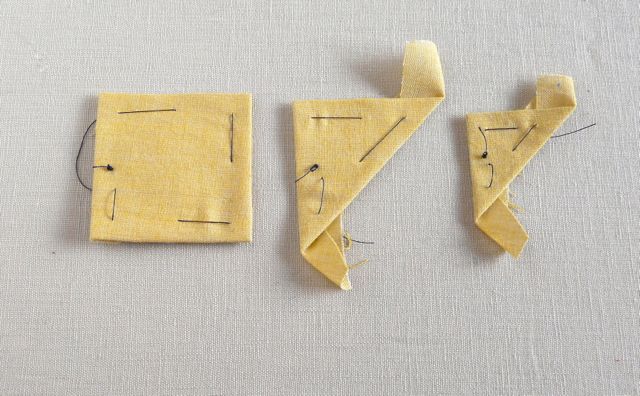
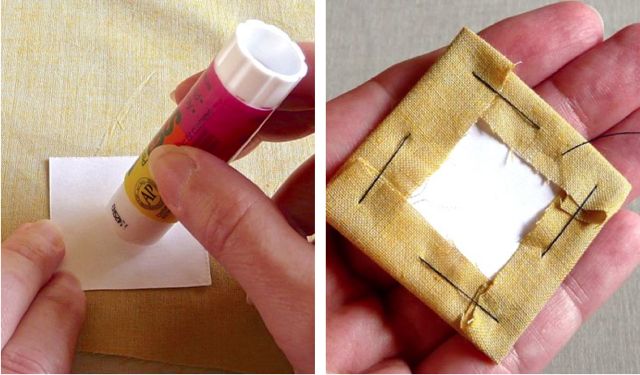
    Unlike hexies, octagons don't fit perfectly together – they leave little square spaces in between! So I cut some more card stock shapes to fill in those spots. For each side of my tote, I needed nine 1 ¾" squares. Four of them I left as-is. I cut four more in half on the diagonal, making eight triangles. And to fill in the very corners, I cut one last square into quarters on both diagonals.
    VQB-Composite-9-12

    I basted my solid fabric to these shapes. To do this basting, you can either pin or lightly glue the card stock to the wrong side of the fabric. (Have you ever tried using glue stick for English paper piecing? Hoo, boy is it dandy. You just use a tiny dash, so it doesn't damage the fabric at all. And you never get stuck by pins!)

    Anyway. I basted these patches through both the card stock and fabric, just using large stitches to hold down the points where I folded one side over the other. Since the pieces are so small, you won't need more than one stitch at each edge.
    VQB-tote-16

    Part 3: Sewing Stuff Together

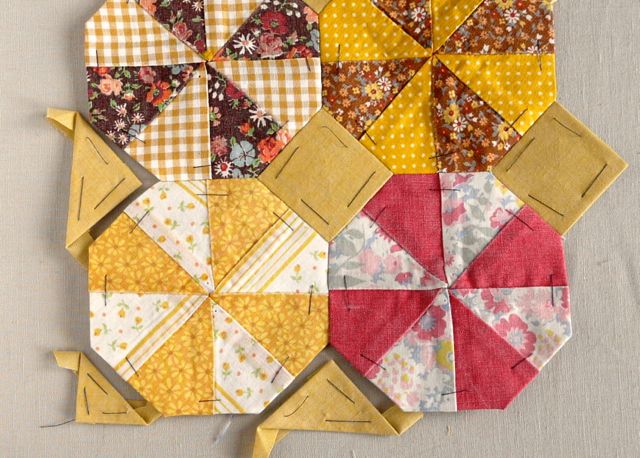
    The thing I love about English paper piecing is that you can sew a whole bunch of shapes together like this, and get very precise corners with little effort. Here, I sewed my octagons and squares together first, and then added the triangles at the sides and corners.
    VQB-Composite-14-15

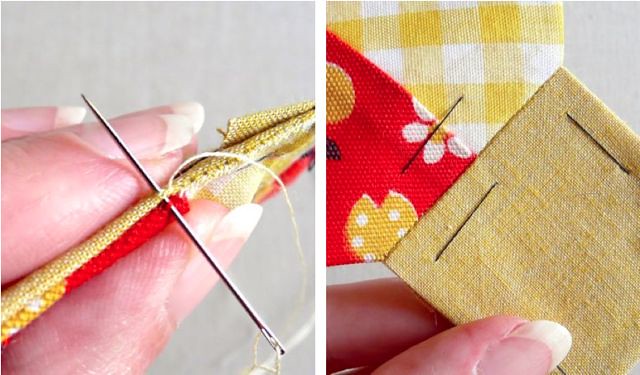
    I like to sew my patches together with a whip stitch. It's just a matter of lining up the edges you want to sew together (right sides facing), making sure their end points match up. Then, take very tiny stitches; just a few threads from the edge of each patch. Make sure you sew all the way from one end to the other – don't leave any gaps at the ends! (Sunshine's tutorial covers the basics of whip stitch nicely.)

    If your stitches are tiny, then you won't see them at all on the right side of the fabric. If you are seeing stitches on the right side, try a smaller needle and smaller stitches.
    VQB-tote-17

    Part 4: Finishing

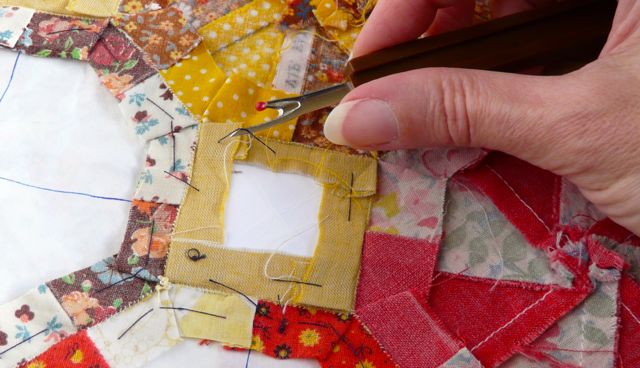
    Once I'd sewn all my patchwork together, it formed two big blocks. I gave each one a good pressing – papers and all. I pressed a whole lot around the outer edges of the blocks, because I knew I'd need sharp creases there (more on that in a moment).

    Then, I carefully removed all the basting stitches and papers. That's my favorite part of English paper piecing, incidentally – when this stiff, crackly thing transforms into beautiful flowing patchwork.
    VQB-Composite-18-19

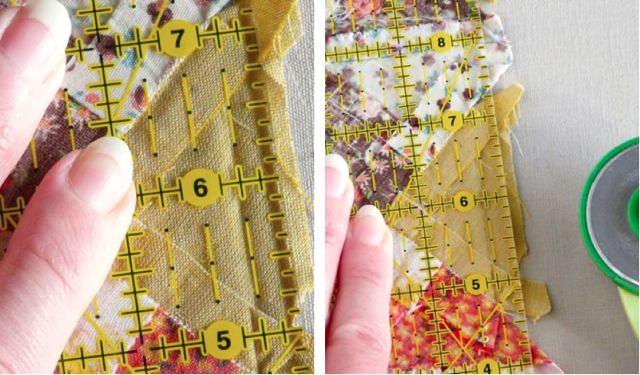
    Now, in order to sew anything accurately to these patchwork blocks, I needed to square them. Here's where I used those sharp creases I was pressing around the outer edges.

    I carefully opened out the folds along one edge of the patchwork, but I didn't press them. The crease that runs along this edge is my seam line, and I need an accurate ¼" seam allowance extending from that.

    So, I used a ¼" line on my quilting ruler and lined it up with the crease, making sure it lined up both at the top and bottom of the block. (This being hand sewing, there are always a couple places where the alignment's slightly off, but you can aim for the closest possible overall alignment and it'll work just fine.) When I had the whole edge lining up with that ¼" line, I used a rotary cutter to trim away any excess fabric bits. Then I pressed the edge out flat before sewing. I did the same thing on all four edges of my blocks.
    VQB-tote-20

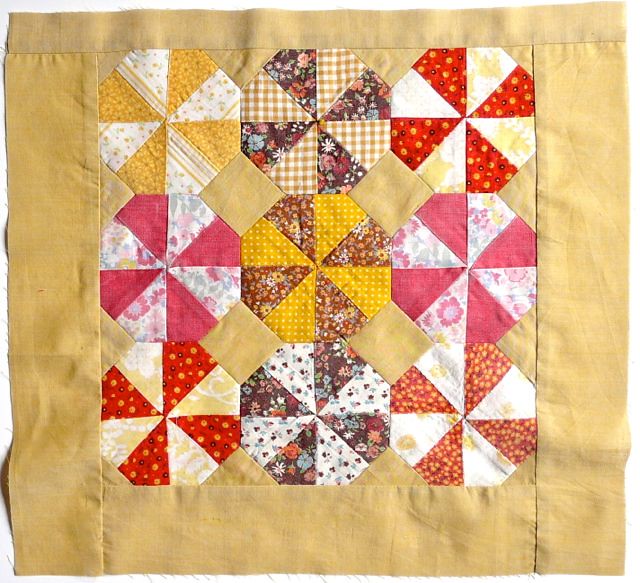
    From there, I machine-sewed solid strips to to all four edges of the patchwork. I used 3" wide strips at the bottom and sides, and a 1 ½" wide strip at the top. (That extra width at the bottom and sides allows the tote to have some depth while keeping the patchwork centered on each side.) I made two panels like this; one for the tote front and one for the back.
    VQB-tote-21

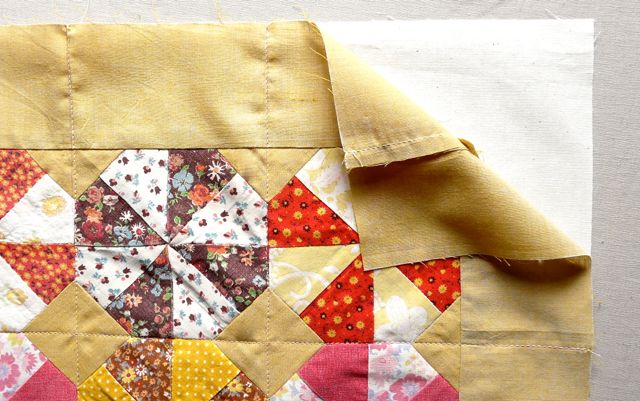
    …And then I gave the panels a bit of reinforcement. Let's face it, vintage quilt blocks are somewhat delicate, so I didn't want any of those old seams carrying the weight of my library books and farmer's market produce!

    I cut two pieces of lightweight canvas the same size as the tote panels, and then pinned one to the wrong side of each panel. I used a walking foot on my sewing machine to stitch some simple quilting lines over the surface to hold the layers together.

    From there, I used my favorite-ever tote tutorial from Skip to My Lou to make up the rest of the bag.
    VQB-Composite-finished

    ***
    You see that? It was wise to keep those old quilt blocks around for all those years after all. I just love that she's repurposed them into these extra pretty patchwork totes. It is such a great way to highlight their simple beauty. Note to self: Keep eyes peeled for yummy old quilt blocks.

    Now where do I start with Sister Diane? Wow, there's a question and a half.

    Well... Diane is a Renaissance woman if ever there was one. She is not only a talented crafter, no no. That does not even begin to scratch her surface. She is also an author of books. "Kanzashi in Bloom" springs to mind, "Quilting Happiness" is due out in late summer, AND she's written ebooks of both the crafty and bloggy varieties. Diane is a teacher. She has an online class coming up in June called "Getting Started Craft Blogging". And as someone who has taken a number of her classes, I can tell you that she is super-knowledgeable, extra thorough, and darned sweet. Plus, she's been a blogger forever, so she knows stuff. Diane is a thinker. This month on the Craftypod, she'll be exploring the idea of "Your Actual Audience" and trying to help pinpoint who out there is really paying attention to you as a blogger/business person. Seriously. I could go on all day. But my point is this. Just check her out. You can thank me later. I'm not going anywhere.

    Dear Diane, thank you so much for the gorgeous post. I'm feeling pretty darn blessed right now, you know that? Massive cyber-hugs from me to you!

    ♥M


    P.S. Have an idea for an eco-craft? Seeking a new audience? Consider submitting a guest-post idea to Michele Made Me's "You Guest It"! Get all the details HERE.

    LinkWithin

    Related Posts Plugin for WordPress, Blogger...