Showing posts with label pincushion. Show all posts

Thursday, October 3, 2013

Pyramidal Pincushion PDF Tutorial in The Shop!


Hi.

Is it Thursday today? I believe so.

Well, this is as good a day as any to update the little Shop, I reckon. Today's offering is one that's been around a spell and that several people have asked me about over the last few years. And, I am nothing if not accommodating. After a while... eventually... when I'm good and ready, that is.

It is the downloadable "Pyramidal Pincushion PDF Tutorial" in all its colourful glory. Notice the cover page screenshot below...


In this tutorial, I show you how to put together this scrappy, felty, pyramidal pincushion. The supplies are decidedly simple. You'll need some felt and felt scraps, cotton string, embroidery thread, scissors, a few pins and needles, and of course the handy-dandy tutorial. With that, you'll be on your way!

The project is probably best suited for the intermediate crafter. You'll do well to posses some basic embroidery skills. And if you're one of those crafters with an artist's heart, you'll find you'll be able to make your very own customized version of the pincushion, if you so desire.

The 9-page PDF covers the step-by-step pincushion-making process and includes detailed photos, a full colour template, live links to some wonderful on-line embroidery instructions, and a convenient black-and-white printable version of the tutorial. 

Here's a screenshot of the last page with two versions of the completed pincushion.


I had a fun time creating and assembling the whole she-bang, and I think you'll have an equally fun time making it.  Henceforth, find the downloadable "Pyramidal Pincushion PDF Tutorial" in the Shop!

♥M

Thursday, February 2, 2012

Reader Question: What Can I Make With Plastic Bottle Caps?


A little while ago, I received the following email:

Dear Michele,

Do you have any idea of what to do with old bottle caps, like those of your juice cap ornament, and some like those that come on plastic milk containers? I have at least a few thousand of them and need some ideas! Help!

Sande

Whoa there Sande! Did you say "a few thousand"? Tarnation that's a lot. What is the proper term for a person who passionately collects bottle caps I wonder? I have "capitalist" on the tip of my tongue, but I don't think that's quite right... Well, in any case, I put together a few suggestions for you. Hopefully these will help put a dent in your supply.

Idea #1. One, and probably my favourite, idea for reusing plastic bottle caps is to morph them into tiny, cute and useful pincushions. In fact, I'd been meaning to try making one of these for, like, ever. So that's what I did. I give you (drum roll) my Bottle Cap Pincushion Critter (above)! He was so much fun to design and make. I see many more of these in my future. Learn how to make the basic pinny at Craftstylish.

So that uses up ONE of your bottle caps. Fabulous. What's next...

Idea #2. You could adorn your fridge in happy/sad/angry bottle cap fridge magnets. Or, if the emotionally fragile craft doesn't strike your fancy, here's a somewhat more even-keeled project: a lampshade. Find both at Esprit Cabane.

Idea #3. You've seen my juice cap ornament right? As far as bottle cap crafts go, it's a unique alternative I think. (Shameless self-promotion... Really Michele?)


Idea #4. Sande, do you have kids? Making bottle cap lady bugs might be a neat way to spend a rainy afternoon. Get the details at Crafts by Amanda.

Idea #5. Or, if you're the slightly more ambitious artsy-type, you could attempt a self-portrait like Mary Ellen Croteau did. That ought to use up a couple caps, eh?

Idea #6. Oh, and I need one of these for my house. When you get a few spare moments, could you maybe make me one?...

Idea #7. And finally, Dollar Store Crafts was asked the very same question back in June 2011. Read all the interesting suggestions in the comments of this handy post.

Edited to Add: Melissa from Those Northern Skies pointed out her sweet bottle cap Christmas trees, and I just had to add them to the list!

There it is Sande. I hope this list gets your crafty juices flowing and helps you on your way. If anyone has any other brainwaves, do pipe up in the comments. I'd love to hear your ideas.

♥M

Monday, October 17, 2011

Leftovers


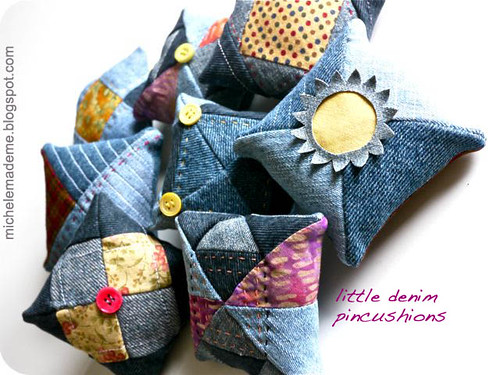
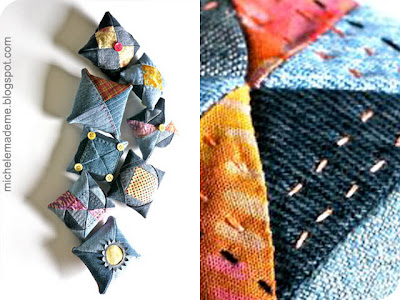
little denim pincushions

As a rule, I always have leftovers.

As a rule, I like to eat 'em up the very next day.


With these leftovers (from here), I made something small and pretty... and inedible.


And then I sent the inedible somethings far away over land and sea to some very special people where I just know they will be loved.


What do you like to do with your leftovers?

Thursday, July 22, 2010

Amy's Pincushion Dreams

Ready?... Here is your pincushion, Amy...


You see, I am working on it bit by bit... I'm slow you know. Good things take time (that's my excuse anyway). Don't worry. You'll get it before the deadline. Until then you'll have to settle for pincushion dreams... :)

Tuesday, July 13, 2010

Tutorial: Toilet Paper Roll Pincushion


Okay. Couple of things you should know. I love toilet paper rolls. Can't get enough of them. Secondly, I love flowers. Love them. You may have noticed a theme over the 3 months of this blog's short little life.

That said, today I'm combining those two passions into one useful and pretty pincushion!!! And, no Amy, this isn't yours! :)

Let us begin!

First I'm going to send you back in time to this post where I show you how to mark out your toilet paper roll (Conveniently, you'll have to scroll down to the last flower... sorry...).

So you end up with these pieces here. Note that I glued an additional small ring to the bottom of the tall piece.


I painted them Christmas green. You should also paint the inside of the largest piece (vase shape) too, btw. And then I let it all dry.


I then dry-brushed all surfaces with a couple of lighter shades of green.


All pieces now looked like this. At this point I glued the little crown onto the tall piece.


I then found some appealing fabric (my little sister, Ariane, gave me this particular one for my birthday...) and cut out a circle and a rectangle. The circle should be the diameter of your tall tube plus 1/2 inch (for the 1/4 inch seam allowance all around). Your rectangle should be the height of your tall tube plus 1/4 inch seam allowance on both top and bottom. Your rectangle should be long enough to go all around your tall tube plus 1/4 inch seam allowance on both sides.


Hand baste your circle to your rectangle right sides together. Machine sew the short edges of your rectangle together. This will give you a fabric cylinder. Go back over the hand basting with your sewing machine.


Turn your cylinder inside out and stuff it with batting.


When it is tightly stuffed, hand sew a running stitch all around the open edge leaving the thread ends to dangle.


Grab both thread ends and tighten. Tie a knot.


Stuff the little fabric cylinder into the tall toilet roll piece.


The top should look like this.


Cut out a cardboard circle the diameter of your tall piece and paint it Christmas green.

Once dry, take a pin and perforate the edge of your circle. Also perforate the bottom edge of the vase shape with an equal amount of holes.


Sew the circle to the vase shape like so.


Take a flat pebble and glue it down to the inside bottom of the vase shape for added weight and stability.

Slide the tall piece into the vase shape and glue it in place.

And the pincushion is born! Welcome to the world little pincushion!


Friday, July 9, 2010

Beautiful Mail (2nd Post of the Day)!


Look what flew in today! The extremely rare felty bluebird of Massachusetts. This little guy is just about the sweetest little fowl you'll ever catch a glimpse of, if you're lucky. He's a rare bird. Unique. One of a kind. You birdwatchers look hard. You may never again see such a sight. He's way off course but it looks like he may stay a while. See, he's already built himself a most interesting nest out of linen and clothesline! He's a clever one that felty bluebird, wouldn't you say?

He doesn't travel light either. Look what he had packed in his little birdbag. Why it looks like he shops on Etsy! In particular, he may have a weakness for the wares of Amy at During Quiet Time. Oh! Wait a minute! What's that you say little bluebird? They are gifts. Gifts for me? From Amy? Well, I'm just flabbergasted! That is so kind of her... Just look at what she sent along!


Not good enough! Let's see some closeups!!!

My very own square of pansy-printed linen... Score.


Some gorgeous linocut printed covered buttons... Score.


A lovely linocut evening primrose printed card... Score.


And this great card! (Does Amy know I hoard greeting cards?...) Score.


And finally (as if that wasn't enough), some matching pins for my rare felty bluebird of Massachusetts!!!


All made by Amy, here:


That bird is getting comfortable... Yep, he's definitely staying. Welcome home my little friend!


Thanks so much Amy! I love it all! I guess this means I owe you, eh? :)

LinkWithin

Related Posts Plugin for WordPress, Blogger...