

I LUV covered buttons! Have you noticed a spike in their popularity recently? I have. I'm paying attention over here ya know. So I devised this handy tutorial that avoids the trip to the button store altogether and allows you to make these little babies with stuff from around the house.
Let's do it!
You will need the following:
- fabric scrap
- needle and thread
- polyester batting (not shown)
- flat plastic (I keep the plastic packaging that comes my way for craft purposes)
- felt scrap
- narrow ribbon
- circle template or round thing
- pencil or marker
- scissors
- craft glue

To begin, draw out 2 circles on your plastic. Cut them out. If your plastic is too thick it'll be difficult to cut out. I use thin, cuttable plastic and layer a few pieces to make it sturdy.


Draw a circle from your chosen fabric that is about twice as wide as your little plastic circles.

Cut it out! No really, cut the fabric circle out. With a needle and thread, sew a running stitch all around the edge of the circle.

Pull up the ends of the thread just enough to make a little fabric cup.

In your little cup, layer a few pieces of batting. On top of that, place your glued plastic circles.

Now pull up the thread ends tightly so that the fabric comes around and over the batting and plastic circles. Tie the ends tightly.

If you flip the thing around, it should now look like a button! But, patience, we're not done quite yet...


Cut out a little felt circle, slightly smaller than your button. Take a large needle and a short piece of narrow ribbon. Thread your needle with the ribbon.
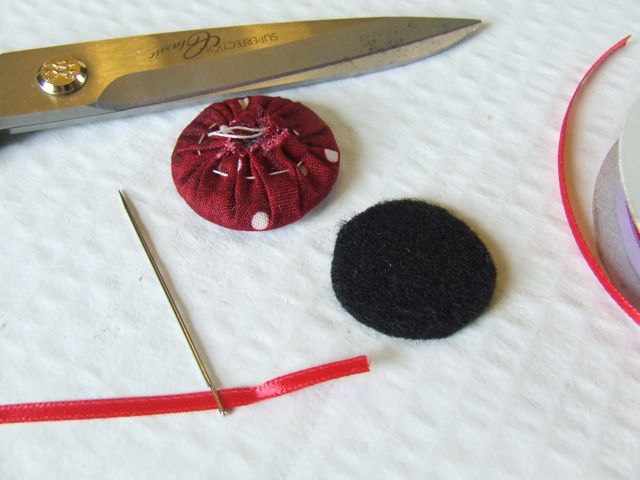
Create a button shank by sewing your ribbon through the centre of the felt circle as shown in the next photo.


Next, sew your ribbon down onto the felt so that it stays in place.

Then put a whole whack of glue on this side of the felt. This will hold the felt to the button and will help keep the ribbon shank intact as well.


Using some nice matching thread or embroidery thread, blanket stitch the edge of the felt to the button.


I made a whole bunch of them...


Let the button-making begin!
I'm joining a few link parties today:
I love those!!!!! They are amazing!!!
ReplyDeleteGosh this is going to save me money and frustration when I need covered buttons and can't get to the shops. I just bought a covered button kit for 1 1/2" buttons, 2 buttons for $6.00!! Thanks for taking the time to do this tutorial!
ReplyDeleteMichele:
ReplyDeleteI don't know whether or not you're a Button Floozie. I am, and if you're not, and would like me to, I'd gladly write about this post and link back to you here. Just let me know via email. It's a great tutorial!
xoxo
Donna
Well worth the effort and much nicer than the ones in the kit you buy at the store. These are gorgeous! Ann :-)
ReplyDeleteHi Michele Sweetie...
ReplyDeleteWhile visiting Donna over at Brynwood Needleworks this morning she said you had a tutorial today for the button floozies and I just had to pop over so I could get the steps noted down somewhere. Oh I thank you so much for these instructions. You made it seem so simple. Great instructions.
I have signed up to follow your blog, as I can't wait to see what you share next. Please stop over and say hi. I would be so thrilled to have you follow my blog as well. I love meeting new friends and sharing creative ideas.
Country hugs sweetie...Sherry
Thank you for sharing such an awesome tutorial! I love making covered buttons but when the urge strikes it's usually a Sunday and the shops are shut! Now, thanks to your generosity, no more frustrations and happy times!
ReplyDeleteDang! Just wished I had read this first as I have just bought some of those metal pesky things to make a covered button. This is great.
ReplyDeleteI have found you through Button Floozies and will now be following you too. Stop by and say hello sometime if you have a spare moment.
over from button floozies :)
ReplyDeletethese look really nice!
wow...that's very creative...
ReplyDeleteHow lovely, thank you this will save me paying a small fortune for the plastic buttons to cover!
ReplyDeleteKandi x
What a great tut and i just love buttons so will be defo making some of these when the need comes.....thanks for sharing.
ReplyDeleteSuper! I just bought a package of the metal thingies too but I am sure they will come in handy one day but today I am gonna try making your buttons. They are just super! Thanks for sharing this with us!
ReplyDeleteAren't YOU the clever one! Thanks for this great tutorial! ~karen
ReplyDeleteI love these buttons and I can see why they would become addictive - I can't wait to try them.......
ReplyDeleteQue buen tutorial gracias!!!!!!!!!!!!!!!!!!!!!!!
ReplyDeleteWhat a terrific idea , I really have to give these a try as often I have the problem of not having that perfect button for a project ,thanks so much for being so clever .
ReplyDeleteLOVE your tutorial...you are sooooo smart. Plan to use this idea for sure!!
ReplyDeleteHave a God Filled Day
Shirley
Great tutorial! Now I have to check out the rest of your blog!
ReplyDeleteMarvellous tutorial. Thank you so much for sharing your cleverness
ReplyDeleteTHanks for that, I'm always needing buttons. Found you through Freebies for Crafters, am now a follower!
ReplyDeleteVery clever! But while recycling is a great idea, I like to make things that I can wash and dry easily. I think I'd use heat resistant template plastic instead of plain plastic, that way they'll survive the laundry. Thanks for the lesson!
ReplyDeleteThank you for sharing, this is a great tute!
ReplyDeleteThank you! Love these. I can see using these on lots of projects.
ReplyDeleteHi Michele, just to let you know I have linked one of my posts to your button tutorial..... wanted to share a great idea. Hope you can come by and have a peek! Hugz
ReplyDeleteawesome ....
ReplyDeleteLovely ! Thank you !
ReplyDeleteThis is fantastic! I will be linking back to your post sometime next week! Thanks for sharing. Oh, and I found you through Totally Tutorials.
ReplyDeleteI just saw your buttons on totally tutorials. I love these and how perfect that you can just use up things you already have laying around the house. This one is going in my stumble favorites :)
ReplyDeleteBrilliant! Thank you!
ReplyDeleteThis is most excellent. I've been wanting to find a way to make buttons without buying a kit. This is a bookmark for sure!
ReplyDeleteP.S. I'm your newest follower
ReplyDeletethanks for sharing this wonderful idea.
ReplyDeleteI'll do it.
Yasmin
www.patchworkmipasion.blogspot.com
What a great idea!! Your tutoria was perfect :) Thanks for sharing that idea. Have a great day!
ReplyDeleteThat is so cool, and it's much easier than those button kits. And quieter, I usually have to use a hammer when making buttons.
ReplyDeleteLOL! I just bought a button kit too but I have some anyway. Love this idea. Here's another option - before gluing the two plastic circles together, drill a center hole in one (maybe even with just a hot needle?), then stick a loop of heavy gauge wire through the hole with the loop on the "outside" and the end pieces "inside". Then glue the two together. Might have to adapt the back felt a bit, but if you wanted something sturdier than a ribbon, it might work.
ReplyDeleteawesome idea. wish I would have read this 2 years ago. I linked your post up to my blog. http://callmecraftymomma.blogspot.com/
ReplyDeleteLots of free tutorials to share.
Oh how great! Found you from Totally Tutorials and I am so glad I did. Well done!
ReplyDeleteWhat a great tutorial I shall have to give those buttons a go they look just fab!
ReplyDeleteThanks for the tutorial.
Georie x
Great tutorial - I love covered buttons. I will try these today. Thanks!
ReplyDeletefabulous idea and great tutorial, thanks for sharing
ReplyDeletethose are so cute and I always have those supplies on hand.
ReplyDeleteThanks for sharing
Hammer & Thread
Those are so cute and I always have the supplies on hand. Thanks for sharing
ReplyDeleteHammer & Thread
Your projects amaze me, so resourceful. These would be great as a fabric flower embellish for flowers.
ReplyDeleteClever! Patsy from
ReplyDeleteHeARTworks
Thanks for sharing your button tutorial. Well done!
ReplyDeleteConnie
What a spectacular tutorial!!! thoroughly entertaining and inspiring!!! TFS!!!
ReplyDeleteAWESOME!!!
ReplyDeleteYour tutorial is absolutely amazing and very very helpful!
Thank you!
Hi michele!!!
ReplyDeleteYour Blog is wonderful!!! I´m brazilian sewing crafter , and patchwork loved !!! your tutorial of buttons are realy cool, i´m be make this. thanks for all ideas. Congratulations!!
I can't believe this! Amazing creativity. I always throw that plastic away! I have both a Sizzix and Cricut machine which would make really fast work of cutting those small circles! And plenty of scrap fabric, felt and paper. I'll never buy decorative buttons again for scrapbooking embellishments or for my clothes that need buttons replaced! This is awesome; the best thing I've seen all month. Thank you!
ReplyDeleteça y est, Michèle, j' ai enfin essayé ton tuto ... Je m'en suis bien inspirée pour faire différents boutons !!! Merci !!!
ReplyDeleteThis is amazing! With no sewing store in my area, it is hard to find good buttons. Now I can have amazing buttons whenever I want! Thankyou...
ReplyDeleteMa sono bellissimi!!!! Grazie mille per il tutorial!!!
ReplyDeleteThese are fan-flippin-tastic!!! I can't wait to make a bunch of buttons! Thank you!!!
ReplyDeleteI loved it. very good !!!!!!!!!!!
ReplyDeleteWhat a gorgeous series of photos accompany this tutorial. For many of us pictures tell it so much better than words. You have done a wonderful job and your results are beautiful.
ReplyDeleteNossa amei essa ideia parabens!
ReplyDeleteolá chara adorei seu blog muitas idéias essa do botão eu vou fazer depois coloco no meu blog para vc ver estou te seguindo e divulgando seu blog na minha lista de favoritos bjs
ReplyDeleteMuito boa a tua idéia! Adorei! bjussss...Deise
ReplyDeleteGreat tutorial...thanks...I´ll feature on my blog. hope you don´t mind.
ReplyDeletehugs from Brazil
great....I wasted a lot of time trying to find metal bases for my buttons...This is something that I'll definetely try...Thanks a lot Michele
ReplyDeleteJust what I was looking for! Starting right away making 9 for decorating my string quilt. Thnks!
ReplyDeleteI love this idea! I love the look of covered buttons but hate always buying the stupid not so cheap kit. I am so happy you posted this!
ReplyDeletethanks so much for sharing your wonderful tutorial! I was going to purchase an expensive kit to get me started but now I have everything I need in my stash!!!
ReplyDeletethey look great and you are a genius!!!!
hi again Michelle!
ReplyDeleteI made 50 of your buttons today and they are on my blog with a bit of a tutorial as to how I made mine! I have also linked your tutorial to my post!
http://www.myscrapnaddiction.wordpress.com
thanks so much for sharing your creativity!
Kerri x
These fabric covered buttons you have made are adorable! How clever that you made them with things from around your house. I hope it's okay, I just couldn't help but share this post on my button crafts round-up hub here:
ReplyDeletehttp://jamiebrock.hubpages.com/hub/Super-Cute-Button-Crafts-Tutorial-Round-Up?done
Thanks SO much for sharing!!
Jamie
genial adorei
ReplyDeleteadorei a ideia obrigada por compartilhar bjs
ReplyDeleteAwesome! If using for the center of hair bows or flowers, you would not even have to.add the felt or ribbon. Just glue onto.center after covered. Love it! Thanks!
ReplyDeleteAwesome way to save money.
ReplyDelete