

Yay!
We're on our way with the bracelets for Craft Hope's Project 12. Actually, now that I look at them they are probably more like cuffs, wouldn't you say? I admit that I've done most of the work so far. But my little one loves to admire his designs on the cuffs. And he wants me to make him two of his own: one for each wrist. He likes the feel of them on because, as it turns out, they are pretty darn comfortable. It's so nice to have such positive feedback from the boy. Believe me, this is not always the case.
I designed these to be as simple as possible to make. Here's a little tutorial in case you're inclined to join in the effort.
Tutorial: Soft Cuffs
As shown in the first post, the boy had drawn some little designs which I'd traced onto freezer paper and then cut out to make stencils.
1. I used regular liquid acrylic paint (not fabric paint) and freezer-paper stenciled the boy's designs onto some scraps of solid cotton.
2. I free-handed a short line of stitching around each design.
3 I sewed on a scrap of patterned fabric to each solid scrap beside the designs.
4. I cut out the cuff pieces. Enough for 12 cuffs.

Below is my pattern. I made 2 sizes, cutting 6 of each size.


6. To make each cuff soft yet durable, each is made of three layers: the top stitched and stenciled layer, the middle layer cut out of an old flannel sheet, the bottom layer of soft flannel in plaid.
7. Place the middle layer and bottom layer bad sides together.
8. Machine-sew these two together. I made two lines of stitching along the length to hold them together.
9. Take a small elastic hair-tie and use a twist-tie to hold it together in a figure 8 (with a big loop and a small loop). This will be your closure.

10. Make a cuff sandwich with good sides together (good side of flannel plaid up, and good side of stitched-stenciled piece down). Place the hair-tie at one end with the big loop on the inside and the twist-tie at the edge as shown.
11. Stitch around the perimeter with a 1/4 inch (6 mm) seam allowance leaving the end opposite the hair-tie open. Remove the twist-tie.
12. Trim the edges and turn it inside out. Use a skewer to push out the corners.
13. Close up the opening with a line of hand-stitching.

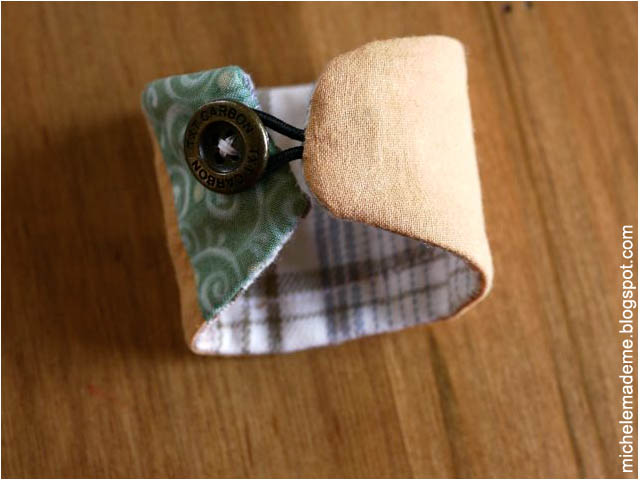
14. Sew on a pretty button.

Oh goodie, you have a cuff. And it is oh so soft! Here's what the back looks like.
Only 11 more to make, well 13 if you include 2 for the boy. No problemo, eh? I'll have pictures of the whole she-bang once they're all complete.
Edited to Add: Check out the finished cuffs HERE!
Have a lovely weekend now, I'll see you again on Monday!
P.S. Thank you Blogger for resolving your earlier issues. Everything seems to be intact and just as I left it. Let's keep it that way, shall we?
Good for you! What a nice thing to do. Even though you are doing most (or all) of the work..your son is learning a lot!
ReplyDeleteJust a quick note to let you know that a link to this post will be placed on CraftCrave today [14 May 02:15am GMT]. Thanks, Maria
ReplyDeletethis is smart n cute cuff..you are doing great..keep it up my dearrrrrrrrrr :)
ReplyDeleteThose are awesome... wonderful for you to be involved.... and what a great idea they are
ReplyDeleteHugz
I love cuffs so I really enjoyed the post!
ReplyDeleteCan't wait to see all of them!
Mais ça alors, almost at the same moment we've been doing the same kind of things ... Your cuffs remind me of my bracelet of Friday 13 , and , good idea , the button !!! gives me ideas ... Thanks !
ReplyDeleteThese are fantastic Michele! So glad you're doing this too. I know the kids will love these!
ReplyDeleteLove your cuffs. And this project sounds like a wonderful project. Thanks for introducing me. I'll see what I can do to help.
ReplyDeleteSewCalGal
www.sewcalgal.blogspot.com
thanks for the tutorial! you always inpire me. Kisses
ReplyDeleteThis is wonderful. I haven't worked on a craft hope project since the pillowcase drive. Thanks for sharing this.
ReplyDeleteWhat a splendid idea, Michele. This is something totally different than what I would have expected for the Craft Hope project. Fantastic!
ReplyDelete