
It's the first Thursday of the month and you know what that means, don't ya? Right. "You Guest It", a post that is created just for you by a wonderfully crafty human that isn't me. Today's offering comes to you courtesy of the unstoppable Sister Diane Gilleland of the Craftypod. Take it away Diane!
***
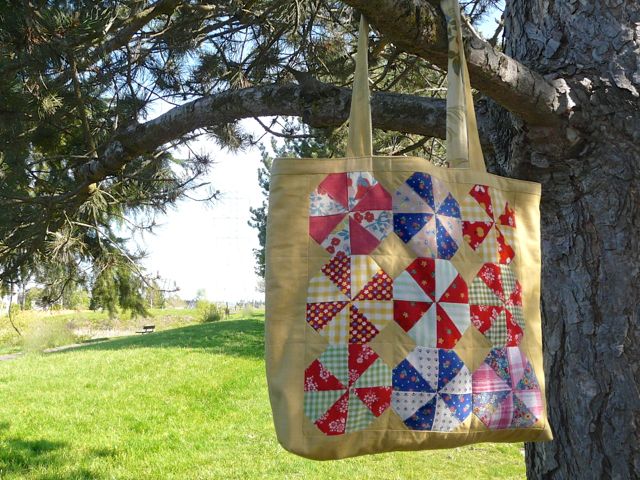
New Life for Old Quilt Blocks: The Octagon Tote
Hi, everyone! It's so cool to be hanging out with you today on one of my very favorite blogs. I'll try to do justice to Michele's recycling genius by sharing one of my favorite upcycled sewing projects ever.
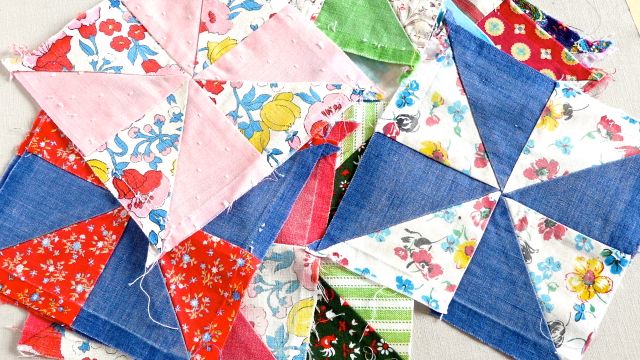
The whole thing started when I found a stack of quilt blocks at a thrift shop – the product of someone having taken a seam ripper to a pretty groovy old pinwheel quilt. These blocks were full of nifty vintage fabrics, sun-faded to the prettiest mellow colors. I snapped them up with grand plans to return them to quilt form.
Well… rookie mistake. I didn't notice until I got them home, but many of the blocks had been torn right along the seam line when they were taken apart. So, I couldn't simply sew them back together. Then I thought I'd just cut them down to a smaller size and add some sashing. That's when I discovered that the piecing was just inconsistent enough that cutting the blocks down only made them look very wonky.
Sigh. I put the whole mess in my stash. Four years went by. You know how that goes.
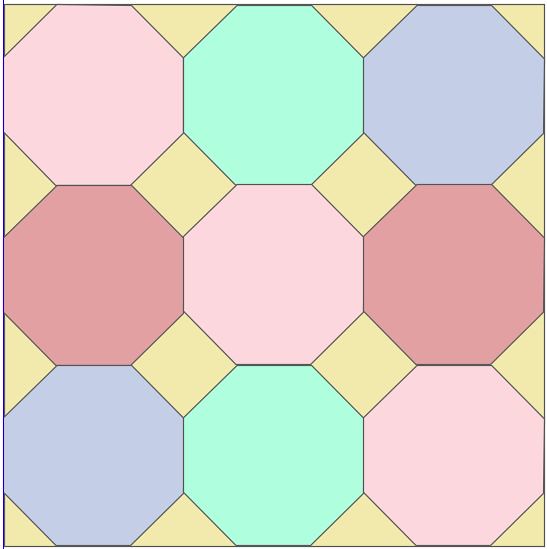
Anyway, during that time, I got interested in English paper piecing, which you've seen in action with Michele's beautiful hexie quilt. It finally occurred to me that maybe I could use this technique with my blocks. Since the pinwheel design of the block has eight sections, I thought an octagon shape might just fit the bill.
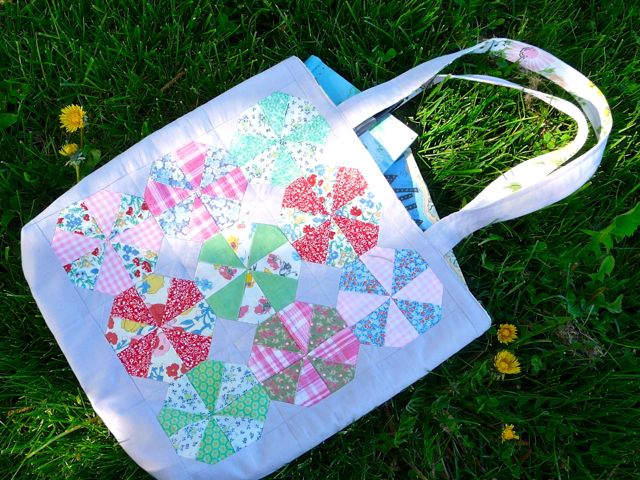
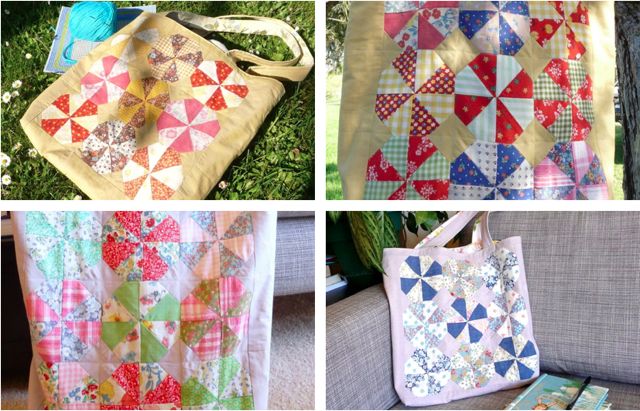
And you know what? It did! So here's how I rescued my quilt blocks and turned them into two pretty tote bags (and enough left over for coasters).
The Plan
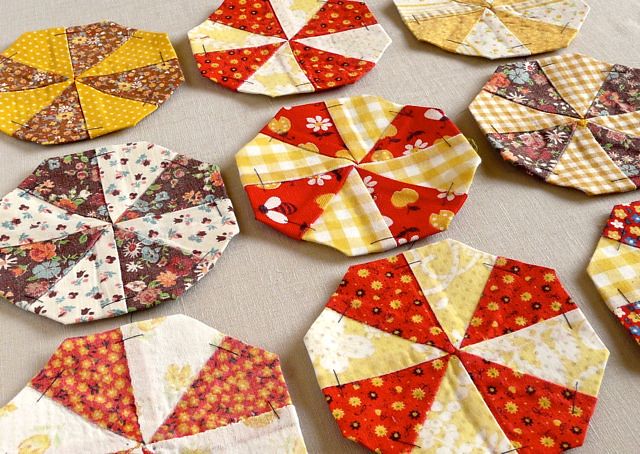
I didn't get too crazy with the measuring when I designed my tote. I knew I could get octagons measuring 4 ¼" across out of my quilt blocks, so I worked from that.
I decided that nine octagons this size would make a reasonable-sized tote panel, and I decided that, once I'd pieced together the octagon parts, I'd add some strips of solid fabric around the edges. So I used ¾ yard of solid to flesh out the rest of the tote's outside, and ¾ yard of a thrift-store sheet I had in stash for lining.
My finished totes measure 15" x 15", with 25" long handles. But the beauty of this kind of project is that you can end up with any size and shape you like.
Part 1: Make the Octagon Patches
If you've never English paper pieced before, there are so many good tutorials online. My all-time favorite is this one from Sunshine's Creations.
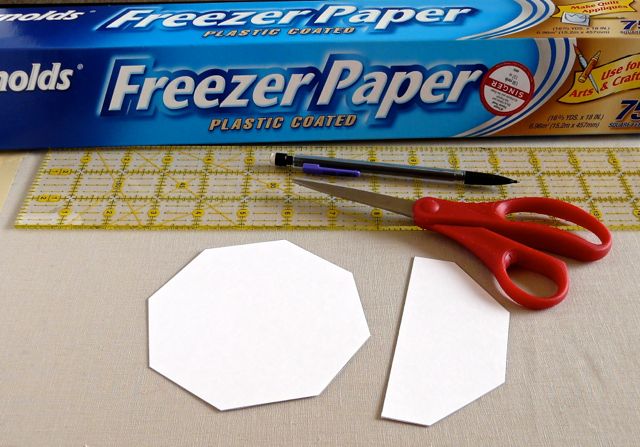
I used freezer paper to make my octagons because I wanted to be very sure the paper wouldn't move while I was basting the fabric to it. So I drew an octagon using a drawing program on my computer (Google Drive's Drawing tool is a dandy free option). I printed two of them onto card stock, cut them out, and cut one of them precisely in half. (I'll explain why in a moment.)
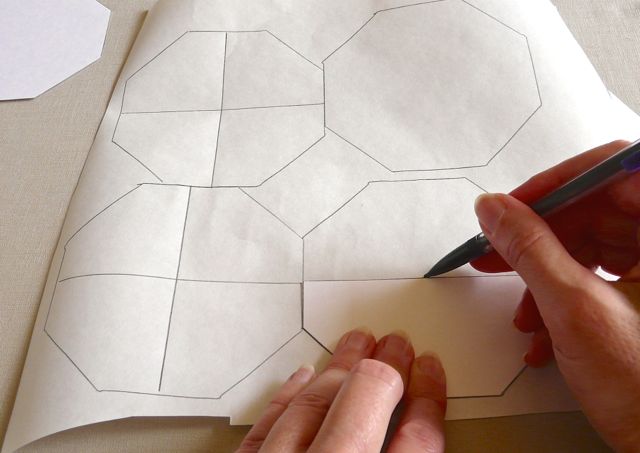
Then I traced the octagon onto the dull side of the freezer paper 18 times (I needed nine octagons for each side of my tote). I used that half-octagon to trace myself some registration lines across the middle of each octagon in both directions. Then I carefully cut them all out.
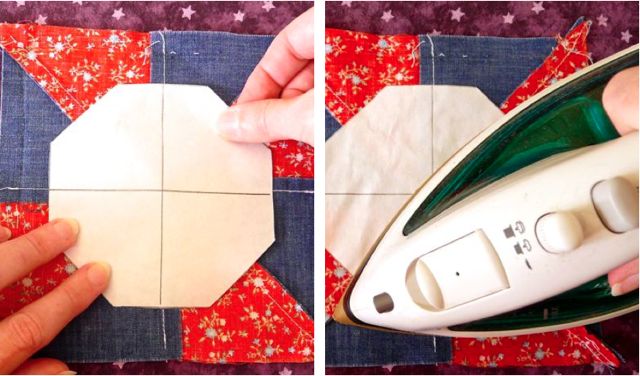
Next, I placed the freezer paper over the wrong side of the fabric, shiny side down, and I used those registration lines to match up with the seams in the quilt block. (Not every block was a perfect match, but those lines helped me get very close.) I pressed the paper with a hot iron, which lightly fused it to the back of the block. Now I was ready to baste!
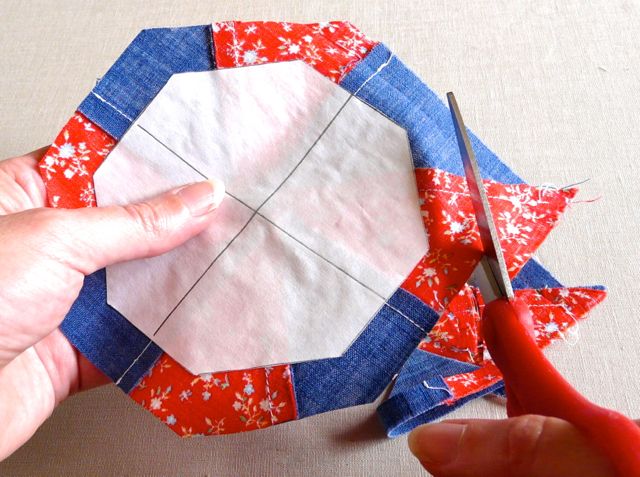
From this point, making octagons is a lot like making hexagons. I trimmed the quilt block to a generous 3/8" outside the edges of the paper. Then I threaded a needle with some contrasting thread, so my basting stitches would be easy to see and remove later.

Here's how I baste a patch this size: I start by taking a large-ish stitch in the middle of one side, sewing through both the paper and fabric. Then, I fold the next side down over that one, and I take a little tack stitch, just through the fabric at the fold point. I alternate those two stitches as I make my way around the octagon.
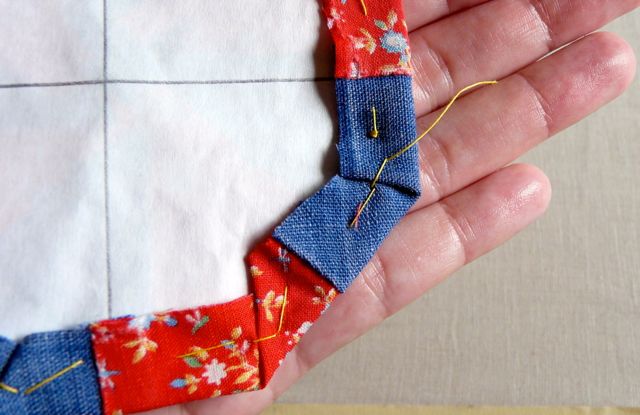
When I get back to where I started, I leave a couple inches of thread hanging from my last stitch, but I don't tie a knot. Your basting will stay in place just fine with this method, and be much easier to remove later. (You can see this whole process in action in this video of mine.)
Part 2: Making Square and Triangle Patches
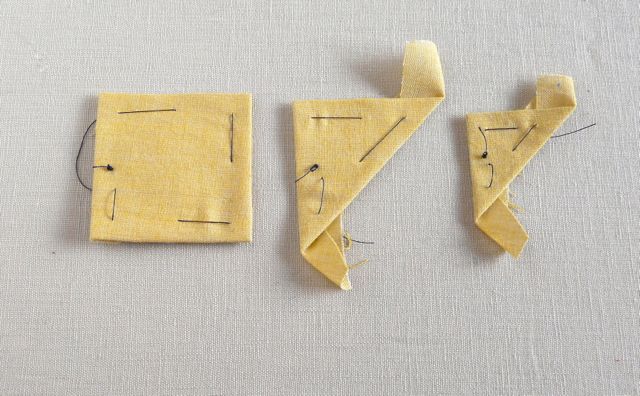
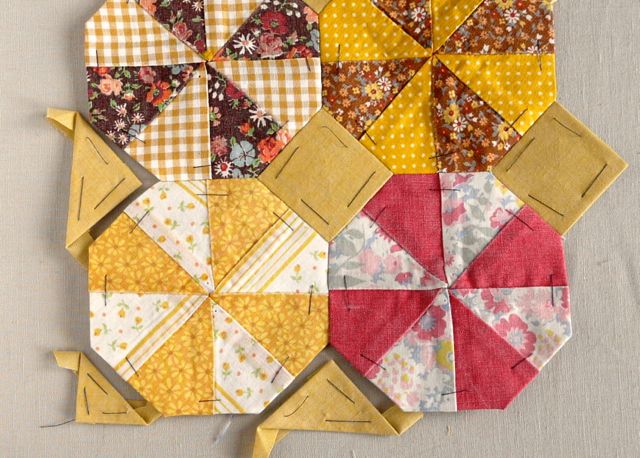
Unlike hexies, octagons don't fit perfectly together – they leave little square spaces in between! So I cut some more card stock shapes to fill in those spots. For each side of my tote, I needed nine 1 ¾" squares. Four of them I left as-is. I cut four more in half on the diagonal, making eight triangles. And to fill in the very corners, I cut one last square into quarters on both diagonals.
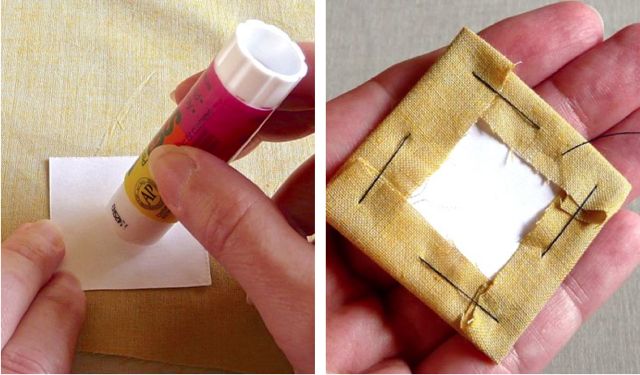
I basted my solid fabric to these shapes. To do this basting, you can either pin or lightly glue the card stock to the wrong side of the fabric. (Have you ever tried using glue stick for English paper piecing? Hoo, boy is it dandy. You just use a tiny dash, so it doesn't damage the fabric at all. And you never get stuck by pins!)
Anyway. I basted these patches through both the card stock and fabric, just using large stitches to hold down the points where I folded one side over the other. Since the pieces are so small, you won't need more than one stitch at each edge.
Part 3: Sewing Stuff Together
The thing I love about English paper piecing is that you can sew a whole bunch of shapes together like this, and get very precise corners with little effort. Here, I sewed my octagons and squares together first, and then added the triangles at the sides and corners.
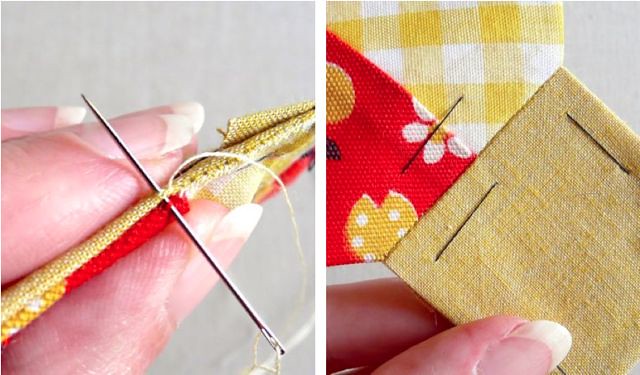
I like to sew my patches together with a whip stitch. It's just a matter of lining up the edges you want to sew together (right sides facing), making sure their end points match up. Then, take very tiny stitches; just a few threads from the edge of each patch. Make sure you sew all the way from one end to the other – don't leave any gaps at the ends! (Sunshine's tutorial covers the basics of whip stitch nicely.)
If your stitches are tiny, then you won't see them at all on the right side of the fabric. If you are seeing stitches on the right side, try a smaller needle and smaller stitches.

Part 4: Finishing
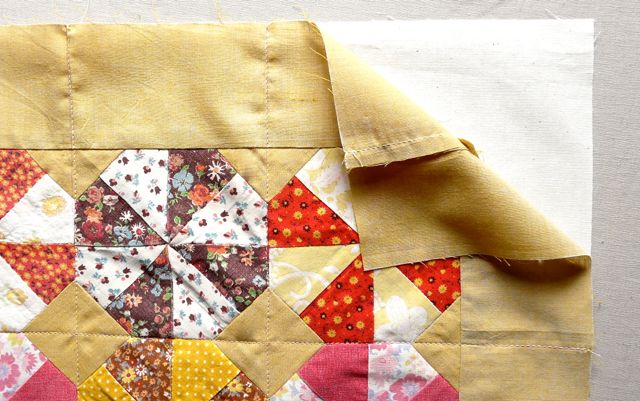
Once I'd sewn all my patchwork together, it formed two big blocks. I gave each one a good pressing – papers and all. I pressed a whole lot around the outer edges of the blocks, because I knew I'd need sharp creases there (more on that in a moment).
Then, I carefully removed all the basting stitches and papers. That's my favorite part of English paper piecing, incidentally – when this stiff, crackly thing transforms into beautiful flowing patchwork.
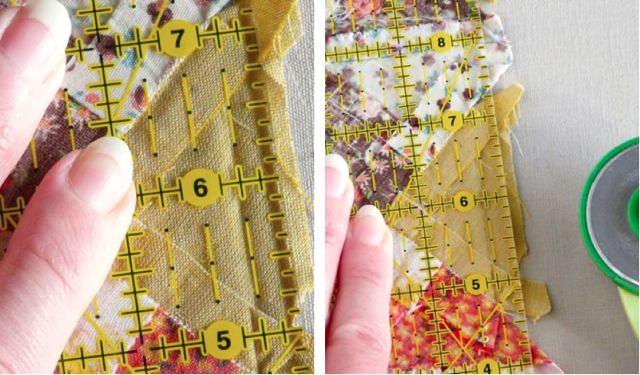
Now, in order to sew anything accurately to these patchwork blocks, I needed to square them. Here's where I used those sharp creases I was pressing around the outer edges.
I carefully opened out the folds along one edge of the patchwork, but I didn't press them. The crease that runs along this edge is my seam line, and I need an accurate ¼" seam allowance extending from that.
So, I used a ¼" line on my quilting ruler and lined it up with the crease, making sure it lined up both at the top and bottom of the block. (This being hand sewing, there are always a couple places where the alignment's slightly off, but you can aim for the closest possible overall alignment and it'll work just fine.) When I had the whole edge lining up with that ¼" line, I used a rotary cutter to trim away any excess fabric bits. Then I pressed the edge out flat before sewing. I did the same thing on all four edges of my blocks.
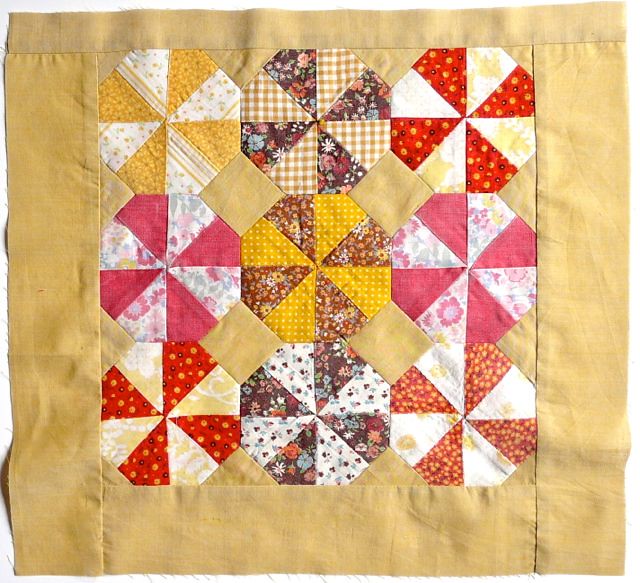
From there, I machine-sewed solid strips to to all four edges of the patchwork. I used 3" wide strips at the bottom and sides, and a 1 ½" wide strip at the top. (That extra width at the bottom and sides allows the tote to have some depth while keeping the patchwork centered on each side.) I made two panels like this; one for the tote front and one for the back.
…And then I gave the panels a bit of reinforcement. Let's face it, vintage quilt blocks are somewhat delicate, so I didn't want any of those old seams carrying the weight of my library books and farmer's market produce!
I cut two pieces of lightweight canvas the same size as the tote panels, and then pinned one to the wrong side of each panel. I used a walking foot on my sewing machine to stitch some simple quilting lines over the surface to hold the layers together.
From there, I used my favorite-ever tote tutorial from Skip to My Lou to make up the rest of the bag.
***
You see that? It was wise to keep those old quilt blocks around for all those years after all. I just love that she's repurposed them into these extra pretty patchwork totes. It is such a great way to highlight their simple beauty. Note to self: Keep eyes peeled for yummy old quilt blocks.Now where do I start with Sister Diane? Wow, there's a question and a half.
Well... Diane is a Renaissance woman if ever there was one. She is not only a talented crafter, no no. That does not even begin to scratch her surface. She is also an author of books. "Kanzashi in Bloom" springs to mind, "Quilting Happiness" is due out in late summer, AND she's written ebooks of both the crafty and bloggy varieties. Diane is a teacher. She has an online class coming up in June called "Getting Started Craft Blogging". And as someone who has taken a number of her classes, I can tell you that she is super-knowledgeable, extra thorough, and darned sweet. Plus, she's been a blogger forever, so she knows stuff. Diane is a thinker. This month on the Craftypod, she'll be exploring the idea of "Your Actual Audience" and trying to help pinpoint who out there is really paying attention to you as a blogger/business person. Seriously. I could go on all day. But my point is this. Just check her out. You can thank me later. I'm not going anywhere.
Dear Diane, thank you so much for the gorgeous post. I'm feeling pretty darn blessed right now, you know that? Massive cyber-hugs from me to you!
♥M
P.S. Have an idea for an eco-craft? Seeking a new audience? Consider submitting a guest-post idea to Michele Made Me's "You Guest It"! Get all the details HERE.
thank you!!! nice tut!!!
ReplyDeletexxxx Ale
OMGersh, what an amazing tutorial, with video and links and closeups and the most gorgeous pictures. I am a beginner, but you make the paper peicing look so comprehensible, even to me. The tote is so lovely, and I love that you are reusing these old treasures - I see quilts in terrible condition at thrift shops so often, what a great way to transform them.
ReplyDeleteThanks Diane, and Michele the hostess with the mostess!
Definitely give English paper piecing a try, Michelle! In many ways it's much easier than machine patchwork - especially for matching up corners and points.
DeleteOh my goodness! I remember the day you showed me those rescued quilt blocks, Diane. Like so many great ideas and found treasures, they just need time and experience to become magic!!!! Your totes are absolutely gorgeous!!!
ReplyDeleteAnd your tutorial is not only beautiful to look at but hugely informative! I probably don't need another tote - but you have me wanting to make one just like these!!!
Michele! I found you through Diane! In one of her classes - a long time ago! I love where you have taken your blog during that time - it just gets more brilliant each year! And you have become my inspiration and muse for all things repurposed, recycled, reused. You truly "get" it.
Aw! You are just the best Mom. :-)
DeletePerfect, perfect! Such a nice idea! I'm in the process of re-sewing a whole bag of left over blocks, but never thought of paper piecing!
ReplyDeleteI love this tote! How fun that you can customize it to whatever sized you want.
ReplyDeleteI love your bags!!! Gorgeous way to use up those vintage blocks!!!
ReplyDeleteSuch a great idea! Thanks for the quest post Diane and Michele!
ReplyDeleteWhat a great idea! I love it!
ReplyDeleteMany years ago, for about 8 years, I ran a residential, adolescent therapeutic unit in North London.
ReplyDeleteWe had 16 residents - all male - with a wide range of 'issues' that often manifested in bouts of violence.
I wanted to model some skills and behaviours that offered alternatives to male aggression, and, when a staff member brought in a plethora of fabric samples, I decided that I would make a quilt for one of the teens who was moving to his own place.
Reading through your blog brought back many memories - and all these decades later, I still have contact with that 'lad', now a father and a Grandfather, and the fact that still has the quilt, suggests to me that the time, energy and love that I put into the quilt, reminded him that he was a person of worth
Thank you
Go well.
.