Showing posts with label free-motion quilting. Show all posts

Friday, September 20, 2013

Guest-Posting at Sew Ready To Play Today


Do you remember my good friend Louise from I'm Feelin' Crafty? Ya, you met her in person back here? Well... she is hosting a merry event this month called "Sew Ready To Play".  In Louise's words, the idea behind the series is this: "You pick a game and sew anything that is inspired by that game". The event is in its 3rd year (check out all the goodness from previous years HERE) and guess what... this year I get to "play" along!

Nifty, eh?

Sneak a peek at what I made...


Hmm, can you tell what it is?... To see more, hop on over HERE!

♥M

Thursday, July 11, 2013

Quilt Finish: On A Picnic

This here is the simple picnic quilt I made for my sweet friends, DnA, who got married just a little while ago. Yahoot for their beautiful matrimonial union! Let us drink to their long and blissful wedded life!!! Hugs to you both, DnA!


Previously pictured in progress here and here, this is the quilt I quilted on Betty, my old White sewing machine. It's my first attempt at free-motion quilting (FMQ) a large-ish project. And I'm pleased with it!

And, as usual, every quilt has its lesson.

What did I learn this time 'round? Well... a few things actually.

Lesson 1: I learned the value of a good marking tool. After fussing with a regular HB pencil, a so-called quilting pencil, and a new but-soon-dry-as-the-desert quilting marker, I finally settled on the wonderful chalk pencil to mark the quilt with my quilting designs. It doesn't even compare with the rest. The heavens opened up, as I recall.


Lesson 2: For my next project, I will be taking a new approach to FMQ designs.

Part A: I ended doing gobs and gobs of unpicking because my quilting lines were designed long and smooth yet SO often ended up wobbly and crooked. Given Betty's minimal throat space, it was quite tricky to maneuver the quilt along these lines. Shorter lines would be far less challenging for Betty and me.

Part B: A little more space between the quilting lines themselves would also help. Then I wouldn't have to fret so over the fabric buckling. I was constantly checking for buckling and bunching on the backside of the quilt and it had a negative impact on my flow. It seems to me that more space between quilting lines is the answer here. That's my theory anyway. Still have to test that out in my next project though.


Lesson 3: I love the modular quilting design idea. By that I mean working in a small area on a discrete motif, as opposed to an all-over quilting pattern. Being limited by my machine's tiny throat space is not necessarily a bad thing, it just means having to think differently about how to accomplish the quilting. Modular quilting designs are one solution to the space problem.

Lesson 4: This project shows me the potential of my simple old machine. So what if it's old? I am not limited by it. IT is limited by ME! I'm supposed to be the one with the brain after all.


Lesson 5: Except for batting and thread, I could probably make 20 more quilts from my scraps/stash alone. Like really, I had everything for this lap quilt in my house! This is an old, old lesson. An oldie but goodie.

Lesson 6: If you want motivation to finish a quilt, plan to give it as a gift for a big day like a wedding or a birth. There's nothing like a deadline to set one's butt astir.

Yeah... So I think that about covers it! I hope to get started on THIS colourful one soon. Poor thing's been waiting most patiently in the wings...  I think I may need to set a deadline of some sort, eh?

♥M

KITTEN UPDATE:   Thanks so much for your kind input on the kittens. Of which there are now three (I named the third "Twigs")! We've put out food and water for them. They aren't touching it from what I can tell. So the mom must still be around?...  They've begun to meow at me when I look in on them. Am I scaring them? The Humane Society said to give them a call if we decide to hand them over. Also, after last posting, Lo reminded me that Elle (my eldest) is highly allergic to cats. That fact had totally fallen out of my head, if you can imagine!!! I'm so worried about the poor little things. I just want them to be safe and alive...

Friday, June 21, 2013

On My Quilty Way...


Remember these blocks back here? Well, they've been altered slightly and are presently being used to make the gift pictured here... These photos have been altered slightly as well. I'm showing them in black and white 'cause I'm trying to be discrete. Until I give the gift to the recipient family, I won't be showing it in all its colourful glory. So patient you must be.

I'm free-motion quilting (FMQ) the quilt. I created one design. Started quilting it. Hated it. Unpicked it. Let me state firmly. I do not like unpicking. However, I'm trying to deal with irksome predicaments such as unpicking with a little more calm and restraint than I normally would. I'm trying to remember that I don't have control over a lot of situations, only how I respond to them. So, yes, it took me two hours to unpick the two squares I'd FMQ-ed. And yes, I had to re-design the quilting pattern. But the good news is version 2 of the quilting pattern is much better! So, you know what? It's all good, right?


Also, I sometimes worry that Betty, my old White sewing machine, won't be able to handle the job of quilting, but there too I needn't get my knickers in a twist. She is up to the task. Take a gander at what she's done so far...


Not too shab for the old girl, eh?

♥M

Tuesday, April 9, 2013

The Space Between


When I was little and I went to bed before the sun did, I'd lay in my bed and make pictures with my hands. You know when you take both hands and bring the thumbs and index fingers together? You know that space that lives in the middle there between them all? In that space I'd create a whole world of shapes. I'd make all manner of hearts and trees and animals and letters, and my mind would wander aimlessly, and happily, through them all until my eyelids grew droopy and I fell asleep.


For reasons that I don't really understand, I have very few recollections of when I was a kid. This is a memory that just recently came back to me. And it's a good one. I think it came back to me because it was an activity that I repeated over and over again. It was imaginative and natural and easy and free and portable and quiet and good, and the results belonged only to me. Plus, it is probably the creative root of everything you see here.


What, you might well wonder, does this have to do with Dresden placemats? Oh nothing. Nothing at all in fact. I'm just so glad the memory is mine again. And I was reminiscing out loud.

♥M

P.S. As you can see, I finished the Dresden placemats, yipee-kayay! Previous posts about this scrappy little project live here and here.


Saturday, April 6, 2013

Free or Not Free, That is The Question.


I mean, if free-motion quilting (FMQ) is highly planned, can it really and truly be called FREE-motion quilting? I doubt it severely. I mean, yes, I used all the same settings on the ol' machine, the darning foot, machingers et al... But I designed the above quilting pattern - the quilting is represented by the coloured bits, not the black bits. And then I marked my Dresden placemats with a slightly improved version of this design before proceeding with the quilting. So with all that prep work, does this still qualify as FMQ? And if it's not FMQ then what, pray tell, is it? Please educate me on this question if you could. I really need to know. Like, really really really. Like, yesterday if at all possible. Thank you.


Furthermore, despite the plan to have these done by March 25th (of this year), I'm still weaving in ends and sewing the binding on them, tarnation. So no finished placemats to show yet, blasted. Maybe they'll be done one day when we're all living on the moon and we've all learned to play the steel drums 'cause that's the only instrument you can make from moon dust... But no. No placemats today. Sigh...

♥M


P.S. I seem to recall having one more question for you... What was it again?... Oh ya! What would you say to some sort of re-use/recycled paper-based craft-along? I've never done a craft-along before so Gord only knows how it would go, but if you're game, I would love to give it a shot? Opinions?

Tuesday, March 19, 2013

Well I'm Free... Free Motion Quilting!


I've got some sweet free-motion quilting (FMQ) plans for my Dresden placemats and also for the Craftsy BOM quilt. But before I put needle to placemat or quilt I thought I'd bone up with some FMQ practice.


Are you familiar with the unstoppable Leah Day of The Free-Motion Quilting Project? She shares a million and one free-motion quilting designs in video format! She's amazing, this young woman. I've been skulking around her site and taking a look at the various patterns she's created. The other day I started practicing with a freshly lubricated Betty, my old White sewing machine.


I've attempted several of Leah's FMQ beginner patterns with mixed results. But ain't that the beauty of playing and learning? No worries if you mess up right? I'm still learning how to use my machine in this new way, how to move my hands, control the speed and direction of sewing, and let my shoulders relax with the motion. It is tricky. But so far I've tried:  Flowing Glass, Mario Vine, Trailing Spirals, Overlapping Arches, Sea Oats, Woven Lines, and Wave Chain.


I think my favourite of the batch is Flowing Glass. So pretty and easy to execute even for a beginner. The rest will need more practice, but you know what? It's darn fun! 

And what about you? Are you trying anything new lately?

♥M


Tuesday, January 18, 2011

Tutorial: Reversible Fabric Gift Box


A few weeks ago, Lo and I ordered dinner from a lovely locally-owned Thai restaurant. Delicious crispy spring rolls, pad thai, ginger chicken with rice. Yum. The spring rolls came in a pretty brown, cleverly-designed, cardboard take-out box. I was instantly attracted to the spring roll box. It was love at first bite. That box had my name written all over it. Once empty, I tried hard to clean it so that I might re-use it, but alas it was too yucky to be redeemed. Before I tossed it in the garbage however, I carefully unglued and unfolded it, and copied its sweet sweet shape onto a sheet of newsprint and cut it out. If I couldn't have the box, I could at least try to replicate it. I practiced folding my cut-out to see if I could reproduce the original box. Happily, I could, hee hee! Goodbye soily spring roll box. Hello fresh and clean little template box!

Yes. My relationship with garbage resides on that line between cunning and cuckoo. I know it. You know it. Let us accept it, embrace it, and move on.

In today's tutorial, I will show you how I made my new-fangled version of the box. I discovered in my exploration, that in a snap you can make your box easily reversible, very strong and long-lasting. How you ask? Well, let me show you. Step into my office, and we will begin!


Tutorial: Reversible Fabric Gift Box

You will need:
  • 2 roughly 14" x 18" scraps of fabric in whatever colours you desire
  • 1 roughly 14" x 18" scrap of fabric to place between the other 2 pieces (You may want to use interfacing instead. I didn't have any interfacing so I just used a piece of white cotton.)
  • the box template which is provided here
  • 4 pretty brads
  • pair of scissors
  • tool for poking holes (I used a tiny screwdriver)
  • sewing machine with darning foot
  • Mod Podge
  • paintbrush
  • ribbon and embellishments
1. Photo 1 shows you what the box will look like in the end. Pretty!
2. Blow up this template to twice its size. Cut it out. Create a sandwich with your 3 fabric pieces with top and bottom pieces having good sides out. Ensure that the fabric sandwich is somewhat larger than your template.
3. Using your sewing machine and darning foot, free-motion quilt a stipple pattern on your sandwich. Once your sandwich is quilted, cut-out the template shape.
4. Notice that I added a line of stitching 1/4" from the edge for extra strength. You may want to zigzag the edge or finish it in some other way. I chose to leave it raw.


5. Because I didn't use interfacing, I decided to spread Mod Podge over both the top and bottom fabric layers. I mod-podged one side, let it dry, and then mod-podged the other side.
6. Once dry, the Mod Podge gives the fabric some rigidity.
7. Fold the fabric along all fold lines, according to the template.
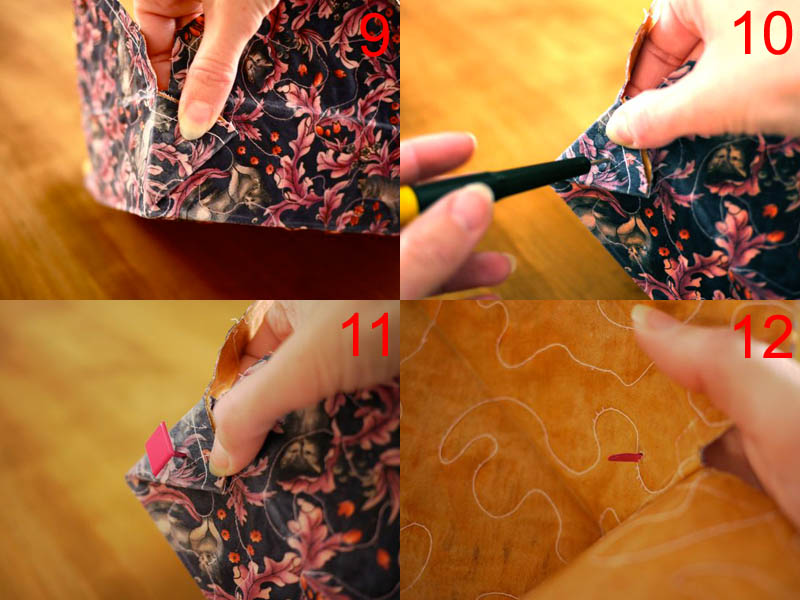
8. Next bring two of the corners (see photo#3) up toward each other, and grab the little wedge section (see photo#3) that joins them between your fingers as in #8.


9. Fold that wedge section flat against the long side of the box.
10. Poke a hole through the wedge and through all layers. I used a tiny screw-driver as a hole-poker.
11. Now insert a brad through all layers.
12. At this point, you will see the brad end inside the box.


13. Fold down the little arms of the brad.
14. Repeat steps 8 through 13 to form all sides of the box.
15. Fold down the small top flaps of the box, followed by the large flaps.
16. And finally insert the curvy end of one large flap into the slit in the other large flap.

And that's it! You have a lovely, quilted, strong, long-lasting and reversible fabric box that renders gift wrap redundant. And you made it, yippee!


Place your gift inside, attach a ribbon and maybe an egg carton flower, and you're off to bring joy into someone's little world!


Now this box has at least two personalities. I've devised a catchy little phrase to help you find them. It goes:

Unfold it, reverse it, refold it, behold it!

And there you have it: a whole different gift box! It couldn't be easier, could it?


This is just the little project on which to practice your free-motion quilting. Make a few and you'll soon be ready to tackle more substantial free-motion jobs. That's MY plan anyway!


Now please do have yourself a lovely evening, and I'll see you again soon!


Friday, November 12, 2010

The Versatile and Vervy Half-Moon Quilted Scarf


This isn't just a scarf.


Oh it's a scarf, that's true.

But it is also a fabric-batting-binding-yarny-utterly-stash-busted-scrappy scarf. It is a free-motion-machine-slash-hand-quilted-hand-appliquéed-and-couched scarf.


This scarf is a soft and sweet lovey. Roll it up, it's a cozy muff for your cold cold hands. Could it be a wall-hanging, you ask? Very astute of you, I reply.


In a pinch, it's a stream-lined yoga mat. Or a multi-mug mug rug. Tie it around your head and your husband's gypsy fantasies come true.


Don't have a wrist cuff? Oh yes you do.


This scarf is a table runner. Wear it out dancing 'cause it's a sash baby! With this scarf, you're Queen Nefertiti for a day.


This isn't just a scarf.


Or is it?


Now go have yourself and great day, will you?


Monday, October 25, 2010

Tutorial - Kid and Grown-up Placemat Fun


Yesterday the boys and I had planned to do yard work all day but as it happened, not only did Mother Nature have other plans (it was cold and rainy out), but Lo was feeling somewhat under-the-weather. So we all decided to stay ensconced in the warmth of our house. Of course that meant coming up with something to keep the Boy occupied. Now, I usually have some kind of crafty back-up plan up my sleeve for such an occasion. Yesterday, Plan B involved making one-of-a-kind placemats.

Now the Boy loves to craft. It's in his blood. But Lo. When I asked him if he wanted to make a placemat I wasn't actually expecting him to say "Sure." But he did! AMAZING. CRAZY. ( I thought it must be the virus talking or something...) But he actually sat down with us for probably about 2 hours helping the Boy, creating his own design, cutting the pieces. And the Boy! He had so much fun, he made two different placemats! It really was a great family rainy day activity!

Here's what we did...


Tutorial: Kid and Grown-up Placemat Fun

You will need:
  • Fabric scraps
  • Fabric pieces (roughly 12"x 18"), 2 per placemat (1 for front, 1 for back)
  • Batting pieces ((roughly 12"x 18"), 1 per placemat
  • Fabric binding
  • Fusible web
  • Pins
  • Pair of scissors
  • Iron and ironing board
  • Sewing machine with darning foot
  • Needle and thread
Note: Nothing was bought specifically for this project. I found everything in my stash! Bo-nus!

1. Take one of the 12" x 18" fabric pieces. This is your base fabric.


2. Using the fabric scraps and a pair of scissors, create a design by placing various scraps on your base fabric. You can reshape the scraps or leave them "as is" and just place as you like on your base fabric. The point: Be creative, do what YOU like, this is YOUR placemat.


This is the first of the Boy's designs.


Here's what our dining room table looked like. The floor was a mess but that's to be expected.


3. Note: The kid friendly part of this activity is over. The rest should be done by you. Following the directions on your fusible web, use it to adhere the fabric scraps to your base fabric. If you're still not sure about using fusible web, here is a good fusible web tutorial link.

Here's what our placemats looked like once they were fused. Notice that some of the larger pieces were pinned in place. That was just my preference, feel free to fuse all pieces.


4. Now you will make a quilt sandwich. Place a piece of batting between your designed top piece and your back piece. Pin the sandwich together. Do this for all your placemats.

5. Free-motion quilt all your placemats. I'm still learning how to do this so my work is FAR from perfect. But I can tell you that if you have a regular old sewing machine like I do, you will need a darning foot to do this step. You also need to put your feed-dogs down (those are the little toothed pieces under your sewing-machine needle that feed the fabric along as you sew).

Note: The finished design has raw edges. The edges will likely soften and lose threads over time with washing. Once they completely fall apart, we will make more.

Here are a few details of the free-motion quilting...


6. Bind your placemats. Here is a very good tutorial at Sew Inspired that shows you how to do that.

And here are the finished placemats! Here is Lo's which I just love! I'm super-fond of circles.


Here's the Boy's first design...


Here's the Boy's second design. I love this one too. I like the way Saturn is about to collide into our house. So great. The stars are very cute too.


And here's my design!


We had a great time doing this together as a family. Perhaps you will too...

Have a wonderful day!

Saturday, October 9, 2010

There Are 157 Words in This Post


The post title is silly. I didn't know what else to call my post so that's what I went with. It may or may not be accurate. Pretty sure it's the latter.

So, I'm practicing my free-motion quilting and freezer paper stenciling. I made these Ent potholders for my little girl. Okay, not-so-little girl.


Definition of ENT:

You know, the old tree-like creatures that came alive in The Lord of The Rings. Yes, yes. I know that regular trees are alive. What I mean to say is "mobile" rather than alive. Those guys.


My stitches are quite uneven. I'm so tense while I'm free-motioning. I feel like old Betty (my sewing machine) is going to suddenly take flight she's moving so quick for her age. I gotta relax. Tips? Suggestions? Ideas? Maybe I need lotion or something?

By contrast the stenciling is quite relaxing. The possibilities are endless and it's such a simple technique. I'm looking forward to some intricate designs.

Have an lovely evening and Happy Canadian Thanksgiving!

LinkWithin

Related Posts Plugin for WordPress, Blogger...