Showing posts with label Mod Podge. Show all posts

Thursday, November 6, 2014

Parallels: A Junk Mail Collage

Have you tried collage? Ah yes, most enjoyable... Especially if you allow a piece to emerge spontaneously out of the materials you've chosen I think.

All parts of this small collage were cut from sale flyers and the local newspaper. I used favourite bits of yellow, grey, black and white for this one. The bits were then attached "improvisationally" with Mod Podge to a piece of paper stretched and stapled onto an old unused picture frame.

I'm calling it "Parallels".


♥M


Friday, July 19, 2013

Retro-Groovy Sewing Machine Cover Revamp


I revampled my old sewing machine's (you know her as Betty) cover and base. Ya, I know the term is technically "revamped" but I typed "revampled" by accident and decided to go with it. Sometimes you just have to love your mistakes.

So ya, get a load of this. Miss Betty has got herself a snazzy new outfit. You can't miss 'er now, can ya? Hee heeeeee.


She's a little bit retro and a lot groovy in her flashy new cover, eh?

I got this look by mod-podging junkmail and construction paper circles over the entire cover and base. I didn't actually choose the construction paper colours. I just used The Boy's rejects: orange, pink, purple, yellow and brown. He's a touch picky about his construction paper hues. Anything remotely pink or purple or yellow he rolls his eyes and will not touch. Way, way too girly. And I think he rejects the brown and orange because they do not excite him... He knows what he likes, I guess.

And I borrowed my little sister's 2-inch circle punch. It came in darn handy to punch out the quantity of paper circles I needed.

The cover was originally clad in grey paper. I removed that about 5 years ago. Here's what the cover had been looking like these last few years.  I yawn.

Quite a change, eh?


I could have made an effort to have the top and base seam match. But I didn't even think of it, truthfully. So I may have to fix that 'cause it's bugging me now. But I like the basic concept and colours. It's fun to have something this colourful and lively in the house!


Now I feel like circle-podging the living room too. Don't think Lo will go for it... I do have a lot of paper circles left though. So, fair warning: don't be surprised if you see them here sometime!

♥M

Wednesday, July 17, 2013

Sneakin' a Peek


Hi.  Here's a wee look at my remedy to avoid scratching the infernal poison ivy blisters on my arms and legs. A sweet summer project involving junkmail and Mod Podge... More soon, okay?

♥M

Saturday, May 4, 2013

Junkmail Puzzle Wall Art


I think "the facilities" is an interesting choice of words for the household bathroom, don't you? Because if we're honest here, is there really anything "facile" about it? I say no. In fact, facile is probably the last word I would have chosen to describe the room where we go to do our business. I think maybe the word-people hoped to send us psychic messages of relaxation when they picked that one. Not surprising then, that they called it the "facile-at-ease". "The loo" on the other hand is a great term for it because no one is quite sure where is comes from. Consequently "the loo" has no discernible baggage and is perfectly harmless. It causes zero anxiety. It puts one under zero pressure to perform or to be in any way competent whilst in that room. It's even a little bit humorous when you say it out loud, hee heeee... The loo. The loo... It sounds like a song and I like it.


Now, say you've come over for a cup of tea, and nature suddenly calls. You will require the use of the loo and, at our house, that will take you by way of the stairs. Along the way you'll encounter a few things: a landing, an ugly boat painting, naked windows, a ragtag rock collection. And when you've almost reached your destination, you'll see in front of you what seems to be a framed rectangle of white nothingness. "Strange to frame a bit of wall like that," you might think to yourself, examining the nothingness. And I would agree with you wholeheartedly.


That is why I took it upon myself to change the framed-rectangle-of-white-nothingness (which, by the way, is the access to the loo's plumbing). I mod-podged it with my junkmail puzzle from back here, and embellished it with black marker and little daubs of dimensional paint.

This is a much pleasanter prelude to your forthcoming loo appointment than the framed-rectangle-of-white-nothingness, wouldn't you say? Indeedy.

♥M

For other junkmail craftiness, click HERE!

Tuesday, July 24, 2012

Mod Podged Hexie-Making Kit


Since I lug it about hither and thither, high and low, and everywhere I go, the hexagon-quilt-in-progress-paraphernalia needed its own little carrying case.


I made one out of junk mail and an empty ice cream bucket. I cut the junk mail into hexies before mod podging them onto the bucket. It had to match the quilt, eh? Not a question.


And speaking of which:

~ Hexagon quilt coming along famously.
~ A little over half-way there.
~ Approximately 1000 more hexies left.
~ Working working.
~ Bit by itty bit.
~ Every day for 68 days now.
~ Very pleased with progress.
~ Tunnel in sight but no light yet.

♥M

Previous posts about this hexagon quilt:  here and here and here
Other hexagon projects: here.


Tuesday, March 13, 2012

A Boy Caught Thinking


The Boy gets a look of concern sometimes. A furrowed-brow look. One that is far away. Important. Quiet. And deep.

If only I could read his thoughts... But alas I'm not allowed into his secret inner world. Here's my first attempt to capture one of these old-soul looks of his...


'A Boy Caught Thinking' is 16" x 22" (40cm x 56cm), rendered in junkmail and Mod Podge on craft paper and stretched over an old picture frame.


♥M

P.S. The March Break is here, posting may be light over the next week. Have a great one!

Tuesday, December 13, 2011

Junkmail Snowflakes - Possibility #2


Hiya.

It's Tuesday.

You knew that?

Oh.

Did you also know about my little junkmail-snowflake-making rampage? Well... I regret to inform you that it goes on. I know... Call me obsessed. I can take it.

Here's my junkmail snowflake experiment du jour. Jars. I stuck the snowflakes to jars. See?

Junkmail Snowflake Lanterns

All I did was cut out teeny snowflakes using THIS method. And then I took some watered-down Mod Podge (roughly 1:1 water to Mod Podge) and brushed the Podge onto the back of each snowflake (or half-snowflake). Then I stuck the snowy flakes onto jars, and bam: junkmail snowflake lanterns.


I suggest brushing the snowflakes with Mod Podge while holding them in hand. Otherwise they will become forever stuck to whatever surface you have them on. They'll stick to your hands too, but if you use the Podge judiciously and brush it on with a tiny paint brush, you'll avoid the flakes becoming permanently affixed to you.


Here's one with a candle glowing inside. Aaaah, the warmth... Makes me want to bellow to the heavens... Chestnuts roasting on an open fire, Jack Frost nipping at your... What? No bellowing, you say? 


Oh. Okay. Perhaps I could serenade you on Thursday then? Wouldn't that be great? Don't let me forget, okay?

Well you have a lovely day now. Bye bye until Thursday. ♥M


Junkmail Snowflake Possibility #1 is back HERE, btw.

Tuesday, November 15, 2011

Reader Question: Nesquik Can Ideas


 Multi-layered, rotatable Nesquik can inspired by MeiJo's Joy

A question showed up in my inbox recently. It went something like this:

SA: I have a question... Do you have any ideas for the Nesquik can?

Ah yes, the Nesquik Can... So useful and quite impossible to relegate to garbage-dom. Good question SA!

Well... to start, here's a swell collection of possibilities from the craftosphere:

1. Candy Totes @ Craft
2. A Little Tin of Shamrocks @ You Are My Fave
3. Organizer @ Chrystal's Corner
4. Vintage Holders @ Parsimonia
5. Tin Can Pincushion @ Living With Punks
6. Idea Board w/ Cans @ I Didn't Sign Up For This
7. Soup Can Organizer from HGTV@ Craft
8. Can Cover @ Elsie Marley

But I also found this super-cool Rotatable Layered Storage Box tutorial by MeiJo's Joy so I decided to try it out on my one and only Nesquik can. My results:


Thanks so much for the great tutorial MeiJo. It totally works. Absolutely rotatable AND layered! I mod podged the outside of the can with a page from an old space calendar; the top part innards I podged with some old tissue paper.  I also couldn't help but slap an egg carton flower on top there to jazz it up. Just have to decide what to store inside. Maybe it could become someone's fancy two-part Christmas wrapping, eh, with candies on top and chocolates in the bottom? Or love notes in the bottom and a beautiful trinket on top?

So I'm curious... Put on that thinking cap of yours and let me ask you this. What would you create from a lovely Nesquik can?

Wednesday, March 9, 2011

Make It Good with Ariane's Crafts


A wonderful Wednesday to you!


I am thrilled to be doing another Make It Good Challenge today. Do you know how much I love these little one-on-one challenges? There's just something about them: the forcible garbage recycling, the white-knuckle intensity of one crafter versus another, the perpetual passing of the torch, the rules as set by your previous victim who, obviously, is stickin' it to you. It's good times, eh? Find out more about "making it good" by clicking the button below.

PeachesMakeitgood

The opposition today comes in the guise of my little sister, Ariane, who blogs over at Ariane's Crafts! I'd been thinking of inviting her to "make it good" for a little while. I figured a smattering of recycling rivalry between two sly sisters couldn't hurt. I wasn't sure she'd accept because she's a quilter after all. She has made entire quilts by hand. Like, every-single-stitch-hand-stitched-with-only-a-needle-and-thread by hand. Amazing? YES! She's such a talented girl with potential far beyond the quilt. So I thought, what the heck, it doesn't hurt to ask, right? Lucky for me, she said yes! Woo wee! And because the challenge culminates in a gift exchange, the timing couldn't be more perfect. You see, we're both March babies. So after the challenge, we swap gifts, and that takes care of that for another year. It's almost like I planned it that way or something, hee hee.


Now here is today's challenge as set by the effervescent Mich L in L.A., my previous opponent.

The Challenge Material: Paper- or foil-based liquid containers (no glass or plastic)
The Challenge Rule: Make something inspired by the human hand.

So your job now is to check out what Ariane made, check out what I made, and you're good to go. No winners, no losers, just shiny happy people holding hands, that's right.

Let's see what's what, shall we?

TO SEE WHAT ARIANE MADE {CLICK HERE}
TO SEE WHAT MICHELE MADE {KEEP READING}

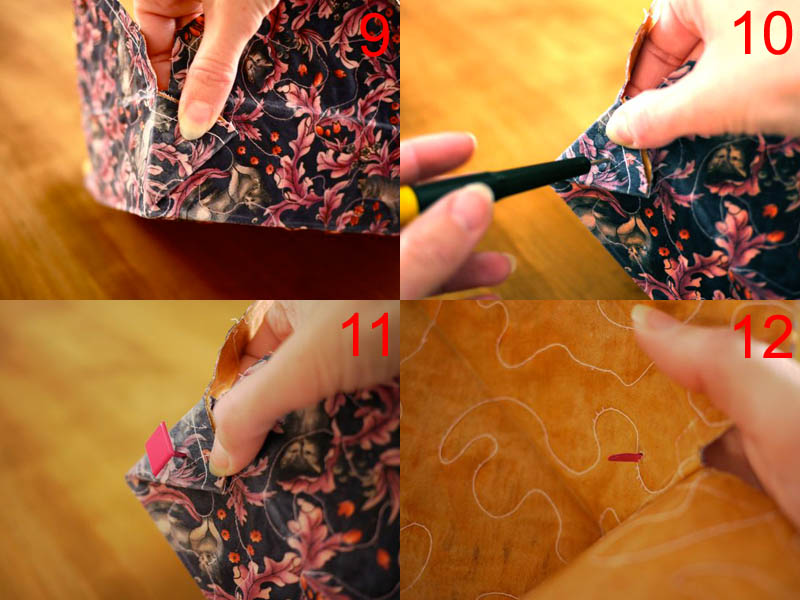
Well, I chose a milk carton as the basic ingredient for my craft. I also threw in a generous amount of cereal box, a ke-niggle of ripened tissue paper, a wee bit of construction paper, a scrap of fabric, a twinkling of metallic paint, a pinch of the Podge, and a sliver of silver thread for good measure.


I threw it all together, mashed the lot of it up, and out came this. It is a HAND-bag.


Or a HAND-basket.

The HAND-le is two bits of cereal box sandwiched together and attached with nuts and bolts.

Ain't it HAND-some? The innards are lined with a scrap of cotton from my woefully neglected fabric stash.

It is embellished with a waving pink HAND-plant, some cereal box rivets attached with silver string, and finished in metallic paint.


Can you HAND-le it?

Happy birthday to you little sister! Enjoy your new HAND-bag, and use it in the best of health!

Now off I go to visit my rival's wondrous work. Are you coming with? It's not far... Oh, here it is right here! How HAND-y, tee-hee...


Your work here is done. Have yourself a great day, and I'll see you imminently!

P.S. For interest's sake here is a previous milk carton tote I made.
P.S.S. I'll be linking here!

Monday, February 28, 2011

Waiting


Waiting, Michele Pacey 2008

Entirely recycled and consisting of junk mail mod podged onto brown craft paper on a scrap wood frame. 5-1/2"x 5-1/2" in size.

Have a lovely day!


Thursday, February 17, 2011

From the Land of Blog


Happy Friday!

It's time for another installment of "FROM THE LAND OF BLOG". This is the feature in which I show off some of YOUR projects inspired by some of mine! What do we have here? Let's see...

First up, Amy from During Quiet Time notified me of her gorgeous mod podged container shortly after I blogged this project. Look at how pretty it is? I really think her eye for detail is dead-on: the apple, the bow! Doesn't it just make you want to save that plastic container you trashed only yesterday, and mod podge away? Well go save it already. I'll wait.


The second submission comes courtesy of Lindsay from Diary of a Crafty Lady. She made these shabby chic patchwork throw pillow covers after seeing this post. What a great project Lindsay! This is the perfect craft for using up fabric scraps. Just fit the scraps together like a puzzle and make your own unique and funky-looking cushions.


And finally, NetNoe who blogs over at Art Perspective sent me this email just the other day in response to my recent butter knife post:

"Dear Michele, thank you for showing me the glory of the butter knife. I used it recently on a card I made: Coat Thank You Card. In order to get straight lines without errors (and subsequent refolding), I used a ruler to draw my fold lines, to make the folds against the pressed butter knife. Thank you. :)"


Notice I've strategically revealed only itty bits of the various projects. Conniving little me... That's to encourage you to visit the bloggers who've actually made them. I've provided all the links for you to be able to click away with ease. Do check them out, won't you?

A warm thank you to Amy, Lindsay and NetNoe for letting me know of your delightful projects. You give me a sense that I'm doing something good over here, and I'm so grateful for that.

And if you yourself have crafted a craft inspired by something you've seen on Michele Made Me, please don't be shy. Let me know. I won't have a problem shouting it from the rooftops!


Now have yourself a lovely weekend. I'll see you again soon!


Friday, February 4, 2011

Madonna and Child


Madonna and Child, Michele Pacey 2011

Happy Friday!

This is a Madonna and Child, a painting which I created over the last several days. It is a humble little 6"x 8" (15 cm x 20 cm) piece made from things I had around: a small thrifted picture frame wrapped in brown craft paper, and "painted" with junk mail and Mod Podge.

Have yourself a great weekend, and I will see you again soon!


Monday, January 24, 2011

Tutorial: Lace Hearts


Happy Monday!

A quiet little post for you today. You may have noticed the gift ornament in this earlier post. Here's how I made it.


Tutorial: Lace Hearts

You will need some lace, a heart shaped cookie cutter, Mod Podge, a paint brush, a needle and thread, and a pair of scissors.

Use a paint brush to spread a good layer of Mod Podge on the outer side of your cookie cutter.


Cover the mod-podged cookie cutter with lace as follows. Leaving a bit of extra lace at the beginning and starting at the heart's bottom point, take your lace all the way around the cookie cutter to meet the other lace end.


Slather on a few more coats of Mod Podge. I did 4 coats and left each to dry in between. Once completely dry, I carefully removed the lace by slipping a butter knife (see previous post and add this to that list, tee hee...) underneath it and working it off the cookie cutter. I did have to re-shape the heart a little, pinching the top inner point and rounding the curvy parts between my fingers, but that was easy. Then I added string to make an ornament, or strung it with several others to make a little garland, using a needle and thread.


And that, as they say, was that!

Note: I think fabric stiffener would be a good alternative to Mod Podge to stiffen the lace and make these hearts. I didn't have fabric stiffener, so I used what I had on hand. If you do try it with fabric stiffener, let me know how it goes!


Have yourself a heart-shaped Monday, and I will see you again soon!


Tuesday, January 18, 2011

Tutorial: Reversible Fabric Gift Box


A few weeks ago, Lo and I ordered dinner from a lovely locally-owned Thai restaurant. Delicious crispy spring rolls, pad thai, ginger chicken with rice. Yum. The spring rolls came in a pretty brown, cleverly-designed, cardboard take-out box. I was instantly attracted to the spring roll box. It was love at first bite. That box had my name written all over it. Once empty, I tried hard to clean it so that I might re-use it, but alas it was too yucky to be redeemed. Before I tossed it in the garbage however, I carefully unglued and unfolded it, and copied its sweet sweet shape onto a sheet of newsprint and cut it out. If I couldn't have the box, I could at least try to replicate it. I practiced folding my cut-out to see if I could reproduce the original box. Happily, I could, hee hee! Goodbye soily spring roll box. Hello fresh and clean little template box!

Yes. My relationship with garbage resides on that line between cunning and cuckoo. I know it. You know it. Let us accept it, embrace it, and move on.

In today's tutorial, I will show you how I made my new-fangled version of the box. I discovered in my exploration, that in a snap you can make your box easily reversible, very strong and long-lasting. How you ask? Well, let me show you. Step into my office, and we will begin!


Tutorial: Reversible Fabric Gift Box

You will need:
  • 2 roughly 14" x 18" scraps of fabric in whatever colours you desire
  • 1 roughly 14" x 18" scrap of fabric to place between the other 2 pieces (You may want to use interfacing instead. I didn't have any interfacing so I just used a piece of white cotton.)
  • the box template which is provided here
  • 4 pretty brads
  • pair of scissors
  • tool for poking holes (I used a tiny screwdriver)
  • sewing machine with darning foot
  • Mod Podge
  • paintbrush
  • ribbon and embellishments
1. Photo 1 shows you what the box will look like in the end. Pretty!
2. Blow up this template to twice its size. Cut it out. Create a sandwich with your 3 fabric pieces with top and bottom pieces having good sides out. Ensure that the fabric sandwich is somewhat larger than your template.
3. Using your sewing machine and darning foot, free-motion quilt a stipple pattern on your sandwich. Once your sandwich is quilted, cut-out the template shape.
4. Notice that I added a line of stitching 1/4" from the edge for extra strength. You may want to zigzag the edge or finish it in some other way. I chose to leave it raw.


5. Because I didn't use interfacing, I decided to spread Mod Podge over both the top and bottom fabric layers. I mod-podged one side, let it dry, and then mod-podged the other side.
6. Once dry, the Mod Podge gives the fabric some rigidity.
7. Fold the fabric along all fold lines, according to the template.
8. Next bring two of the corners (see photo#3) up toward each other, and grab the little wedge section (see photo#3) that joins them between your fingers as in #8.


9. Fold that wedge section flat against the long side of the box.
10. Poke a hole through the wedge and through all layers. I used a tiny screw-driver as a hole-poker.
11. Now insert a brad through all layers.
12. At this point, you will see the brad end inside the box.


13. Fold down the little arms of the brad.
14. Repeat steps 8 through 13 to form all sides of the box.
15. Fold down the small top flaps of the box, followed by the large flaps.
16. And finally insert the curvy end of one large flap into the slit in the other large flap.

And that's it! You have a lovely, quilted, strong, long-lasting and reversible fabric box that renders gift wrap redundant. And you made it, yippee!


Place your gift inside, attach a ribbon and maybe an egg carton flower, and you're off to bring joy into someone's little world!


Now this box has at least two personalities. I've devised a catchy little phrase to help you find them. It goes:

Unfold it, reverse it, refold it, behold it!

And there you have it: a whole different gift box! It couldn't be easier, could it?


This is just the little project on which to practice your free-motion quilting. Make a few and you'll soon be ready to tackle more substantial free-motion jobs. That's MY plan anyway!


Now please do have yourself a lovely evening, and I'll see you again soon!


LinkWithin

Related Posts Plugin for WordPress, Blogger...