Showing posts with label guest-post. Show all posts

Thursday, April 18, 2013

You Guest It: Artist in LA LA Land

On the 1st and 3rd Thursdays of each month here on Michele Made Me, I step aside and let some other crafty soul take care of things. Today I'm so happy to have the gifted Melissa of Artist in LA LA Land guest-post. Have you ever met her? Well now's your chance, eh? Please make her feel at home!

***

First of all, I wanted to thank Michele for this opportunity to do a DIY tutorial on her wonderful craft blog.  I've been following it for over a year and have shared all the DIY fun, joy and tears with her and all you blog readers.  It's a real honor to be here with you.


Today, I'm going to take you through the process to make a Springtime Bird Fold Out Wing Card. I've created different versions of this clever card (which is also an articulated paper doll) for my online shop and blog, Artist in LA LA Land. But I designed these ones special for you and they are made completely out of recycled paper and junk mail.

DIY Bird Fold Out Wing Cards by Artist in LA LA Land

Here are the supplies you'll need to get going on the Fold Out Wing Bird Cards:
  • thin cardboard (the kind used for cereal boxes, tissus boxes and packs of soda or beer.) 
  • glue 
  • pencil 
  • paper fasteners 
  • self-healing mat or a thick surface you can cut on (like thick cardboard or an big old book. 
  • scissors and craft knife (exacto-blade) 
  • printable PDF I created for you at this link: Spring Birdie Fold Out Wing Card. It has the bird patterns and directions on it. 
  • junk mail, old catalogs, old calendar, etc. (recycled paper for decorating) 
Read all the directions and print out the PDF. You could easily make the Bird Fold Out Wing Card on your own after reading the PDF, but let's do it together here, just to be extra sure of how to do it. Cut out all the PDF pattern parts and trace them onto the thin cardboard. Cut out the cardboard parts.

I think the fun part starts after you've done this prep work. Now, you get to decorate all those cardboard parts with your recycled paper. Choose the papers you want and think about how the colors and patterns will work together or not. I think since you've created quilts and done crafts before, you'll be pretty good at this. I only used paper, but feel free to use washi tape, old ribbons, glitter, scraps of paper or whatever you have in your craft supplies at home.

Trace around the cardboard parts onto your chosen paper. Cut out the pieces from the recycled paper. Then glue the paper to the cardboard. Take your time and make something really special and pretty. Remember both sides of the wings will need to be decorated. The rest of the pieces of cardboard will only need one side decorated.

After decorating the bird, glue on the pocket as the directions say (add glue just around the bottom edge of the pocket and stick it to the bottom of the bird above the tail).

When all the decorating and gluing is finished, you'll want to assemble the bird with the paper fasteners as the directions say (the wings to the wing tabs and the head to the body). I make a tiny "x" with my exacto blade to make holes for the paper fasteners, but you may have a tiny whole punch or an awl to do this.

Then repeat the same process for the rest of the birds, little bird, heart and egg. The little bird, heart and egg carry your special message to your recipient. When making the little bird, keep in mind you'll want to write a message on his belly and/or wings, so don't decorate with paper that won't allow you to write a message upon it. For the hearts and eggs, your message will be written on the blank side of the cardboard. 

When you've finished your Fold Out Wing Bird Cards, tuck either the little bird, heart or egg in the pocket of the big bird. Then fold closed the wings and insert him in an envelope. It will fit in an 8.75" x 5.75" envelope. Your recipient will be thrilled to receive this very special and very clever bird card. 
 

Not only do these birds carry your special message, but they can also be played with. The wings fold in and out, but they also flap up and down. I think that makes them twice as fun. Use them for mother's day and father's day which are coming up. And why not for a birthday, to say I LOVE YOU or to your special pen pals! There's lots you can do with them.


I think these three birds tell a story too. First, there was love as you can see with the fold out heart card. Next, there was a union made as you can see with the egg card. And finally, they made a family as you can see with the little, baby bird card. Have fun celebrating the best moments of your life with these special Bird Fold Out Wing Cards.

Thank you again for having me here on one of my favorite craft blogs!

***
As you can see, Melissa is a uniquely talented paper artist. She is also a busy papier-maché sculptor, blogger and shop owner. If you visit her Artist in LA LA Land blog, you'll quickly come to realize just how prolific this young woman is, and how very open she is about her art-making process. I particularly enjoy seeing some of the custom orders she works on. For example, take a look at this one-of-a-kind custom squirrel wedding invitation she recently designed! Pretty amazing, eh? But that's just the tip of the iceberg... Here are a few more tasty links to get you started:

Thank you Melissa for your beautiful Bird Fold Out Wing Card guest-post. I'm so happy you could come and share your talent with us today. What a super way to start the day!

♥M

P.S. Have an idea for an eco-craft? Seeking a new audience? Consider submitting a guest-post idea to Michele Made Me's "You Guest It"! Check out the details HERE.

Thursday, April 4, 2013

You Guest It: A Happy Stitch


Every 1st and 3rd Thursday of each month I'm doing something new. It's a thing I'm calling "You Guest It" and it's where I let a guest do their crafty thing right here on Michele Made Me. Today I'm welcoming A Happy Stitch's Melissa Q! Oh look, she's starting...

***

Hello Michele Made Me friends! I'm so excited to be one of Michele's guests. I love Michele's blog... Her projects and her perspective are so inspiring and honest. I am just thrilled to be here.

I'm sharing how to make what I call the Super Scrappy Scarf but 'scarf' really doesn't scratch the surface of what this scrappy chain of knit fabrics can be. Intended to spark the imagination, the Super Scrappy Scarf is a great open-ended play-thing for little people and in our home it has been everything from pretend hair, a tail, 'water', a finish line and on and on... It's super!

So, let's get cracking on how to make it!

Thursday, March 21, 2013

You Guest It: Sun Porch Studio


On the 1st and 3rd Thursdays of each month, through a new feature I'm calling "You Guest It", I'm happily sharing this Michele Made Me space with a fellow creative. So if you don't mind, Mary Jo from the lovely and warm Sun Porch Studio will be handling things for today. Oh, here she is now... Welcome Mary Jo!

***

I have a difficult time wasting things. I consider something being wasted when I carelessly toss it away without taking into consideration what it may have become. Could there be another use for these corks that I pop out of my bottles of cabernet sauvignon? Do you ever save an abundance of something with the hopes of manifesting some creative potential? I have a strong desire to find a new life for the things that get tossed so frequently. Such as paper. How much paper to you drop into the receptacle each day? Oh my!

This is the story of how something as simple as tossed paper can be transformed into something beautiful and celebrated.


Thursday, March 7, 2013

You Guest It: Falafel and The Bee


But enough about me.

A little while ago I decided it was time to open up this blog and expose it to some fresh inspiration. To that end, on the 1st and 3rd Thursdays of each month, through a new feature I'm calling "You Guest It", I intend to let someone completely different take the reins for a change. Exciting, eh? Kicking the whole thing off today is Michelle - note the completely different spelling - who is the force behind Falafel and The Bee. Ready! Set! Go Michelle!

***

First, I would like to thank Michele for having me guest post today. Besides having a very cool name *grin*, she has a great blog with really fantastic ideas {as you all must know}. It is an honor to {virtually} be here today.

Today I am sharing a tutorial to make your own Reusable Produce Bags!

producefinishm


Tuesday, February 5, 2013

Be My Guest!


I'm so excited and I just can't hide it! Starting now, this blog is accepting submissions for guest-posts... Eep!

Seeing that this is an equal opportunity craft blog, submitted ideas can come in all shapes, sizes and types. As you may have surmised, I enjoy everything from paper crafts to sewing, quilting to the fiber arts, home decor to jewelry and well... just about anything as long as it's nifty and re-used! If you are a member of Michele Made Me and have a clever idea for a sweet and simple eco-craft tutorial that is your own work, well-written, and beautifully photographed, I want to help you share it with a wider audience.

If all goes as planned, guest-posts will appear on the 1st and 3rd Thursdays of each month as of March 2013.

Your initial email submission should contain the following:

  1. Your name and email address
  2. Your blog url
  3. A clear and concise explanation of your idea (3 to 5 sentences)
  4. One beautiful photo of your completed craft

If your initial idea is accepted, your completed guest-post should include:

  1. Clear and beautiful photography throughout.
  2. Clear and concise explanations.
  3. At least one gorgeous photo of the finished project.
  4. A short bio telling the reader who you are and why you create things.
  5. Links to your blog and shop (if you have one).
  6. Links to your 2 favourite blog posts to be used by me in a short introduction to YOU!
It should be stressed here that not all submissions will be accepted. As the owner of this blog, I reserve the right to choose what I feel best fits this space.


Email your submission to:

michelemademe AT gmail DOT com  →  subject line "Craft Submission"


I can't wait to hear from you! 

♥M


P. S. Here are a few resources to help make your guest-post extra-sparkly!

Writing a Great Tutorial

Edited to Add: P.P.S. Yippee! The Boy's new bedroom is featured HERE on Apartment Therapy today. Thanks Dabney for the invitation and lovely write-up! 


Thursday, January 12, 2012

Exploring Loop Closures


Today's post originally appeared in November 2011 at Pickup Some Creativity as part of Chris's immensely practical Sewing 101 series. I'm re-posting it here now. Here we go...

loop and button closure 3

I've decided to tackle this post from the point of view of a learner because, to be honest, that's what I'm doing. I'm sitting at the front of the class doing these things for the first time, fumbling about, and figuring them out as I go. As a result, I will be sending you hither and thither to a few really great tutorials.

Are you ready? Let's learn something!

So for my part, I've chosen to explore the "ins and outs" of the loop closure as an alternative to buttons and button holes, snaps, and other closures, so that we might add it to our bag of sewing tricks. The loop closure is simple. Essentially, it's made up of two elements: 1) the loop, and 2) what I'm going to call "the anchor". See? I'm making stuff up already... As part of my learning, I decided to try my hand at a few loop closure variations.

Variation #1: Fabric Loop + Button

First, I visited The Sewing Diva. Her button loop tutorial showed me how to make the most basic button loop closure. The process photos I include below are only to prove that I actually tried doing it for real. The Sewing Diva will show you the way.

Just let me add two small recommendations to the info The Sewing Diva provides: 1) to get the perfect button placement once you've sewn in the loops, mark the button locations through the loops and stitch the buttons in place. And 2) to make the loops themselves, make tiny fabric tubes using the highly recommended "Turning Tubes of Fabric" trick from Pattern Review and go from there.


I will say this for the basic button loop. Of the variations I tried, this is by far my favourite. Once you've learned the trick to lining everything up properly, it is quite simple and the results are so pretty. Not only that, but it won't take long to perfect. The following result was my very first attempt. Not too bad eh? Only a little bit off. I still think it looks pretty.


Variation #2: Fabric Loops + Tie

Next, using the very same method as in #1, I decided to try putting a series of loops on either side of an opening, and have it lace up like a pair of shoes. You've no doubt seen this concept on vests and dresses to allow for growth or cinching. But I could imagine using this variation as a small-scale decorative element on the flap of a messenger bag maybe, or on the back pockets of girl's pants even. Wouldn't that be cute?


Again in variation 2, I used the handy "Turning Tubes of Fabric" trick from Pattern Review to make the loop fabric.

Variation #3: Stretchy Loop + Decoration

Elastic hair ties make great stretchy loops. For my third loop closure variation, I started by making a felt swirly flower. Dozi Design shows you how to make swirly flowers here. I made my flower out of felt instead of paper, secured it with several stitches, stitched on some leaves, and paired my flower with an elastic loop for a sweet decorative closure. I used the very same method presented in #1 and #2 for installing the loop.


The possible uses for this closure are many and varied. Think belts, bracelets, needle cases, journal covers, bags and more. The stretchiness of the loop allows for firm closure and permits the use of bigger and odd-shaped anchors. For example, instead of a flower, why not use something else entirely? Like a painted wooden cutout or a crocheted bobble? Just make sure your loop is long enough to stretch around your chosen anchor.


Variation #4: Chinese Frog and Knot

Before writing this post, I had seen "frogs and knots" on oriental dresses and silk bags. You can purchase these closures ready-made in sewing shops and online. But guess what? You can actually make your own too! Bridges on the Body has a beautiful Chinese frog and knot closure tutorial that will allow you to make your very own closures to match your particular project.


Truthfully, it took me many many - probably about 15 to 20 (I stopped counting after awhile...) - tries before I got these to look anywhere near authentic. But to be fair, I was using the wrong type of cord at first: a small crocheted chain that I'd made. Bad idea.


To be successful, you need the type of cord with a high coefficient of loopiness. In other words, it's gotta hold its loopy shape and resist flopping and folding. Once I figured that out, the frogs were much easier to make. Also, after so many tries, the method is etched forever in my little brain. But it is an elegant process once you know it. I'm very glad I learned it!


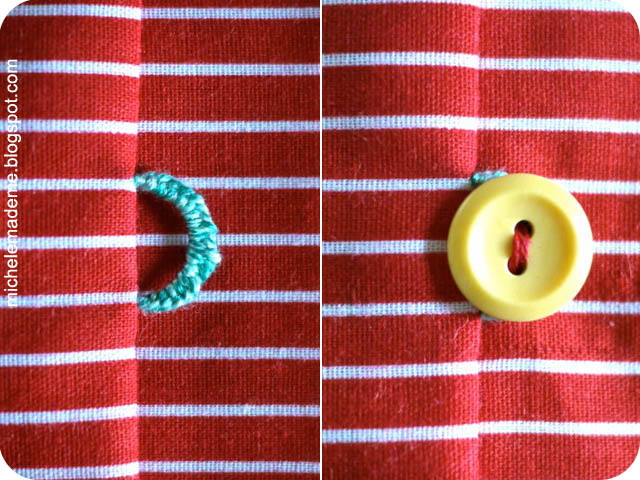
Variation #5: Emboidered Loop + Button

And finally, the fifth variation that I attempted was this embroidered loop. I learned how to make it from Ysolda.


Ysolda's button loop tutorial perfectly explains the easy steps to create this simple embroidered loop. It seems to me this variation would be perfect for a small subtle closure, one that you hope won't be too obvious.


And there you have it: my round-up of five loopy closures. Hopefully you will find it useful or, at the very least, feel encouraged to learn about a different closure! I certainly did. I'm sure whole new neural pathways have formed in my brain as a consequence too. And it didn't even hurt. Yay!

Okay that's the post. Thanks for reading. I'll be back here on Saturday!

♥M

Monday, November 14, 2011

Just a Little Something I "Whipped Up".


You've no doubt heard of Whip Up, website of the unstoppable craft entrepreneur and author Kathreen Ricketson. Well, today you will find me guest-posting over there with a fair and festive recycled project. Curious? Well, dagnabbit, go on over and have a look-see. Click HERE to check it out!

Oh, and speaking of Ms. Ricketson, be sure to check out Sister Diane's thorough review of Kathreen's latest book, "Little Bits Quilting Bee" right HERE.
I'll be back tomorrow. ♥M

Monday, September 5, 2011

Drop-Dead Denim Guest: Mich L. in L.A.


Happy Monday!

As you know, September is all about remaking old jeans into new denim loveliness. For today I'd like you to welcome my first guest-poster EVER, a sweet and amazingly creative friend of mine. Let's see what kind of Drop-Dead Denim she's dreamed up... Take it away, Michelle!


Hi there, friends of Michele Made Me! I am SUCH a fan of this gorgeous blog, and extra excited to be here with a denim project! My name is Michelle L. and I write about upcycled jewelry over at Mich L. in L.A.

I don't often try my hand at decor, but here's a quick and funny NO SEW denim project for your home. Do you like any of the following? Faded blue jeans, tomboy style, rustic, farmhouse, shabby chic? Then take a gander at this:


Or this:


Or this:


No-sew blue jean lampshades! Here's the ridiculously easy DIY.

Step one: cut the bottoms off some jean legs.


(I love old work jeans after my husband works them to death - so much character! But yours don't have to be this beat up. Any jeans will do.)

Step two: stuff a mini lampshade inside a jean leg.


Depending on the relative sizes of leg and shade, it may require some tugging and grunting to get the shade all the way in.


Note: if you use boot cut or flared jeans, it will be easier and you will have more of a bell shape.

Step three: spend a moment dorking around with any available pets or children.


(The Sorting Hat put him in Hufflepuff. But he was hoping for Ravenclaw, waaah!)


Step four: trim the jean leg to about an inch above the lampshade.


Step five: secure and embellish with something cute! The quickest: a simple ribbon tie.


You're finished! Jean leg lampshades, for sconces, little table lamps or even a chandelier.


But a ribbon is just a starting point. This is where you play and become giddy. Add stuff! Try stuff! Trims, notions, yarn, pom poms, fringe! As we all know, a comfortable old pair of jeans goes with anything.

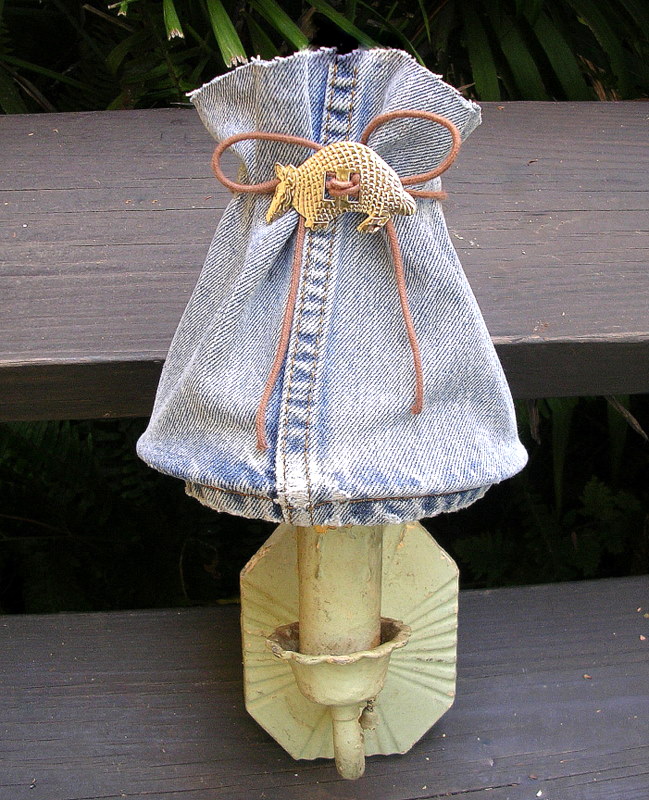
How about a cute concho ornament, for a boy's room?


I added crystals to this one, for a girly tomboy's bedside lamp:


So rack your brain and rummage your junk drawers, and add your own personal style to the basic look. It's super duper easy, and a great denim upcycle.

Hope you enjoyed this shabby sweet home decor project. Thanks for having me over for your marvelous month of denim, Michele! So. Much. Fun.


Is home decor supposed to be such a blast? 'Cause jeepers, that was so much fun! What a cute project (and PUPPY!) with so many possibilities, don't you think? Thank you so much Michelle for the play date today. I sure hope you'll come again!


Oh yes, and today I'm Diggin' This Denim: Art by Ludingirra


Now YOU have a great day! Wednesday's post belongs to another dear and supremely talented friend of mine, Amy from During Quiet Time. I'll see you then!

LinkWithin

Related Posts Plugin for WordPress, Blogger...