Showing posts with label storage. Show all posts

Tuesday, November 15, 2011

Reader Question: Nesquik Can Ideas


 Multi-layered, rotatable Nesquik can inspired by MeiJo's Joy

A question showed up in my inbox recently. It went something like this:

SA: I have a question... Do you have any ideas for the Nesquik can?

Ah yes, the Nesquik Can... So useful and quite impossible to relegate to garbage-dom. Good question SA!

Well... to start, here's a swell collection of possibilities from the craftosphere:

1. Candy Totes @ Craft
2. A Little Tin of Shamrocks @ You Are My Fave
3. Organizer @ Chrystal's Corner
4. Vintage Holders @ Parsimonia
5. Tin Can Pincushion @ Living With Punks
6. Idea Board w/ Cans @ I Didn't Sign Up For This
7. Soup Can Organizer from HGTV@ Craft
8. Can Cover @ Elsie Marley

But I also found this super-cool Rotatable Layered Storage Box tutorial by MeiJo's Joy so I decided to try it out on my one and only Nesquik can. My results:


Thanks so much for the great tutorial MeiJo. It totally works. Absolutely rotatable AND layered! I mod podged the outside of the can with a page from an old space calendar; the top part innards I podged with some old tissue paper.  I also couldn't help but slap an egg carton flower on top there to jazz it up. Just have to decide what to store inside. Maybe it could become someone's fancy two-part Christmas wrapping, eh, with candies on top and chocolates in the bottom? Or love notes in the bottom and a beautiful trinket on top?

So I'm curious... Put on that thinking cap of yours and let me ask you this. What would you create from a lovely Nesquik can?

Wednesday, October 12, 2011

O is for Organization.


Remember last week's recyclables post? That was me starting to organize my mounds of junk, attempting to bring some order to my workspace. I'm hoping to eventually come to a point where I can share my basement craft zone with you. Note the use of the word "eventually"... Let me just say this. I spend my days somewhere between clutter and chaos. The whole order thing is a teensy bit of a struggle. I'm forever making. Cleaning rarely comes into it. But I'm trying to change that. Here are my baby steps...

Buttons. IN JARS. With letters on them. That spell B-U-T-T-O-N-S... The buttons used to be in a bunch of different places. I couldn't see them and never used them because I didn't ever think of them. Now they are in plain sight on my work table, and I have actually used them on a few projects. Exciting stuff!

Yes, so I just threw the buttons in some canning jars we had kicking around, covered the tops with junkmail pictures, and topped them off with some letters I cut out.


Next, I organized what used to be a literal rat's nest of embroidery thread in a painted egg carton. This way it's no longer a mess of knots, I can see all the pretty threads, and all the similar colours are together. It's only about a million times better this way.


Just a few little steps toward the workspace sanity I long for... but the progress is actually satisfying, you know?

Well, you have a lovely day now. I'll be back here on Friday!

Sunday, September 25, 2011

Drop-Dead Denim Guest: Krista from Poppyprint


Today is Sunday and I am breaking my own rule about not posting on the weekend! And the reason I am breaking my own rule is that I could not possibly fit all the September denim goodness into my regular 3 day/week schedule. So my cup runneth over with the following joy-of-a-post from my sweet and talented friend Krista of Poppyprint. Haven't heard of her? That ends here. And fair warning: you will be hooked. Not saying another word.

***

Thanks for having me here in this auspicious corner of blogland, Michele! Every visit to Michele Made Me is an inspiring adventure in clever crafting and writing - I'm so happy to be here.

I didn't think I had an upcycled denim idea in me, but then I found an old jean skirt in my closet a few weeks ago and a lightbulb instantly went off! The back of this straight, ankle-length skirt (read: LOTS of uninterrupted great denim to work with) featured two square pockets that I figured would be entirely useful. For holding my day to day sewing tools.

It all starts here
Before - you've served your original purpose with aplomb, but it's time for a makeover

Denim Sewing Control Centre!
After - look at you now!

That's right, today we're going to make the Upcycled Jean Skirt Sewing Command Centre! Or, if you prefer: a little quilted placemat thingy to put under your sewing machine that has pockets that hang down over your lap, conveniently holding all of your sewing essentials right at your fingertips. I will use this project under my Featherweight machine. My UJSSCC measures 16"W x 17"L.

This tutorial (and I) assume that you have some basic sewing/quilting knowledge. You can always email me with any questions, but I don't want this to become World's Longest Guest Post because Michele might never invite me back {eta: okay, this is officially the World's Longest Guest Post}.

SUPPLIES
  • 1 long denim skirt
  • 1/2m cotton fabric for backing
  • approximately 2 m of double-fold quilt binding (this is a 2 1/4" strip of fabric, folded in half wrong sides along the length) OR one package of double-fold bias tape.
  • batting scrap approx. 22" x 12"
  • rotary cutting equipment and shears
  • sewing machine, jeans/denim needle for your machine & walking foot if you've got one
  • coordinating thread (I use Mettler quilting weight cotton in colour #830 to hem all my jeans as it seems to be a close match to the standard yellowish jean thread.)
  • ruler, fabric marking pen, safety pins, straight pins
First thing's first. Let's cut up that skirt! Open up the side seams and make a horizontal cut across the back panel at least 1" below the bottom of the pockets. Retain the top hem or waistband (unless the pockets are more than 3" below the waist, in which case you may want to cut a second line about 1" above the top of the pockets, too). Trim sides perpendicular to the bottom/top edges you just cut to form a rectangle with at least 1" of fabric on the left and right of the outer pocket edges.

Denim Sewing Centre tutorial


Now grab all of your sewing essentials and place them in the pockets. Draw vertical lines where you'd like to sew narrow slots for your tools like seam ripper, marking pen, hera marker, ruler, turning tool...etc. I also sewed a horizontal line across one slot so my scissors wouldn't disappear too deep into the pocket. Sew along your marked lines backstitching at the top and bottom of the pocket to secure.

Denim Sewing Centre tutorial

Denim Sewing Centre tutorial

For extra funky factor, sew a strip of binding across the top of your pocket panel with a 1/4" seam allowance, matching raw edges of binding with top edge of panel. Leave about 1" of extra binding hanging off the ends.

Denim Sewing Centre tutorial

Press the folded binding edge up and over to the back of the panel. Pin in place. Stitch in the ditch along the seam of the binding/panel to secure the binding to the back.

Denim Sewing Centre tutorial

Your pocket panel is complete! Now, we're going to make the small quilt that you'll attach this pocket to.

Ultimately, your quilt will be the same width as your pocket panel, but for now, you want a little wiggle room because things can get a bit distorted with quilting. Measure your Pocket Panel width (PW) and add 1". Now, measure the Depth of your sewing Machine (DM), add the distance you like to have between the front edge of your machine and the edge of your table (TD for Table Distance), add the height of your pocket panel (PH) and add another 3" for wiggle room. Your quilt will be:

(PW + 1" ) X (DM + TD + PH + 3")

Cut a piece of denim from the front skirt panel to this size. Cut a piece of cotton to the same size. Cut a piece of batting that is (PW + 1") X (DM + TD + 3"). You don't want batting behind your pocket panel. You want the batting to end at the edge of your table, so the pocket hangs neatly down over the edge of your table.

Working on the right side of your denim quilt top, lay the batting on top, matching one long edge. Mark a horizontal line on the denim along the edge of the batting (so this line will be DM + TD + 3" down from the top of your quilt). Take the batting away and mark parallel lines 1" apart from the first line, all the way to the top of the denim piece. In other words, you are only going to mark lines where there will be batting under the denim (roughly the top half of the quilt).

Denim Sewing Centre tutorial

Making your quilt sandwich. Layer as follows, from the bottom up, aligning the top edges. Cotton fabric wrong side up, batting, denim right side up. Pin baste through all 3 layers. Here's what mine looked like at this point (notice there are only faint lines drawn on about 1/2 of the denim quilt top).

Denim Sewing Centre tutorial

With a slightly longer stitch length (I used 3.5) sew along the marked lines through all three layers using a walking foot. When those lines are complete, baste all around the outside edge of the quilt sandwich with a 1/4" seam allowance.

Denim Sewing Centre tutorial

You're almost there! Now you need to trim your quilt to it's finished size. Trim the edges so that they line up perfectly with the width of your pocket panel. Pin your pocket panel to the bottom 1/2 of your quilt, aligning the sides and bottom raw edges. Hang the pocket off your table edge and place your machine on top of the quilt as you'd like it to be when you would sew. Determine if you want to trim any of the quilt top off (is the quilt taking up too much table space behind your machine? If so, trim it down to where you'd like it).

Denim Sewing Centre tutorial

Baste your pocket to the quilt. Sew a vertical line up the middle of the pocket panel, forming two large pockets. I did this so the panel wouldn't gape open. These two pockets will be great as a thread catcher, or to hold your cell phone. Note that I didn't stitch through that decorative horizontal 'belt loop thingy' - I figured I could hook a pen or my seam ripper in there.

Denim Sewing Centre tutorial

Starting in the middle of the top edge of your quilt, bind your Control Centre as you would a quilt, mitering the corners. If this concept is new to you, there are a gazillion binding tutorials online. I happen to like this one and this one for their clarity. I like to fold my binding to the back and attach by machine stitching in the ditch (like we did on the top edge of the pocket).

Denim Sewing Centre tutorial Denim Sewing Centre tutorial

Ok, this might very well be the longest post I've ever written. This is really a fairly simple sewing project except for the binding if you've never done that before. Of course, you can make a Sewing Command Centre out of just about any type of fabric. Corduroy would be fun, but a major lint magnet. Ditto velour. I think sticking with cotton would be best. Here are some action shots, demonstrating the handy usefulness of the UJSSCC:

Denim Sewing Control Centre! Denim Sewing Control Centre!
NOTE: If you find your machine is too slidey on the table now that it's sitting on it's very own quilt, you can cut a hunk of non-skid kitchen drawer liner to put under the UJSSCC, or hand tack a rectangle of rubber-dot slipper fabric to the bottom (available at Jo Ann or Fabricland).

If you make your very own, please share in the Drop Dead Denim Flickr Group and I'd love to see it in the Poppyprint Project Group as well!

Edited to add by Michele: Please visit Krista at Poppyprint anytime for her gorgeous quilting and crafting projects, her beautiful writing, and her laugh-out-loud sense of humour.


Okay, just a few more words... Krista!!! You have a knack for making beautiful AND useful things. I could seriously use one of these UJKLMNOP's (okay... I admit I don't actually remember the actual acronym...) for under my sewing machine, notorious misplacer-of-things that I am. Now that we have this extremely well-documented step-by-step, that should NOT be a problem. Thank you so much for putting this baby together. It, like its creator, is most excellent!

For today I'm Diggin' This Denim: Denim Boots by Leila Lamon and Stephan Bruce

Have a fine day! Tomorrow (that's Monday) there's a...

GIVEAWAY!!!


Monday, September 19, 2011

Drop-Dead Denim Guest: Gwen From Gwenny Penny


Week 3 of our little denim experiment appears to be upon us. Stunning how quickly time is buzzing by us. Luckily, my friend is here to help us appreciate what time we have left. Her name is Gwen and, well, I think I'll let her handle things from here...


Hey, everybody! I’m Gwen, and I blog over at Gwenny Penny. I'm so flattered that Michele asked me to be a part of her clever Drop-Dead Denim event. I love to sew, but I had never sewn with denim until Michele presented me with this challenge. I bought myself a needle made specifically for sewing denim, and you know what? It wasn't bad at all! Today I'm going to show you how to make a denim round-bottom clothespin bag like this...


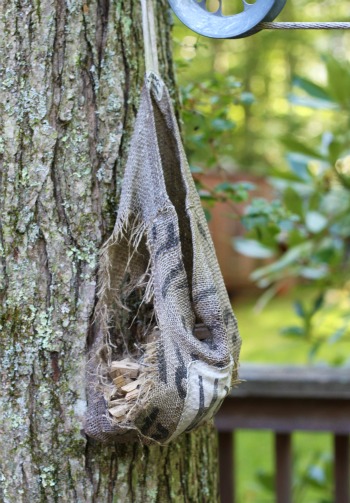
Isn't it cute? It's really simple, too. Let me start with a little story about how this came about. A couple of years ago I bought an adorable burlap clothespin bag. It hung on a hook on a tree by our clothesline, and it looked fantastic. Over time, the evil squirrels that are slowly taking over our yard destroyed this cute little clothespin bag. And all that was left was this...


It was in sad shape. I'm not even sure how the clothespins were still staying in the bag.


I decided it was high time I made a new clothespin holder, and I'm hoping the denim will hold up to the squirrels better than the burlap did.

OK, enough about my clothespin bag troubles. Want to make one? Here's the how-to...

Materials:
  • 1 old pair of jeans
  • a few scraps of fabric
  • paper-backed fusible web (I used Wonder Under.)
  • seam ripper
  • ruler
  • scissors
  • thread
  • pen
  • iron
Instructions:

Step 1: You are going to use a pant leg from your jeans to create your bag. Lay out your pair of jeans and cut one pant leg 10.5" from the hem.


Take this piece and measure the width of the leg across the end where you just cut. Write this down... you'll need it in a few minutes.


Going back to your pair of jeans, with your jeans laying front side down, cut right up the seam of the pant leg to get to the widest area of the leg. Cut across under the pocket to open up the fabric.


Step 2: Now you will need your pant leg width measurement from Step 1. You need to determine what size circle to cut for the bottom of your bag. This can be done using the equation for circumference, C=(Pi)d, where we are looking for the diameter, d. If you are afraid of math... don't freak out! I'm a former math teacher; I'll walk you through it. You want to know what diameter to use, so take your measurement, multiple it by 2, and divide that by 3.14. That will give you the correct diameter for cutting your circle. For example, my width measurement was 9.25". I multiplied that by 2 to get 18.5". I then divided that by 3.14 to get 5.89". I rounded that up to 6".

Next, I took the very scientific approach of measuring every bowl I own to find one that is 6" in diameter. I traced that onto my opened up pant leg, then cut out my circle.


Step 3: Cut out one of the pockets on the back side of the jeans. Cut as close to the edges of the pocket as possible.


Cut off the back of the pocket. Cut as close to the seam as possible.


Step 4: Time to decorate the pocket. The possibilities are endless, but here's what I did... I took four scraps of fabric and some paper-backed fusible web. I ironed the fusible web onto the back of my scraps, following the manufacturer's directions. I then cut hexagons from each of the scraps (I used my AccuQuilt GO! Baby fabric cutter, but you can use any type of die cutter or trace a template onto the fabric and cut the shapes by hand). I removed the paper from the back of my hexagons, arranged them on the pocket, and ironed them in place. Finally, I sewed around each hexagon, about 1/8" inside the edges. Cute, huh?


Step 5: Lay out your pant leg piece from Step 1 with the original hem of the jeans at the top (You'll be tempted to turn it around so the hem is at the bottom... don't). Position your pocket in the center on one side of the pant leg and pin in place.


Sew around the edges of the pocket, leaving the top open.


I use the front pocket to hold my clothesline spreaders (those things that keep the top and bottom of the clothesline from spreading too far apart when the clothes are hanging on the line). Hopefully it will not become a storage unit for a squirrel's winter supply of nuts and acorns.

Step 6: Turn your pant leg inside out. Take your circle from Step 2 and mark every quarter with a pin. To do this, fold the circle in half vertically and place pins at each fold. Open the circle and fold in half horizontally. Place pins at each fold. Do the same around the raw edges of your pant leg... place a pin at each seam and pins on both sides halfway between the seams.


Match up the pins on your circle with the pins on your pant leg. Pin the two with right sides together at the four places where your pins meet up at each quarter.


Add additional pins all around the edges, and sew around the edge using a 3/8" seam allowance.


Your basic bucket shape is complete! This is what you should have at this point...


Step 7: Now you need some way to hang your clothespin bag. Using a seam ripper, remove two belt loops from your jeans.


Loop one of the belt loops around and pin it to the inside of the back of the bag in the center, right at the top.


Loop the other belt loop around and pin it to the inside of the front of the bag in the center, right at the top. I added this loop to keep the bag closed when I'm not using it (and to discourage unwanted visitors from sleeping in it :). When I want clothespins, I just need to remove the front loop from the hook in order to get into the bag.

Sew back and forth over both belt loops to secure. And guess what? You're done!


I hope you'll come visit soon over at Gwenny Penny. I would love to have you stop by. Thanks so much for having me here today, Michele! Wish me luck with the squirrels :)


Um, don't tell Gwen I said this but, honestly if I were a squirrel, I'd move all my nuts lickety-split to that clothespin bag, settle in with the wife and kids, and never leave. That is one sweet bucket of a clothespin bag! I'm impressed at Gwen's use of all the different jean parts, and how she works that π (3.14) like there's no tomorrow. She is one smart cookie, eh?

Thanks so much for playing along Gwen. It was an honour having you and I hope we'll work together again very soon!

Okay. For today I'm Diggin' This Denim: Denim Chair by Scrap Lab

You have yourself a fabulous Monday now. Chris from Pickup Some Creativity will be having a go at the denim on Wednesday. And me? Well I'll see you then!

Wednesday, March 9, 2011

Make It Good with Ariane's Crafts


A wonderful Wednesday to you!


I am thrilled to be doing another Make It Good Challenge today. Do you know how much I love these little one-on-one challenges? There's just something about them: the forcible garbage recycling, the white-knuckle intensity of one crafter versus another, the perpetual passing of the torch, the rules as set by your previous victim who, obviously, is stickin' it to you. It's good times, eh? Find out more about "making it good" by clicking the button below.

PeachesMakeitgood

The opposition today comes in the guise of my little sister, Ariane, who blogs over at Ariane's Crafts! I'd been thinking of inviting her to "make it good" for a little while. I figured a smattering of recycling rivalry between two sly sisters couldn't hurt. I wasn't sure she'd accept because she's a quilter after all. She has made entire quilts by hand. Like, every-single-stitch-hand-stitched-with-only-a-needle-and-thread by hand. Amazing? YES! She's such a talented girl with potential far beyond the quilt. So I thought, what the heck, it doesn't hurt to ask, right? Lucky for me, she said yes! Woo wee! And because the challenge culminates in a gift exchange, the timing couldn't be more perfect. You see, we're both March babies. So after the challenge, we swap gifts, and that takes care of that for another year. It's almost like I planned it that way or something, hee hee.


Now here is today's challenge as set by the effervescent Mich L in L.A., my previous opponent.

The Challenge Material: Paper- or foil-based liquid containers (no glass or plastic)
The Challenge Rule: Make something inspired by the human hand.

So your job now is to check out what Ariane made, check out what I made, and you're good to go. No winners, no losers, just shiny happy people holding hands, that's right.

Let's see what's what, shall we?

TO SEE WHAT ARIANE MADE {CLICK HERE}
TO SEE WHAT MICHELE MADE {KEEP READING}

Well, I chose a milk carton as the basic ingredient for my craft. I also threw in a generous amount of cereal box, a ke-niggle of ripened tissue paper, a wee bit of construction paper, a scrap of fabric, a twinkling of metallic paint, a pinch of the Podge, and a sliver of silver thread for good measure.


I threw it all together, mashed the lot of it up, and out came this. It is a HAND-bag.


Or a HAND-basket.

The HAND-le is two bits of cereal box sandwiched together and attached with nuts and bolts.

Ain't it HAND-some? The innards are lined with a scrap of cotton from my woefully neglected fabric stash.

It is embellished with a waving pink HAND-plant, some cereal box rivets attached with silver string, and finished in metallic paint.


Can you HAND-le it?

Happy birthday to you little sister! Enjoy your new HAND-bag, and use it in the best of health!

Now off I go to visit my rival's wondrous work. Are you coming with? It's not far... Oh, here it is right here! How HAND-y, tee-hee...


Your work here is done. Have yourself a great day, and I'll see you imminently!

P.S. For interest's sake here is a previous milk carton tote I made.
P.S.S. I'll be linking here!

LinkWithin

Related Posts Plugin for WordPress, Blogger...