Showing posts with label wood crafts. Show all posts

Thursday, February 4, 2016

Hurray for Hearts!


Over the past few years, I have concocted quite an assortment of heart-themed things, it's true. So I thought it might be fun to hop into our virtual time-machine and see what sorts of Valentiny treasures we could dig up on the old blog, eh? Here are some of them:

In the left-hand column, we have the sunkissed heart wreath (tutorial included), the tissue box valentines (tutorial included) and the quilted heart rug. In the right-hand column, we have the tissue box photo hearts (tutorial included), the crazy heart cushion and the twig and cereal box heart (tutorial included). And finally at the bottom, we have the fabric heart garland!

It's neat seeing them together in one fell swoop. (That's a whole lot of hearts there Michele.) Kind of puts me in the heart-making mood though, eh? How 'bout you?

♥M

Monday, September 16, 2013

Shelfish

Tell me if this storage concept makes sense to you. Store your stuff on one layer. That way you'll be able to see every bit of it. And if you can see your stuff, then you might actually use it! I don't know about you but it resonates with me so I'll be trying it in practice whenever possible.

I recently made two pink shallow wooden shelves keeping this concept in mind. Oh, how pleasing to see my supplies arranged so prettily and so closely to hand. 

I made a third wooden storage thingy too. This one is more of a drawer. It sits atop a rolley crate that makes its home under my work table. My Lo made the crate several years ago. I made the drawer to exactly fit his crate and to hold my array of pencils, scissors and paint brushes. When I need something, I just pull out the rolley crate and BEHOLD... there they all are! 

Each of these three pieces is essentially a wooden ladder backed with a piece of plywood. Totally make-able if you can get your hands of some wood, a saw, a hammer and nails. I used the simplest of joinery, the butt joint, connected with gobs of glue and nails, to make mine. 

And speaking of butt joints, I better get off mine and get back to work, eh? Today there's sewing on the agenda. More on that later this week...

♥M

Thursday, February 7, 2013

Twig and Cereal Box Heart


This twig heart has been quietly calling my name, wanting to get made for a very long time. Does this happen to you? I bet it does... You see something beautiful that someone somewhere has made, and then begins a whisper deep inside your brain which thereafter endlessly intones: "Michele make me... Michele make me... Michele make me..." until, one day you must inevitably give in. That's what happened with me and this little twig heart o' mine. It was inspired by the beautiful, the wondrous, the plentiful twig hearts that beat in the world.

Here is how I made it!

Tutorial ♡ {Double-Sided} Twig and Cereal Box Heart

You will need:
  • A cereal box
  • Twigs (I used the small end-twigs from my 2012 Christmas tree)
  • A pair of scissors or utility knife
  • A pencil and eraser
  • White glue
  • Glue gun with glue sticks
Step 1: Open and flatten a cereal box. With a pencil, draw a narrow heart outline (as shown below) on one of the cereal box sides. I traced mine in marker to make it visible in the photo but you don't have to.
Step 2: Cut out the outline. I used a utility knife to cut mine out because I wanted to use the central heart later.
Step 3: Glue this heart outline to the printed side of the remaining side of the cereal box. Once again, cut the heart out with a utility knife. This will yield a thick and sturdy (and neutral-coloured on both sides) hearty outline on which to build your twig heart.
Step 4: Gather your cereal box heart outline, small twigs, and your glue gun.
Step 5: Now, the fun part! Begin glueing twigs across the void in the heart, until the void contains as many twigs as seems pleasant to your eye. Once this is done, you will fill in the perimeter (or edges) of the heart with twigs to hide the cardboard. You will need twigs of all different sizes for this last step.


And now hang it up, sit back, and admire!


Oh, and to prove that it is in fact double-sided, here's a pic of the back. Yep, still pretty! I may even prefer it this way...


Sometimes giving in to the voices is not a bad idea.

♥M

You can unearth whole thickets of glorious twig hearts on the interwebs if you look for about half a second. Here are a few that I'm personally smitten with:


Monday, January 21, 2013

The Boy's Bedroom Reno: Hardscape


Now that the painting is all put to bed, we've moved on to what I'm calling "the hardscape" of the Boy's room. In this category, I include things like shelves, bed frame, dresser, etc... anything that is physically hard. Like, if you hit your head on it, it hurts. I know this from personal painful experience.

So first off, I decided to put The Boy's aquarium on a different base.

A few years ago, my middle child Dia, brought the above nightstand home. It was being chucked by some neighbours and she decided to rescue it. At the time, there was a very heavy monster-drawer in the bottom space that made you break into a sweat every time you tried to open it. So I hoyked the darn thing out of there. The blue paint is original to the piece but I distressed it a little more and painted the inside bright white. This little nightstand had lived in the basement collecting dust since that fateful day. I noticed it down there a few days ago and thought it might serve well as a home for The Boy's happy fish.

Next, Lo cut and installed new wooden brackets for the shelves. If you recall, the old brackets were those cheap metal ones that attach to a set of metal rails. So glad to see them gone. They were ancient. The shelves themselves are the same shelves - try saying that 3 times fast! - but freshened with a coat of paint.

Lo - my personal hero - also built a custom desk for the closet space. Didn't he do a fine job? I gave it a few coats of maple stain and varathane. I just love how simple it is. In fact, I'm so happy with everything Lo's done in the room. It's super super duper!


The wooden bed, old brown dresser that Lo's great-grandpa made (seen here), and tall white cabinet behind the door will all remain as-is for now. I'm trying to keep this bedroom overhaul simple, you see. I may decide to paint the dresser eventually, but that's a job best done outside when the weather is somewhere above freezing, even if only slightly.

Still have to deal with cushions and bedding and such... Uh huh... That's the next post, okay?

♥M

Previous posts on The Boy's bedroom overhaul: here, here and here.

Sunday, July 22, 2012

Tower Crane Building with The Boy


The Boy found the children's book Make It Work! Building by Andrew Haslam at our local public library last week. When we got home, he sat drooling over all the projects and loudly pointing out his favourites. After some cajoling and batting of the eyes (his - not mine), he managed to convince me that model building was probably something WE should do together. So, we rather painstakingly, narrowed down his choices to one.


Over the ensuing week, we set to building the model tower crane depicted in the book.

It was not a quick project. We spent a few hours per day over several days gathering and purchasing all the necessary bits and bobs, rummaging through my stash for things we could use, measuring and cutting all the component pieces, sanding, joining, and of course, waiting for glue to dry. A few times The Boy's interest was tested but, with a little cajoling of my own, we got it done.

In a few instances, we strayed from the plans. For example, instead of creating joints using the suggested hot glue gun (which I happily avoid anyways), we created them using carpenter's glue and little triangles of newsprint. And instead of making the boom in two large pieces and then glueing these two pieces together as shown in the book, we made one large boom all at once. We did the same for the tower.


I was also happy to find a use for a few odds and ends from my recyclable stash too. You know those little plastic hooks that come with store-bought socks? I've saved a veritable heap of them! It was nice to finally use a couple of them in this project. Also, the side of a small mandarin orange crate came in handy; we used one to make the two wooden platforms on the vertical tower.


In truth, our tower crane is not quite done. There are still a couple minor kinks to work out. We'd like to tweak the chain winding mechanism; it could run a little more smoothly we think. And the horizontal boom could use a small platform to rest on for additional stability. But otherwise it's pretty darn nifty.


I'm now thinking I'd like to build myself a model of a bridge... No, not for The Boy! For ME!! Doesn't that sound like heaps of fun?

♥M

Tuesday, May 22, 2012

The Boy's Tree Fort Project: Part 1


For posterity's sake, I'm going to be recording The Boy's Tree Fort Project here on the blog. The tree fort has been on my guys' list for some time. Here is the start they've made.

To begin, The Boy sat down with his pen and paper and wrote out a list of things he wanted as part of his dream tree fort. After some discussion between he and Lo, a few tweaks were made to the list... Here's what they agreed on.
The Boy subsequently sketched out some impressions of what the innards and out-ards of the fort might look like. Here are those sketches.


A few weekends ago they cleared the site of an old ornamental well which we'd previously (about 4 years ago) transformed into a covered bench for The Boy (see the final photo). I also dug out many plants from around the well. They are now in storage awaiting a new home.

This past weekend, Lo and The Boy began the tree fort work in earnest.


They dug 4 beautiful holes, 4 feet deep to reach below the frost line, and installed a concrete pillar in each hole. On top of each pillar is a metal bracket. Eventually, beams will span the width of the pillars and be held in place within these brackets. But that's a story for another day... For now, we have 4 lovely new pillars that will cure until next weekend when (hopefully) the next chapter will begin!


I have to say. It's pretty neat to stand back and watch them build this thing together. Lo is very patient with The Boy, explaining the purpose of every step, answering The Boy's questions, and encouraging him to take up the tools and be part of the process as much as possible.


I always feel so lucky to have such a fine daddy for my little one. They make my heart go pitter-pat just watching them together.

♥M

Tuesday, April 10, 2012

A Cool Easter Gift From Lo


For years and years, I have wanted a cold frame with which to extend our growing season. On Easter Sunday, my wish came true (insert choir of angels)! This weekend Lo whipped together this perfect little guy from some old cedar boards and a wooden window. The cedar had served for many years as the Boy's sandbox; the window we recently purchased at a flea market.


I decided to give my newest acquisition a test drive and plant out the mesclun and spinach ... I figured these cool weather lovers wouldn't mind so much... And besides, I was too excited to wait. I'm hoping they'll be fine out there. So far so good; they've survived one night... eep!

The beauty of this little cold frame is that it is lightweight enough for me to pick up and move around. Once the plants are established, I'll just lift it off and let the plants enjoy some fresh air. So cool (or should I say "cold"),  hee.

There's nothing like a useful, handmade, gardening-related gift to get me smiling. Thank you so much Lo. I love you (and it) tons and tons!

Edited to Add: As these old windows may be painted with leaded paint, it is imperative to apply a clear coat to prevent the paint from flaking off into the soil (especially around edibles). Thanks for that reminder Catie.

♥M

Saturday, November 12, 2011

Series 7 - Ornament-ED: Twig 'n Bead Trees


Welcome to Series 7 "Ornament-ED" Part Trois! I hope you're enjoying my little Christmas ornament series. I'm making hangy things like they're going outta style over here. I'm up to my bushy eyebrows in twigs and glue and paper and other stuff I won't mention - I don't want you to guess what I'm up to next. There'd be no fun in that now would there? And do not worry, I will clean up eventually. Sometime pre-Christmas perhaps? That's the plan anyway... Oh but let us not fret over a petite mess here and there. Naw. What do you say to a little craftiness right here, right now? Yes, OK.

Tutorial  ❉  Twig 'n Bead Tree Ornaments

You will need:
  • Beads (to make them you'll need: paper, pair of scissors, skewer or drinking straw, and glue)
  • Twigs with V shaped crotches
  • String
  • Pair of scissors
  • Handsaw to trim the twigs
  • Drill with tiny bit
  • Large-eyed needle
Begin by scrounging around the neighbourhood for a few fallen twigs-slash-branches with v-shaped crotches as shown below. Trim off the excess wood according to the diagram. I've trimmed the sides of my "V" (technically, it is an upside-down "V" but I'm going to call it a "V" to keep things rolling...) to approximately 9-inches long. More will be taken off later on.


Next, roll up some paper beads. You know how to make these right? Here's a tutorial courtesy of Paper University just in case you don't. I used 8 to 11 beads for each little tree but it really will depend on how big you want your ornament to be. Go with the flow, roll with the punches, use as many beads as you like!


Now let's get to down to the meat and potatoes.

1. Grab your drill fitted with a tiny bit and your V twig.
2. Arrange your paper beads in a little tree shape within the V. You want to mark your twig with dots adjacent to the beads. You will locate your drill holes at the dots. You want an additional hole in the top and side of your twig to accommodate a hanger (where the arrow is pointing). Drill the 6 holes as shown in #2.
3. Cut five pieces of string. I cut mine approximately 14 inches (36 cm) long.
4. Insert 1 piece of string into each hole pulling the string through each hole until it is doubled, as shown in #4.


5. Thread paper beads onto the three central doubled strings as shown.
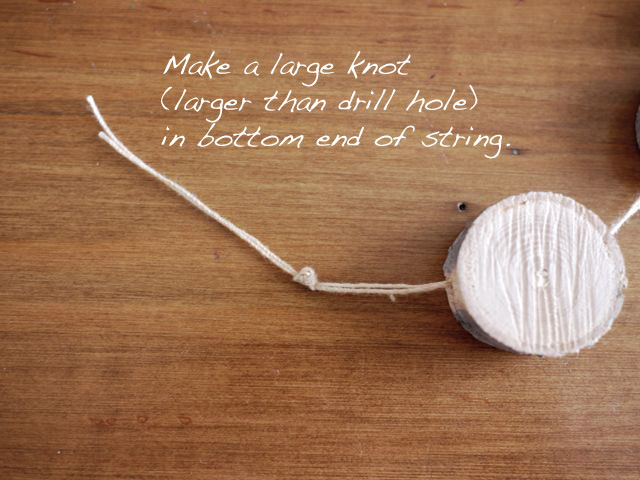
6. Tie a knot in the collection of strings at the base of the central bottom bead.
7. Insert 3 more paper beads as shown in #7.
8. Bring one string from the base of each side bead into the center.


9. Again, tie a knot at the base of the central bead incorporating one string from each side bead in the knot.
10. Using the two strings set aside in 8, tie a small knot above the other big knot you just tied. Turn the ornament over and using those same two strings, tie another small knot above the big knot. Slip a final bead up the center strings.
11. Bring those two side strings down and around the final bead and tie knots front and back as in #10.
12. Thread those two knotty side strings onto a needle and pass the needle up through the final bead to hide the two strings. Trim the excess.

13.  Trim the ends of all strings at the base of the final bead, leaving a small decorative tassel. Using your small handsaw, trim any excess wood from the top and bottom of your twig. Finally, add a string hanger at the top.


Lookie there, a mini beaded country Christmas tree ornament! Ain't it sweet?
Here's my giant hand and morose face doing a closeup shot. Smile much?


You have a beautiful weekend. I will be back here on Tuesday and hope to see you then!

Earlier installments in the "Ornament-ED" series include ☛

Thursday, November 3, 2011

Series 7 - Ornament-ED: Twiggy Skate Ornaments


You remember not so far back when I introduced you to my boot ornament brainwave. Yes, over here. That's correct. Well, I was out on a leisurely autumn walk the other day. It's so pretty out right now with the painted leaves a' falling and the sweet breeze a' blowing. The temperature is near to perfection. This weather brings out the kid in me. It makes things look pretty and shiny. Everything's a treasure I want to collect and keep. You know. Like leaves and rocks and seed pods and things. I could not help bending at the knee to grasp the fallen sticks and twigs I came across.

I was of course thinking of making more boots as before but then it hit me. Why not make some lovely twiggy skates too? "Why not?" I said to myself. So that's just what I did, man. Want to see how? Well come on already. Let's do this thing!

Tutorial ❅ Twiggy Christmas Skate Ornaments

You start by making the boots, same as before. Do you recall how I did that? Here's a refresher, just in case.

For pairs of skates, try finding twigs that are close to the same size. Apply a coat of paint if desired.

Then all you do is drill one hole in the heel, one hole in the toe, and one at the top to accomodate a hanger. You then take a paper clip, unfold it, and trim it to the size of your boot. Shape the paper clip into a skate blade with needlenose pliers. Stick that paper clip into the holes. And BAM! Skates!


Now if you want, you could add a fancier blade to your skates. To do that, take a small piece of metallic duct tape, fold it in half (before removing the protective backing), unfold it, remove the backing, and stick it across the paper clip. Finally, trim both ends with a pair of scissors to resemble skate blades. 

Nifty, eh? Look at the teeny skates... So cute. Now all you have to do is add a hanger and go to town decorating them.


I kept mine real simple. I just brushed on a coat of colourful paint and added some lines and laces with my sweet Sharpie. But you could make yours multi-coloured, bedazzled, zentangled little works of art!


Go ahead and have fun making yourself some twiggy Christmas skates!


You might have noticed this is the beginning of a brand new series. Remember last year's Situation Christmas Ornament-ation Series (Series #3)? I had so much fun with it, I decided to do another ornament series again this year. Thusly, I'll be back soon with more ornament action... See you then!


LinkWithin

Related Posts Plugin for WordPress, Blogger...