Showing posts with label egg carton. Show all posts
Thursday, March 17, 2016
Kid Craft: Egg Carton Window GardenTutorial
Smiles and salutations!
As you know from the last post and many many before that too, I have always had an insatiable appetite for egg carton crafts. The year 2015 was no different because around this time last spring, I had the pleasure of working with Burnbrae Farms - the egg company - on a couple of egg carton crafts for their spring newsletter. Remember the strangely eclectic Rabbit Wall Bust? Yeah, me too. Well, I thought it was high time I share the other, more kid-friendly, craft I made for them too.
Visit the whole step-by-step tutorial over at Burnbrae Farms Blog ☛ The Egg Carton Window Garden!
♥︎M
Friday, March 11, 2016
Egg Carton Super Chick PDF Tutorial To The Rescue

My deeo fwend, might you need saving today? Is wife, wif its many woes and nevo-ending compwications, geding you down? Do you need a fwendwy someone in a pink cape and owange cwown to come down fwum da sky to sweep you off yo feet and bwing joy to you now? Weo... nevo feeo. It is I! Supo Chick to da weskew!
I have dedicaded my chickwet wife to bwinging smyos to sad faces and to dwying wet teos. My favowite job in da wold is heoping angwee folk waff again.
Do you want me to come to yo house to heop you now? As you can imagine, I am avaiwabo at da cwick of a button. Check me out in da Micheo Made Me Shop!
Hi there!
Michele here.
Yes, what Super Chick says is true. Her sole purpose in life is indeed to make others happy. A noble task if ever there was one. And now she - or a downloadable PDF tutorial showing exactly how to make her - is, in fact, in The Shop just in time for Easter!
Be advised that to make her, you will need an egg carton (as above), a serrated steak knife, scissors, a hole punch, some glue, a bit of paint and paintbrush, a marker, needle-nose pliers and a couple of straight pins.
The Egg Carton Super Chick: Saving the world one frowny face at a time!
♥︎M
Friday, February 20, 2015
Ahhh, Egg Carton Wreath...
Ahhh, egg cartons, how I love thee.
So simple. So mutable. So papery and grey.
Ahhh, egg cartons, how you make my day.
♥M
So simple. So mutable. So papery and grey.
Ahhh, egg cartons, how you make my day.
♥M
Thursday, July 4, 2013
You Guest It: The Bushcrafter
Today's "You Guest It" features one of those crafts that makes you go: "That's AWE-SOME!" In fact, I believe those exact words fell out of my mouth when I first laid eyes on it. So let us not dilly dally. Let us get to it, shall we? Coming to you all the way from Sweden, welcome the talented Jenny a.k.a. The Bushcrafter!
My name is Jenny. I'm so glad to be a part of this wonderful "You Guest It" series that Michele has set up for us all to enjoy. I am a textile crafter and I call myself "The Bushcrafter". I am a soul-centered creator and also an artist and teacher. In me, I have some sort of fabric spirit who wants, pretty much, nothing else but to create. So I let it.
You know. Let spirit be what spirit is.
I would say we are all crafters. In one way, or another. When I'm faced with a problem, I try to solve it by using what I have. That's crafting for me. I enjoy melding crafting and recycling together, making the ordinary into beauty. Today I'm sharing how to embellish your egg carton with cross stitch. In this project we are using the whole egg carton and adding the sparkle with threads and colour.
With a few easy steps you can create your own beautiful box. Embroidering on an egg carton is easy-peasy, just follow these instructions.
Peel off any stickers from the egg carton. If you have print on the carton, you could try to painting the top.
Draw a pattern on a piece of paper. Place the paper on the box and push the pin all the way through in all corners.
Start sewing the first colour:
Until it looks like this:
You can embroider the sides of the carton too if you want.
Voila! You are done. You can now use it to keep your favorite things safe.
Here I store my pastel threads. You might want to use it for your jewelery or your buttons. It´s your choice!
Other creations by Jenny "The Bushcrafter" that I recommend you not miss:
P.S. Have an idea for an eco-craft? Submit a guest-post idea to Michele Made Me's "You Guest It"! Find those details HERE.
My name is Jenny. I'm so glad to be a part of this wonderful "You Guest It" series that Michele has set up for us all to enjoy. I am a textile crafter and I call myself "The Bushcrafter". I am a soul-centered creator and also an artist and teacher. In me, I have some sort of fabric spirit who wants, pretty much, nothing else but to create. So I let it.
You know. Let spirit be what spirit is.
I would say we are all crafters. In one way, or another. When I'm faced with a problem, I try to solve it by using what I have. That's crafting for me. I enjoy melding crafting and recycling together, making the ordinary into beauty. Today I'm sharing how to embellish your egg carton with cross stitch. In this project we are using the whole egg carton and adding the sparkle with threads and colour.
With a few easy steps you can create your own beautiful box. Embroidering on an egg carton is easy-peasy, just follow these instructions.
For this project you will need:
1. An egg carton
2. Needle
3. Thread
Peel off any stickers from the egg carton. If you have print on the carton, you could try to painting the top.
Draw a pattern on a piece of paper. Place the paper on the box and push the pin all the way through in all corners.
Until it looks like this:
You can embroider the sides of the carton too if you want.
Voila! You are done. You can now use it to keep your favorite things safe.
Here I store my pastel threads. You might want to use it for your jewelery or your buttons. It´s your choice!
***
You must admit that this is great, right? I mean the combination of recycling and crafting alone makes me want to do a jig. But the embroidery? On an egg carton? Well, that sends me head-long into a cha cha cha!Other creations by Jenny "The Bushcrafter" that I recommend you not miss:
- The "We Are Stardust" Embroidery and Patchwork Pillow
- How to Weave a Strawberry
- The Guardian Angel of Winter
And while you're at it, pop into her shop because some of these beauties are actually available for purchase there.
Thank you Jenny for letting me showcase your beautiful work on the blog today. What a true pleasure this has been for me!
♥M
P.S. Have an idea for an eco-craft? Submit a guest-post idea to Michele Made Me's "You Guest It"! Find those details HERE.
Wednesday, May 15, 2013
Video Tutorial: Egg Carton Gift Bow
Hi there.
How've you been?
Me?
Oh good.
I took a bloggy break there eh? I've literally been away from this little place for a whole seven days... It went by like the wind. Been busy. I'm riding a learning curve the last little while. Learning all kinds of good stuff. Over the last week I've been focussing on video editing. In the not-too-distant future, my hope is to offer a mini-online class. The ability to edit video will go a long way in making that a reality, so I've been practicing practicing practicing like a little fiend.
Below is my very first 100%-Michele-made video! (Lo pretty much edited the first two. I pretty much just plied him with coffee...) This time, though, it was ALL me. Granted, it's not as polished as a Lo-made video, but you know what? That's okay. I'm a beginner right? Stephen Spielberg needn't fear for his job just yet. Still, I'm pleased with my maiden effort. The notion that I have the skills (sorta) to make a movie from start to finish is a little bit exhilarating, you know? Movies! I can make movies!!!
Anyway, blabber blabber blabber... Just show the darn video Michele.
Okay, okay. Here it is: My "Egg Carton Gift Bow Video Tutorial"!
Kinda similar to the last video, eh? I'm making a gift bow video series apparently, tee hee. If you're fond of recycled gift bow ideas there are a few more here, here and here. For a slew of other egg carton crafts, click here.
Have a lovely day now, won't you? See you in two shakes...
♥M
Friday, December 21, 2012
Egg Carton Flower Gift Bow

Step 1. First off, nix the gift wrap. Instead, take out an empty egg carton. Cut out two egg cups and one of those little center egg carton bumps.
Step 2. Cut some quick petals into both egg cups and round the petals with your fingers. Trim the little bump.
Step 3. Cut out some leaves from the flat part of an egg carton top.
Step 4. Glue petals, leaves and bump together as shown.
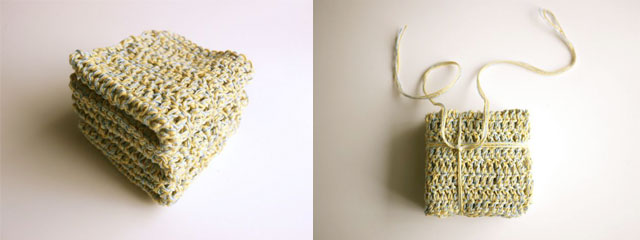
Step 5. Prepare your gift. Mine is a set of crocheted dishwashing cloths I made as part of a teacher gift. I folded each nicely and stacked 'em neatly.
Step 6. Tie some string around your gift. A few lengths together make a nice impact. Trim the string ends to a length slightly wider than the gift itself.
Step 7. Display the remaining string ends into a starburst.
Step 8. Take a small piece of egg carton top and cut it into a rough little circle. Punch a hole into it. Offset the hole a little.
Step 9. Use 2 of the string lengths to tie on the little egg carton circle. Dab some glue onto the circle.
Step 10. Glue on the egg carton flower. Let dry. And tally-ho, you're ready to go!
Quite nice, in an understated kind of way. Might be nice on a book, say, or a pair of lovely handmade mittens or a scarf.
Not bad for a naked grey egg carton, eh?
♥M
Thursday, December 13, 2012
Egg Carton Angels For The Ornament Exchange
My fellow "Handmade Holiday Ornament Exchange" buddies, Jana, Kijsa and Kate, will each be receiving a unique version of this michele-y egg carton angel. The angels are in flight as we speak, crossing border and continent, winging their happy way to far off destinations.
It is my hope that they will reach their new homes safely. I'm quite confident they will. I mean, one would think so, given their angelic status, eh?
Goodbye Angels! And happy Christmas Jana, Kijsa and Kate. Do take care of your new babies!
♥M
P.S. Check out the beauties Kate made for Kijsa, Jana and myself HERE! I'll be getting one of those soon! Eeeeps! Thanks so much Kate.
P.P.S. Create your very own egg carton people with either "The Dozen Egg Carton Folk Ornaments PDF Tutorial" or "The Egg Carton Nativity Scene PDF Tutorial". Both are available in The Shop. Please note however, that the angel in today's post is a brand new design and not part of either of those tutorials.
Tuesday, December 4, 2012
Egg Carton Nativity Scene PDF Tutorial in The Shop!
Today I have the eggstreme pleasure of introducing you to my latest egg carton tutorial for purchase in The Shop!
The "Egg Carton Nativity Scene PDF Tutorial" is an eggshellent, 35-page, full-colour, downloadable set of photographed instructions for making a 14-piece nativity scene out of egg cartons. That's white, I said egg cartons! As you may or may not know, I love my egg cartons. I think they are eggsquisite, and that's no yoke!
Edited to add: Please note that, unfortunately, English egg cartons are not compatible with this North American egg carton pattern.
![]() |
| Screen shot of the PDF title page and document |
In the tutorial, I show you how to make The Holy Family, the three Wise Men bearing gifts, the ox and donkey, the shepherds, their lamb, and more! Only the simplest of tools and materials are required to fashion the lot of them including a pair of scissors, an exacto knife, a hole punch, gobs of glue and paint, and of course, of whole coop full of egg cartons!
Please do keep in mind that this craft can be done by the whole family but results will vary with skill level and age, and children will require adult supervision.
Here is a peek at the little lamb. He cracks me up...
The "Egg Carton Nativity Scene PDF Tutorial" is ready and roosting in The Shop!
♥M
Saturday, December 1, 2012
Friday, October 5, 2012
Howling Halloween Egg Carton Masks
You will need: 2 egg cartons, a pair of scissors, an exacto knife, gesso or white paint (optional), paint brush, glue.
Retrieve a couple of egg cartons from your well-stocked recycling bin. Cut a carton down the middle as shown.
Take the top of the carton. Cut it into 3 sections.
Use a pair of scissors to trim each section so that the square corners are now rounded. Very good. You're doing so well.
Now take the bottom of the egg carton. That's correct. The one in which the eggs sit. Good guess.
Cut off those little parts that stick up in the center between the egg cups. An exacto knife is helpful for this. You'll need six of these parts and there are five per egg carton. Yes, that's right. You'll need to get the last one from another egg carton. You're a smartie! Neatly trim the edges of these little bits. Set them aside.
Do you see the egg cups? Cut 6 of them off and trim their edges nicely.
NOTE: As you prepare your egg carton pieces, you may choose to brush on a layer of gesso to give them a pleasant gaunt look as I've done. White paint would work too I suppose.
For Mask 1 you'll need the following pieces. Place them as I have or however you choose. Glue them together.
In turn, Mask 2 requires the pieces shown below. The eyes are made of two egg cups glued together to make balls. Here look at the pictures. They're worth a 1000 words or so I'm told.
Mask 3 is a little more challenging. But nothing you can't handle. Using the last (middle) section of the top for the base, cut off one of the bits that jut out along the center. It will leave a hole. Now take the second egg carton top and cut out one of the center bits. Once trimmed it will resemble a little sombrero. Gather the rest of the bits. Stick the "sombero" in the hole and put the rest of the mask together as shown. Don't forget the glue!
The masks are virtually done now. Here's what they look like covered with a layer of gesso.
To finish them off, I've glued black confetti to their eye balls. Don't worry, they deserve it.
They're now ready to be hung on your walls. Yes, they deserve that too.
Thursday, November 17, 2011
Series 7 - Ornament-ED: Egg Carton Snowflakes
Quiet Tutorial ❅ Egg Carton Snowflakes
Now...
Trim.
Shape.
Glue together.
Paint.
Embellish with dimensional paint.
Add hanger.
Step back.
Pat self on back.
Relax with huge glass of lemonade.
♥M
Wednesday, October 12, 2011
O is for Organization.
Remember last week's recyclables post? That was me starting to organize my mounds of junk, attempting to bring some order to my workspace. I'm hoping to eventually come to a point where I can share my basement craft zone with you. Note the use of the word "eventually"... Let me just say this. I spend my days somewhere between clutter and chaos. The whole order thing is a teensy bit of a struggle. I'm forever making. Cleaning rarely comes into it. But I'm trying to change that. Here are my baby steps...
Buttons. IN JARS. With letters on them. That spell B-U-T-T-O-N-S... The buttons used to be in a bunch of different places. I couldn't see them and never used them because I didn't ever think of them. Now they are in plain sight on my work table, and I have actually used them on a few projects. Exciting stuff!
Yes, so I just threw the buttons in some canning jars we had kicking around, covered the tops with junkmail pictures, and topped them off with some letters I cut out.
Next, I organized what used to be a literal rat's nest of embroidery thread in a painted egg carton. This way it's no longer a mess of knots, I can see all the pretty threads, and all the similar colours are together. It's only about a million times better this way.

Just a few little steps toward the workspace sanity I long for... but the progress is actually satisfying, you know?
Well, you have a lovely day now. I'll be back here on Friday!
Labels:
buttons,
egg carton,
junkmail,
life,
organizing,
storage
Wednesday, August 24, 2011
Futuristic Construction with The Boy
I'll get directly to it today. Visitors are on their way and my abode needs an overhaul NOW-ish. I'm going for the "illusion" of clean. Wish me luck. Here's what the boy and I got up to yesterday!
Tutorial: Kids' Futuristic Construction Set
You will need:
- Cereal box
- Foam meat tray
- Egg carton
- Paper bag (or whatever paper you have on hand)
- Wooden skewers
- Pair of scissors
- Wax crayons
- Pencil
- Sharpie
- Hole punch
- Assortment of round things to use as templates
- PVA glue
Take your cereal box, open it up and draw out a goodly amount of circles and rings using round things (bowls, cups) as templates. Trace them all with your Sharpie. Colour them in with the wax crayons. There are no rules here. Let your child go colouring-mad!
Cut out all the circles. Use a hole punch to punch out several holes in each piece.
With a paper bag (or whatever paper you happen to have around) and PVA glue, make paper beads by rolling your paper up into long tubes and cutting the resulting tubes into sections like so.
Cut the cups out of an egg carton.
Your little architect now has all the elements necessary to construct his buildings of tomorrow!
Go ahead my little one, build to your heart's content.
Look at him. He's happy. He's busy. This is the life.
We had fun with our simple construction set. I said we, yes. I'm not ashamed to admit that I played with it too. That's right. You're jealous, aren't you? Well... go on then. Make yourself a whole glorious set, and go to town creating some nifty, state-of-the-art edifices!
Alrighty, must clean now. You have a lovely day, and I'll see you again on Friday!
Subscribe to:
Posts (Atom)