Showing posts with label gift wrap. Show all posts

Thursday, December 18, 2014

Pretty Junk Mail Gift Bows


My goal for today is to get some of our gifts wrapped. I've gone back in the archives and made some lovely junk mail gift bows. Remember these? HERE's the tutorial, just in case you'd like to give 'em a whirl!


Happy wrapping!

♥M


Wednesday, May 15, 2013

Video Tutorial: Egg Carton Gift Bow


Hi there.

How've you been?

Me?

Oh good.

I took a bloggy break there eh? I've literally been away from this little place for a whole seven days... It went by like the wind. Been busy. I'm riding a learning curve the last little while. Learning all kinds of good stuff. Over the last week I've been focussing on video editing. In the not-too-distant future, my hope is to offer a mini-online class. The ability to edit video will go a long way in making that a reality, so I've been practicing practicing practicing like a little fiend.

Below is my very first 100%-Michele-made video! (Lo pretty much edited the first two. I pretty much just plied him with coffee...) This time, though, it was ALL me. Granted, it's not as polished as a Lo-made video, but you know what? That's okay. I'm a beginner right? Stephen Spielberg needn't fear for his job just yet. Still, I'm pleased with my maiden effort. The notion that I have the skills (sorta) to make a movie from start to finish is a little bit exhilarating, you know? Movies! I can make movies!!!

Anyway, blabber blabber blabber... Just show the darn video Michele.

Okay, okay. Here it is: My "Egg Carton Gift Bow Video Tutorial"!


Kinda similar to the last video, eh? I'm making a gift bow video series apparently, tee hee. If you're fond of recycled gift bow ideas there are a few more here, here and here. For a slew of other egg carton crafts, click here.


Have a lovely day now, won't you? See you in two shakes...

♥M

Saturday, March 23, 2013

Video Tutorial: TP Roll Flower Gift Bow


Happy Saturday!

Lo's been re-teaching me how to edit video. Don't know if you remember my last attempt all those moons ago in the far distant past over here... Well, I'm back in the saddle. Here's my second little video tutorial.


A pre-Easter moving gift for you... Enjoy!

♥M

I should not fail to mention Lo's - that's my husband, btw - input in this project. Suffices to say, I would still be at the computer breaking things if it weren't for him saving me from myself. Thanks Lo. You are my love.

And thank you to Jill as well. For encouraging me back up on the video horse. So glad to have found you in the vast ether. Let's keep supporting each other ok?

Friday, December 21, 2012

Egg Carton Flower Gift Bow


Here's a simple and pretty way to wrap a small gift!

Step 1.  First off, nix the gift wrap. Instead, take out an empty egg carton. Cut out two egg cups and one of those little center egg carton bumps.
Step 2.  Cut some quick petals into both egg cups and round the petals with your fingers. Trim the little bump.


Step 3.  Cut out some leaves from the flat part of an egg carton top.
Step 4.  Glue petals, leaves and bump together as shown.


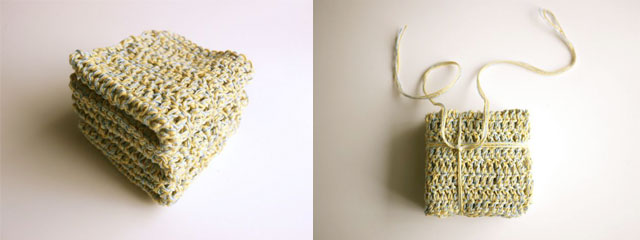
Step 5.  Prepare your gift. Mine is a set of crocheted dishwashing cloths I made as part of a teacher gift. I folded each nicely and stacked 'em neatly.

Step 6.  Tie some string around your gift. A few lengths together make a nice impact. Trim the string ends to a length slightly wider than the gift itself.


Step 7.  Display the remaining string ends into a starburst.
Step 8.  Take a small piece of egg carton top and cut it into a rough little circle. Punch a hole into it. Offset the hole a little.

Step 9.  Use 2 of the string lengths to tie on the little egg carton circle. Dab some glue onto the circle.
Step 10.  Glue on the egg carton flower. Let dry. And tally-ho, you're ready to go!

Quite nice, in an understated kind of way. Might be nice on a book, say, or a pair of lovely handmade mittens or a scarf.


Not bad for a naked grey egg carton, eh?

♥M

Other gift bow ideas here, here and here.

Tuesday, February 14, 2012

Cork Stamp Fun #1


I'm experimenting with the cork stamps I made (Find out how to make your own HERE). Yesterday I was stamping on brown paper bags to see if I could make some interesting gift wrap or scrapbooking papers. The combinations are many and infinite.


I think my favourites of these are:


Message:  I like this one because your words can say something meaningful/funny/silly and personalized.

All-Over Letter/Symbol: These ones I like because I'm a fan of repetition and they are a breeze to do even for a child. Plus, they just look real cool.

Sharpie & Symbol: What do I like about this one?... Beats me. It speaks to me, I guess. For this one, I drew my circles with a medium-size sharpie on the back of the paper so when I flipped the paper to the good side, the sharpie-lines looked faded or distressed. It creates a neat effect. I finished off the design with the sun symbol stamped on the good side.

In case you're wondering, I used the exact same method to create the symbol stamps as I did for the letter stamps. It's easy to draw up cute little nature symbols (or any symbol you can think of really) and use THIS simple method to fashion stamps out of them.

I'm feeling a little peckish. I'm thinking: toasted tomato sandwich (or samwich as Lo calls it) with pickled onions on the side. Yum. Happy Love Day to you!

♥M

Tuesday, February 7, 2012

Decorative Gift Handles


Don't even bother with a bow. Make a nifty handle out of a cracker box. 


Attach it to your inside-out cereal box with some nifty brads.


Place the goodies inside. And see that? It's a nifty gift.

♥M


Saturday, December 17, 2011

Junkmail Snowflakes - Possibility #3 (Finale)


Welcome to the final junkmail snowflake post of 2011. Let us cheer. Rah rah rah!

Okay. Alright. You already know how to make the basic snowflakes, right? I went over that back HERE. So what are these little guys, you may well wonder? Well, they are gift toppers. Use them on a gift in lieu of a bow or ribbon. How did I make them? It is a veritable breeze.

Let us do it.

Tutorial ❈ Junkmail Snowflake Gift Toppers

For this project, you will need: colourful junkmail, a foam meat tray, pair of scissors, hole punch, glue.

Step 1: Start by making two small junkmail snowflakes of similar sizes. My snowflakes measure about 3 inches (7.5 cm) in diameter. Use junkmail in contrasting colours for each snowflake. Note: DO NOT cut away the snowflake apices (the centers of the snowflakes). Press one of the snowflakes with a dry iron. Leave the other snowflake unpressed.


Step 2: Go to your recycling bin and retrieve a foam tray. You know, the kind usually reserved for meat. From the foam, cut out a small doughnut shape. Mine measures about 1/2 inch (~12mm) in diameter. Use your hole punch to punch out the doughnut hole. Save the middle piece of confetti. Now, using your hole punch, widen the hole in the doughnut all the way around. The hole needs to be slightly bigger than the piece of confetti.


Step 3: Glue the doughnut shape to the very center of the pressed snowflake. Glue the confetti piece to the very center of the unpressed snowflake.


Step 4: Apply some glue to the center back of the unpressed snowflake. The glue should cover an area the same size as the doughnut on the other snowflake.


Step 5: Now, place the unpressed snowflake on top of the pressed snowflake so that the confetti is aligned with the doughnut hole. Very gently, press down on the confetti so that it sinks into the doughnut hole slightly. This will cause the snowflake edges to lift up lightheartedly.


Step 6: And there you have it: one completed gift topper. Stick it on a gift and you're golden!


I might have made one or two more...


They're really quite sculptural and interesting, eh?


Goodbye my snowflakes. See you again next year!

Okay, I'm off to clean... um... everything. You have a lovely weekend. ♥M

Previously in this series:
Junkmail Snowflakes: The How-To
Junkmail Snowflakes Possibility #1: Wall Blizzard
Junkmail Snowflakes Possibility #2: Lanterns

Monday, September 12, 2011

Drop-Dead Denim Guest: Charissa from The Gifted Blog


Old jeans!

We're spending some time re-thinking old jeans this September on Michele Made Me. So far we've made um... let me see... a pendant, lamp shades, a child's pillow and chair upholstery. Today's guest is taking your denim to a whole new place still. Oh, here she is now to tell you all about it... Charissa, it's all you.


Hi readers! I'm Charissa, and I write about creative gift wrapping over at The Gifted Blog. If you're anything like me, you're probably a little in awe of Michele. She has a way of coaxing the simplest of materials into something stunning.


When I heard about her Drop-Dead Denim month, I wanted in on the challenge! I love recycling found materials into my gift wrapping but I've never done much with denim. I had a blast coming up with these 3 gift wrapping ideas and hope you enjoy them, too!

Ombre Gift Cuff:
Using a seam ripper, remove stitching from the cuff of an old pair of jeans.


Wrap around gift and trim. Glue ends together. I love Aleene's Original Tacky Glue, but a glue gun could work, too. (Amazing heart/mushroom gift wrap courtesy of paminboots.)


And you're done! Love how this shows the history of this particular pair of jeans - the original color of the raw denim, the lightening wash it was given in manufacturing, and worn strip of fabric where the cuff hit the shoe. A lovely ombre effect.


Happy Bow:
For this one you'll need a small rectangle from an old t-shirt and a section cut from a pair of jeans.


Stitch the rectangle into a loop, securing both ends with sturdy knots. Note the grain of the fabric (the loop should have some 'give' when you pull it open). This will let your loop stretch later!


Gather denim into pleats. Slip the t-shirt material tube onto one end. Shimmy it into the center to secure the bow.


You did it! It really is a happy bow, isn't it? To secure to your package, slip ribbon through the back of the t-shirt loop and then around the present.

Rags to Riches Wrap:
Last one! You'll need the shredded cuff of a pair of jeans (or long strip of similarly distressed denim). Using a seam ripper, unpick the stitching.

Wrap around your gift in a spiral, dotting with glue to secure. (Again, I used Aleene's Original Tacky Glue.) Don't be afraid to angle each wrap differently. I stopped occasionally to press the glued sections down with my thumb.


While probably not the right vibe for a wedding gift, this denim embellishment has loads of personality! I usually favor a clean look, but made this one loose and messy to compliment the frayed material.


If you like, embellish further with old buttons or fabric flowers, attaching with glue. (I learned how to make the yellow rose here.)


I love that wrapping gifts is an everyday opportunity to be creative. I can be found photographing acorns, hoarding envelopes, and printing with celery at The Gifted Blog. So if you liked these ideas for green gift wrapping, stop by anytime! Michele, thanks for having me. It was a pleasure!


The pleasure was all mine Charissa! I believe this is the first time I've ever seen old jeans used as gift wrap. But you know what? It's perfect! Especially for those casual gifting occasions that so frequently arise. And you've shown us a great variety here which demonstrates the real potential of this amazing fabric as a gift wrap alternative. I will definitely be doing this. Way to go Charissa!

On top of that, today I'm Diggin' This Denim: The Quilts of Gee's Bend

YOU have a lovely day now. Aunt Peaches will be running the show on Wednesday. See you then!

Monday, June 13, 2011

A Thousand Thanks Celebration and Giveaway!

This Giveaway is NOW CLOSED. Thank you to all who entered!


Happy Monday!

I'm so glad you could make it! Today I'm celebrating a truly nifty milestone: this blog's amassing of 1000 Google Friend Connect followers. Happy happy joy joy!!! It seems impossible, but there it is in black and white down there in the foot of the blog. See? I'm not even making this stuff up. I'm so chuffed about it I can't even say...

And speaking of following, I also want to acknowledge my lovely email and RSS subscribers. I want you to know that I haven't forgotten you. One day you'll get your very own celebration, never fear. You too are important to me! And needless to say, you are most welcome to stay and play today, as is everyone.


So what are we doing? We're sharing. Sweet eh? I'm going to tell you a little bit about me. And, eventually, you'll do the same. But I'll get it started. Here are some things I've never told you before.

Ready? Okay... here goes nothing:

  • I'm very shy. People don't believe me when I tell them this, but it's true. I'm afraid of you. You scare me.
  • I don't do the dishes every day. Sometimes I skip a day and just let the pile grow for another day. And oddly, I really hate doing 2 days worth of dishes but sometimes I really hate doing ONE day of dishes. It's a circle.
  • I'm ambidextrous. I use my left hand for eating, writing, and cutting. My right hand I use for handling a computer mouse, playing sports like hockey and baseball, and weeding. And despite cutting with my left hand, I cannot abide left-handed scissors. They're just awful.
  • I'm not colour blind, but sometimes red is green and green is red. Unexplainable.

  • I'm modest to the extreme. Sometimes I wish it was winter all year round. That way I wouldn't ever have to wear small clothes. I've literally gone years without swimming to avoid wearing my bathing suit. Canada with its long winters is the place for me.
  • I have a temper; I've been known to get angry much much.
  • I used to do a lot of acting. I co-starred in a local children's television series in the 1990's. We recorded only one season.
  • Frequently my brain itches, and I can't reach in to scratch because it's inside my brain.
  • Warm scarves are crucial, essential, necessitous to my existence. My first few inches are permafrost so I'm cold, always cold... I'm cold right now.
Hey, that went pretty smoothly...


Okeedoke. Now it's your turn. Wanna know what you're playing for? Alrighty then!

The giveaway prize includes:
  1. A small spiral bound notebook for sketching or recording your precious ideas.
  2. A set of 8 fine-point sharpies including a twin-tip black.
  3. 10 squares of felt (4-1/2" x 4-1/2" each)
  4. 3 (10 g) spools of DMC cotton perle
  5. All of the above neatly packaged in a pretty Michele-designed reversible fabric gift box. (Note: See my tutorial and template HERE to make your own, if you just can't wait.)

The rules of giveaway-play are:
  • Anyone, anywhere can enter.
  • Have a solid email address.
  • Leave a comment on this post telling me one little-known fact about yourself, anything you like.
  • If you are a follower, you get a second entry!
The winner will be chosen ever so randomly on Friday June 17th, 6 am EST, and divulged in Friday's post.


Finally I'd like to say that the blogosphere is a big overwhelming place sometimes. Yet you, my friend, have allowed me to stake my claim on a tiny piece of it, call it my own, and share in it with you. I am so tickled by the lovely comments you leave, your thoughtful remarks, and your genuine support of the work I do. I thank you for being part of this with me.


So now it's your turn. Is there anything you're just itching to get off your chest? Come on, don't be shy now...

This Giveaway is NOW CLOSED. Thank you to all who entered!

Monday, May 9, 2011

Series 6: The Box Chain #2 - Junk Mail Rosettes


I figured if I'm going to make more box chain crafts, I might as well organize them into a tidy series. Not that I'm tidy. No, that is something I strive to be but have yet to master. But it is a goal, and it's good to have goals (I hear), no matter how lofty.

So for Series 6 - The Box Chain #2 I'm showing off the little gift embellishment I used to pretty-up this gift as suggested by the lovely Ann Flowers back in these comments. Thank you Ann! Same exact concept as described in Part 1. I just made several short box chains out of junk mail, glued their ends together to make little rosettes, and attached them with glue directly onto the recycled tissue paper wrapping. See how cute and simple this is?


Make a bunch of rosettes, configure them however you like on your package, and Bob's your uncle, it's a gift!

You have a great day now, I'm off to advance myself. I'll see you soon!

P.S. Interesting article in Handmadeology today about making sure you're headed down the right path (something that isn't always clear to me)... Check it out here.

Monday, March 21, 2011

Series 5: Halve a Circle #2 - Wallflowers


It's here. Did you notice? Spring has arrived. And while the flowers have yet to show their pretty faces, their time is oh so close at hand. But I'm terribly impatient. So I'm giving them a little nudge... Are you with me?

Come here.

Cut up some of these...


Make some of these... hee hee...


Glue a half dozen of them together to make these...


And hang them everywhere like this...


The garden varieties will follow suit in no time, I betcha.


In the meantime you have a lovely day, and I'll see you again soon!

P.S. To see part 1 of the "Halve a Circle" Series, click here.

LinkWithin

Related Posts Plugin for WordPress, Blogger...