Showing posts with label felt. Show all posts

Thursday, October 3, 2013

Pyramidal Pincushion PDF Tutorial in The Shop!


Hi.

Is it Thursday today? I believe so.

Well, this is as good a day as any to update the little Shop, I reckon. Today's offering is one that's been around a spell and that several people have asked me about over the last few years. And, I am nothing if not accommodating. After a while... eventually... when I'm good and ready, that is.

It is the downloadable "Pyramidal Pincushion PDF Tutorial" in all its colourful glory. Notice the cover page screenshot below...


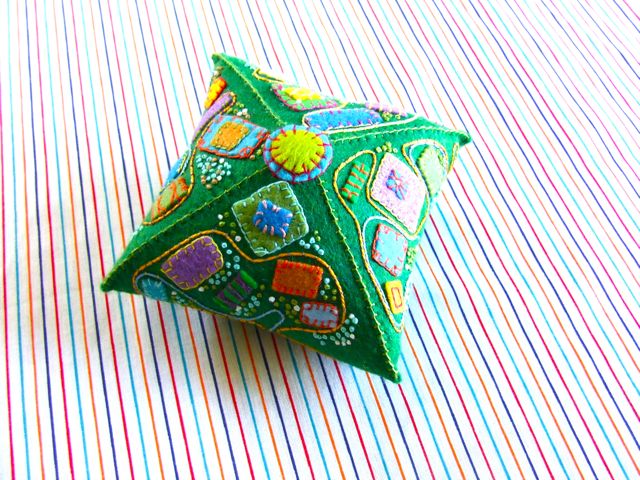
In this tutorial, I show you how to put together this scrappy, felty, pyramidal pincushion. The supplies are decidedly simple. You'll need some felt and felt scraps, cotton string, embroidery thread, scissors, a few pins and needles, and of course the handy-dandy tutorial. With that, you'll be on your way!

The project is probably best suited for the intermediate crafter. You'll do well to posses some basic embroidery skills. And if you're one of those crafters with an artist's heart, you'll find you'll be able to make your very own customized version of the pincushion, if you so desire.

The 9-page PDF covers the step-by-step pincushion-making process and includes detailed photos, a full colour template, live links to some wonderful on-line embroidery instructions, and a convenient black-and-white printable version of the tutorial. 

Here's a screenshot of the last page with two versions of the completed pincushion.


I had a fun time creating and assembling the whole she-bang, and I think you'll have an equally fun time making it.  Henceforth, find the downloadable "Pyramidal Pincushion PDF Tutorial" in the Shop!

♥M

Friday, September 27, 2013

I Felt It Was Time + A Giveaway Winner


Excitement of excitement, I've been busily working on a new Shop tutorial! Hard to believe, I know. It's been way too long, months and months, since I've updated the ol' Shop. The poor thing is no doubt feeling forlorn from neglect. Probably thinks I don't love it anymore. Not the case, I can assure you.  Anyway I'm "knot" going to say much more about it at this time, except that I "felt" it was time. (Ya, that's a clue alright... along with the above pic.)

Now, on to more pressing matters... that Giveaway Winner I mentioned?


Yes, well... as chosen by my very own personal random number generator -The Boy - the winner of Quilting Happiness is...  Commenter #26: TRACEY who said: Looks like a great book, thank you for the review and chance to win. 

Congratulations Tracey, you're most welcome, and I think you'll enjoy this book! Wahoot! I will email you forthwith to arrange delivery.

♥M

Thursday, February 2, 2012

Reader Question: What Can I Make With Plastic Bottle Caps?


A little while ago, I received the following email:

Dear Michele,

Do you have any idea of what to do with old bottle caps, like those of your juice cap ornament, and some like those that come on plastic milk containers? I have at least a few thousand of them and need some ideas! Help!

Sande

Whoa there Sande! Did you say "a few thousand"? Tarnation that's a lot. What is the proper term for a person who passionately collects bottle caps I wonder? I have "capitalist" on the tip of my tongue, but I don't think that's quite right... Well, in any case, I put together a few suggestions for you. Hopefully these will help put a dent in your supply.

Idea #1. One, and probably my favourite, idea for reusing plastic bottle caps is to morph them into tiny, cute and useful pincushions. In fact, I'd been meaning to try making one of these for, like, ever. So that's what I did. I give you (drum roll) my Bottle Cap Pincushion Critter (above)! He was so much fun to design and make. I see many more of these in my future. Learn how to make the basic pinny at Craftstylish.

So that uses up ONE of your bottle caps. Fabulous. What's next...

Idea #2. You could adorn your fridge in happy/sad/angry bottle cap fridge magnets. Or, if the emotionally fragile craft doesn't strike your fancy, here's a somewhat more even-keeled project: a lampshade. Find both at Esprit Cabane.

Idea #3. You've seen my juice cap ornament right? As far as bottle cap crafts go, it's a unique alternative I think. (Shameless self-promotion... Really Michele?)


Idea #4. Sande, do you have kids? Making bottle cap lady bugs might be a neat way to spend a rainy afternoon. Get the details at Crafts by Amanda.

Idea #5. Or, if you're the slightly more ambitious artsy-type, you could attempt a self-portrait like Mary Ellen Croteau did. That ought to use up a couple caps, eh?

Idea #6. Oh, and I need one of these for my house. When you get a few spare moments, could you maybe make me one?...

Idea #7. And finally, Dollar Store Crafts was asked the very same question back in June 2011. Read all the interesting suggestions in the comments of this handy post.

Edited to Add: Melissa from Those Northern Skies pointed out her sweet bottle cap Christmas trees, and I just had to add them to the list!

There it is Sande. I hope this list gets your crafty juices flowing and helps you on your way. If anyone has any other brainwaves, do pipe up in the comments. I'd love to hear your ideas.

♥M

Monday, May 23, 2011

It's a Dandy Giveaway!


THIS GIVEAWAY IS NOW CLOSED! THANKS FOR ENTERING!


Hi!

IT'S GIVEAWAY DAY!!!

The day wherein crafty blogs far and near join Sew Mama Sew in a craftospheric-wide gift-giving extravaganza extraordinaire. The chances of winning a prize today are ama-ZING. So prepare yourself for the onslaught of eye-candy, give those digits a stretch, slather on some hand lotion, visit some beauteous blogs, and click 'n comment til you can click 'n comment no more. Best of luck to YOU!

Today I aim to give away some loveliness as well. If you're new to Michele Made Me, welcome! So glad you could join in the fun.


This day is thricely special to me. I'm officially celebrating my 1st blogiversary (which actually took place last month but sorta got shoved to the nether regions of the to-do pile). I've recently published my 200th post. Yippee! And I've witnessed this blog's 400, 000th pageview. Hurrah! A lot of round numbers and many 'a milestone for sure.

Perhaps you are wondering what is getting given. Perhaps you wish me to get on with it and cease my incessant blathering. Indeed. Forgive me. Let's do this thing.

First off, contrary to popular belief, I am NOT giving away dandelions. They just somehow got themselves into my pictures. They're everywhere.

This is what I will be giving-away:


1. One me-designed handbag upcycled from an old sweater, and inspired by the book "ReSew" by Jenny Wilding Cardon and published by Martingale & Company.
2. One copy of "ReSew" which I reviewed in my last post here.
3. Five fat quarters from the Art Gallery "Color Splash" collection.
4. One seam ripper by Clover.
5. One package of 16 embroidery needles, size 3/9 by John James.


To enter you must:
  • Be from Earth.
  • Have an email account that isn't broken or dead to you, and can be reached by me.
  • Leave a comment on this post stating your most beloved colour of all time.
The winner will be randomly chosen on Thursday, May 26th, 2011 @ 6 pm EST and announced in Friday's post.

And finally, to you who has visited this little blog over the last 13 months, who has left a kind word, who encourages me and pats me on the back, to you my friend I want to say thank you. It's a joy to share my crafty experiments and musings with you. Thank you for being here. ♥

Now, if I dig deep, I'd have to say my favourite colour of ALL time is aquamarine blue. What's yours?

THIS GIVEAWAY IS NOW CLOSED! THANKS FOR ENTERING!

Monday, December 13, 2010

Gadzooks, It's a Giveaway!


THIS GIVEAWAY IS NOW CLOSED!


Well, the people have spoken! Okay... ONE lovely person who's blog starts with a Dresden and ends with a Quilter spoke, and since I do take your suggestions extremely seriously, a giveaway is getting given here today!

WHY A GIVEAWAY?
  • First, it's a Follower milestone here at Michele Made Me! My heartfelt gratitude to you who comes by, reads my thoughts, peeks in at my work, leaves a kind word, and returns regularly to keep me company. I wish I could explain what that means to me... Thank you. ♥
  • Second, it's Sew Mama Sew's Giveaway Day in which I am a downright jubilant first-timer!
  • And third, 'tis the season to be giving, fa la la la la la la la la!

WHAT'S BEING GIVEN?

  • A small recycled ice-cream-bucket-turned-felt-and-embroidered-button-box designed and made by me.
  • Some Michele Made Me handmade covered buttons. (Find out how to make your own by clicking the link.)
  • Some Michele Made Me handmade wooden buttons. (Find out how to make your own by, well, you know...)
  • 2 spools of pearl cotton twine
  • 1 vintage lace collar and 2 pieces of lace
  • Some yarny crocheted bobbles

WHAT ARE THE GIVEAWAY RULES?
  • Please leave a comment that consists of YOUR FAVOURITE SAYING. In other words, what is the most common group of words that spills out of your mouth many times a day each and every day? For example: "Goodness gracious!" or "Holy mackerel." or "Ya know what I mean, jelly bean?" Whatever it is, that's the comment I want. Let 'er rip.
  • Make sure I can reach you by email.
  • Anyone, anywhere can enter.
  • Giveaway ends Friday, Dec 17th at 12 pm noon EST. The winner will be chosen by random number generator. I will announce and contact the winner shortly thereafter.

Now, let those precious little words fly...

Good luck, and have a great day!

THIS GIVEAWAY IS NOW CLOSED!


Saturday, December 11, 2010

What Rhymes With Live-Away?


It's a toughie.... Hmm... I'll be back on Monday to "give" you the answer... Tee hee...

Friday, November 19, 2010

Have you seen this flamingo?


  • Last seen: on October 18th, 2010, in a box amongst tissue paper on her way to the U.K. She has yet to reach her destination.
  • General Description: She's a flamingo with dark brown eyes. She's approximately a foot tall. She's very light. She is made from an old pink T-shirt. She wears a yellow and pink felt hat that looks like a flower. She is adorned in small felt flowers, and has a yellow ring around her beak. She's very well behaved and never says boo.


  • Distinguishing Features: Both her eyes are on the same side of her head. The tops of her feet are green with little salmon-coloured hearts. The undersides of her wings are orange. She has cork-screw legs. She will answer to exactly no name because she hasn't got one. Sniff.
I never named the flamingo because ultimately she isn't mine. I am only her creator. I made her for the Softie Swap held by The Clip Café earlier this year. She actually belongs to Amy @ The Happy Daisy and I felt it was more appropriate that Amy name her. I now regret that decision. Now there's a little pink floral flamingo bobbing amongst the bitterly cold waves of the North Atlantic with nothing. Not even a name. Sniff again.

If anyone sees this flamingo or has any information regarding its whereabouts please contact me or Amy @ The Happy Daisy anytime, day or night.


Now please have yourself a safe and happy day!

Friday, August 27, 2010

Tutorial Revisit - Teddy Bear Swim Needle and Hook Book


Here is a tutorial that I published as a guest-post over at Sew Can Do on the 23rd of July, 2010. I thought I'd post it again today at Michele Made Me because I had so much fun designing and crafting it!

Here it is: The Teddy Bear Swim Needle and Hook Book

Today I am showing you how to make a 'Needle and Hook Book' to hold all of those sewing needles and crochet hooks. It is a colourful little project made of felt and yarn.

So, here's what you will need: yarn, felt in many colours, embroidery floss, fabric, scissors, a couple of sewing needles.


All that, plus your trusty sewing machine.

Now, my design process is kinda simple. I just take out several felt colours that I feel go well together and start working! From these colours, I choose a main colour.
Here, I chose blue. From this blue I cut out a 10"x 10" square. That's my background.

From my other coloured scraps, I very uncarefully (no templates here) cut out a bunch of differently sized circular shapes. I cut out a BUNCH. If I have too many I save them for a later project.


I start to place my circles in some appealing way on my blue background, layering some of the circles, grouping them in complementary ways. Until I create a design that pleases me. In other words, I GO with it... I BECOME the felt, so to speak.


Once I have a design that I like, I pin a section of it to the background.

The rest of the felt design, I remove from the background and carefully set aside somewhere safe so it doesn't get all messed up. Don't want to have to start re-designing all over again!


Working on this one section from the bottom layer up, I start embroidering the edges of my pieces with embroidery floss (your colour choice). Here I use the most basic blanket stitch for every edge. For each eye, I use a french knot.

I repeat this step for each section of the design, until the whole thing is embroidered onto the background.


Now I can embellish the whole piece with some couching. In this case the couching is done using yarn, and thread (to hold the yarn in place). You'll need a large sewing needle for the yarn and a smaller one for the thread.

I start the couching by making a knot in the end of my yarn and bringing the yarn up through the background as shown. I do the same with the needle and thread. The couching process is also very free-form. I design as I go, placing the yarn where I think it looks good and then sewing it in place with the thread.


I do as much or as little as I like. The design dictates how much couching is needed.


Once the couching is done, I cut out two rectangles of felt 4-1/2" wide x 10" high.
I place them on the reverse side of my background.


I machine-sew them in place with a 1/4" seam allowance.


Next, I cut two rectangles out of a matching fabric. One rectangle measures 9-1/2" x 19"; the other measures 9-1/2" x 5". Here I fold the larger rectangle in half right sides together, making a square.


As in the following pic, I machine sew a hem in the top of my small rectangle. I place the small rectangle between the two layers of the square. Then I pin the edges of the square and machine-sew (1/4" seam allowance) all around the edges leaving a 3" gap in the bottom edge.


I flip the whole thing inside out and press. Now it looks like this.


I close up the hole in the bottom with some hand stitching.


And machine-stitch down the centre of the square. I also make some smaller channels by stitching a few lines in one of the pockets as shown.


You see it better here...


Now I pin the fabric square onto the felt square, back sides together.


And I machine stitch down the centre to attach the fabric square to the felt square. It looks like this from the other side.


Do I like the look of all that machine stitching on the front? Naw, it looks bad! So I couch on top of the machine stitching all around the edges and down the centre line.


To make it look like this... Much better! Look at those little teddies swimming around! They are having so much fun!

Now, we're almost done, but not quite!


Finally, I make a fastener using a small piece of felt which has a 1-1/2 " slit in one side and is reinforced with blanket stitching. This piece is stitched to the back of the book and embellished with a circle. And a special "made-from-scratch Michele-Made-Me" covered button is used to finish the whole thing off!!!


Here is the end result!


And here is another one I made for a friend using pretty much the same process.


Now it's your turn! Have fun!

P.S. I'm linking here.

Wednesday, August 25, 2010

Colourful Felt Monster


This week, but more like month really, I'm in the midst of a major workroom cleanup. It's crazy how much stuff I have to go through and organize and clean. Oh the cleaning... I'm trying to do it in little bits so as not to get overwhelmed.

Last night I tackled my felt pile. I 'felt' it needed some TLC. I wanted it organized by colour. I wanted to get it all on one shelf. I actually wanted to get it all in one room first. Many little piles had mushroomed magically in several different locations about the house. How that happened we'll never know... But after a few good hours of consolidating, dividing, ironing, and sorting, I managed to wrestle the colourful felt monster into shape!

Only 25 categories of craft supplies left to do! Sigh...

One step at a time, right?

Have an organized day!

Monday, August 23, 2010

Explore the Pyramid


A quiet and concise little post this morning... This is the patchy pyramidal pincushion that I made for Amy of During Quiet Time for Pincushion Pass. I hope she likes it!

Have a marvelous Monday!

LinkWithin

Related Posts Plugin for WordPress, Blogger...