
Today's post originally appeared in November 2011 at Pickup Some Creativity as part of Chris's immensely practical Sewing 101 series. I'm re-posting it here now. Here we go...

I've decided to tackle this post from the point of view of a learner because, to be honest, that's what I'm doing. I'm sitting at the front of the class doing these things for the first time, fumbling about, and figuring them out as I go. As a result, I will be sending you hither and thither to a few really great tutorials.
Are you ready? Let's learn something!
So for my part, I've chosen to explore the "ins and outs" of the loop closure as an alternative to buttons and button holes, snaps, and other closures, so that we might add it to our bag of sewing tricks. The loop closure is simple. Essentially, it's made up of two elements: 1) the loop, and 2) what I'm going to call "the anchor". See? I'm making stuff up already... As part of my learning, I decided to try my hand at a few loop closure variations.
Variation #1: Fabric Loop + Button
First, I visited The Sewing Diva. Her button loop tutorial showed me how to make the most basic button loop closure. The process photos I include below are only to prove that I actually tried doing it for real. The Sewing Diva will show you the way.
Just let me add two small recommendations to the info The Sewing Diva provides: 1) to get the perfect button placement once you've sewn in the loops, mark the button locations through the loops and stitch the buttons in place. And 2) to make the loops themselves, make tiny fabric tubes using the highly recommended "Turning Tubes of Fabric" trick from Pattern Review and go from there.

I will say this for the basic button loop. Of the variations I tried, this is by far my favourite. Once you've learned the trick to lining everything up properly, it is quite simple and the results are so pretty. Not only that, but it won't take long to perfect. The following result was my very first attempt. Not too bad eh? Only a little bit off. I still think it looks pretty.

Variation #2: Fabric Loops + Tie
Next, using the very same method as in #1, I decided to try putting a series of loops on either side of an opening, and have it lace up like a pair of shoes. You've no doubt seen this concept on vests and dresses to allow for growth or cinching. But I could imagine using this variation as a small-scale decorative element on the flap of a messenger bag maybe, or on the back pockets of girl's pants even. Wouldn't that be cute?

Again in variation 2, I used the handy "Turning Tubes of Fabric" trick from Pattern Review to make the loop fabric.
Variation #3: Stretchy Loop + Decoration
Elastic hair ties make great stretchy loops. For my third loop closure variation, I started by making a felt swirly flower. Dozi Design shows you how to make swirly flowers here. I made my flower out of felt instead of paper, secured it with several stitches, stitched on some leaves, and paired my flower with an elastic loop for a sweet decorative closure. I used the very same method presented in #1 and #2 for installing the loop.

The possible uses for this closure are many and varied. Think belts, bracelets, needle cases, journal covers, bags and more. The stretchiness of the loop allows for firm closure and permits the use of bigger and odd-shaped anchors. For example, instead of a flower, why not use something else entirely? Like a painted wooden cutout or a crocheted bobble? Just make sure your loop is long enough to stretch around your chosen anchor.

Variation #4: Chinese Frog and Knot
Before writing this post, I had seen "frogs and knots" on oriental dresses and silk bags. You can purchase these closures ready-made in sewing shops and online. But guess what? You can actually make your own too! Bridges on the Body has a beautiful Chinese frog and knot closure tutorial that will allow you to make your very own closures to match your particular project.
Before writing this post, I had seen "frogs and knots" on oriental dresses and silk bags. You can purchase these closures ready-made in sewing shops and online. But guess what? You can actually make your own too! Bridges on the Body has a beautiful Chinese frog and knot closure tutorial that will allow you to make your very own closures to match your particular project.

Truthfully, it took me many many - probably about 15 to 20 (I stopped counting after awhile...) - tries before I got these to look anywhere near authentic. But to be fair, I was using the wrong type of cord at first: a small crocheted chain that I'd made. Bad idea.

To be successful, you need the type of cord with a high coefficient of loopiness. In other words, it's gotta hold its loopy shape and resist flopping and folding. Once I figured that out, the frogs were much easier to make. Also, after so many tries, the method is etched forever in my little brain. But it is an elegant process once you know it. I'm very glad I learned it!

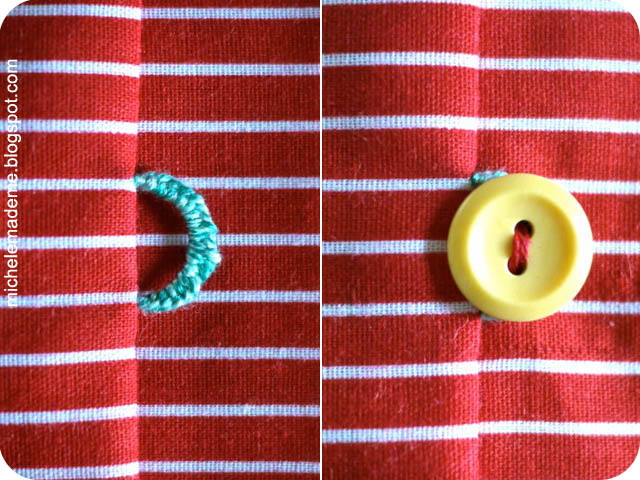
Variation #5: Emboidered Loop + Button
And finally, the fifth variation that I attempted was this embroidered loop. I learned how to make it from Ysolda.

Ysolda's button loop tutorial perfectly explains the easy steps to create this simple embroidered loop. It seems to me this variation would be perfect for a small subtle closure, one that you hope won't be too obvious.
And there you have it: my round-up of five loopy closures. Hopefully you will find it useful or, at the very least, feel encouraged to learn about a different closure! I certainly did. I'm sure whole new neural pathways have formed in my brain as a consequence too. And it didn't even hurt. Yay!
Okay that's the post. Thanks for reading. I'll be back here on Saturday!
♥M

wuwwww!!!... magnifico...
ReplyDeleteThat has been quite a study! I love variation 2, it is fun and a bit naughty!
ReplyDeleteI agree the tie version is very cute and one I hadn't thought of. I love frog closures and I've always wanted to learn how to the embroidered loop.
ReplyDeleteyou are so amazing and inspirational. Thanks.
ReplyDeleteThenk you!
ReplyDeleteImmensely useful!!! I am particular to the hair elastic closure...however over time they do tend to stretch out and lose their elasticity, sadly (my coffee cozy bit the dust this way). Good excuse to make a new one! Thanks Michele!
ReplyDeleteWow, thanks for sharing! I would never have thought to use pins for the embroidered loop. Would come in handy for tying Chinese knots! :-)
ReplyDeleteI forget how I found this blog. Oh Now I remember Allcrafts! I am so impressed with your creative eye. Thanks!
ReplyDeleteBeautiful tute, Michele! I love the crisscross tied one!
ReplyDeleteOh. My. Goodness. I thought I was wasting time messing around on the computer and I came across this posting. Thank you for turning my morning into TIME WELL SPENT. I can't wait to find a way to use these instructions! By the way, your fabric choices made the tutorial even more exciting.
ReplyDeleteI think this is a wonderful story! You positively know the best way to convey an issue to mild and make it important.See more This is our beautiful Brazilian Lace Closure lace closures It is 6A grade 100% Brazilian Hair. Brazilian lace closure is avail in Body Wave or Straight hair texture.
ReplyDelete