Showing posts with label Gwenny Penny. Show all posts

Wednesday, December 7, 2011

Haul Out The Holly: Petite Purse Ornament


Today I'm Haul-ing Out The Holly with Gwenny Penny! Have you heard of this special event? Well, let me tell you. From November 28th to December 16th, 2011, Gwen is busy "featuring fifteen original holiday-themed tutorials from fifteen talented craft bloggers". Wow. That ought to keep you hopping for the "holly"days, eh?

Haul Out the Holly,Gwenny Penny,Christmas tutorials

So if you've come over from Gwenny Penny, welcome to Michele Made Me!

As you may or may not know, I have two older girls...well... women would be a more accurate descriptor probably... they are 19 and 24 years of age after all... Each year by request, we give them the gift of moollah. And each year we do the same old thing: we put the money in cards and place the cards in the tree blah blah blah. This year I wanted to do something a little more memorable, a little more special, you know? Hence, the petite purse ornament. Each monogrammed purse is just big enough to stuff with a bundle of crisp bills. I am actually excited to hang these pretties in our tree for the girls. I also plan on using them every year from here on out too. So I made them to last. Won't that be a sweet new tradition?

Shall I show you how I made them? Walk this way...


Tutorial ❆ Petite Purse Ornament

Since this project is so small, you may have everything on hand to get started straightaway. You never know... Let's see. One petite purse requires:


  • Fabric scraps [one solid (I used old pants), and two prints]
  • Embroidery floss
  • Pretty cord or ribbon for hanger and loop closure
  • Button
  • Pair of scissors
  • Transfer paper
  • Needle and thread
  • Sewing machine
  • Straight pins
  • Paper
  • Pencil
  • Circle template (I used a small drinking glass)


  • Step 1. Start by tracing out two paper templates. The larger template measures 3 inches (8 cm) x 5-1/2 inches (14 cm) and the smaller measures 3 inches (8 cm) x 4-1/2 inches (11.5 cm). Use a small drinking glass to round out the corners of both templates. Cut the templates out.

    Step 2. Cut out your fabric. For my solid fabric, I used a pair of old cotton pants. Cut 2 of the large template from the solid fabric. Cut 1 of the small template from a colourful printed scrap; it will serve as the pocket. Finally cut a ~ 30 inch (75 cm) x 1-1/2 inch (4 cm) length of another pretty print for the binding.

    Step 3. Take the small colourful piece you cut out and fold it in half, wrong sides together. Press it. Pin it in place onto the good side of one of the larger solid pieces. Match the bottom edges as below.


    Machine-sew that piece in place along the perimeter only using a 1/8 inch (3 mm) seam allowance.

    Step 4. Next, if your fabric has some pretty detailing (mine had a bird on it) you might want to draw something similar for your embroidery detail. That's what I did. I drew a close likeness of the bird on a piece of paper and then transferred it near the bottom of the other solid piece using transfer paper. Make sure it is centered and not too close to the edges. Then I embroidered the bird using a simple backstitch. After turning the piece around, I then transferred the initial "N" (in American Typewriter Font) onto the opposite end of the same piece. I backstitched the "N" as well. 

    Notice the "N" is upside-down in the following photo. That is as it should be.


    Here's a closeup of that bird on my colourful print fabric.


    Step 5. Now pin the two solid pieces wrong-sides together. Mark a line 1 inch (2.5 cm) up from the pocket. Stitch along that line. Sew a second line of stitching 1/8 inch (3 mm) up from the first line.
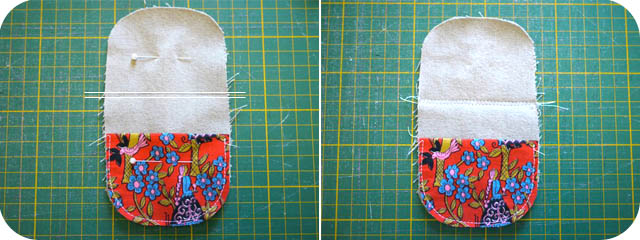

    Step 6. Next it's time to attach the loop closure. I used a 4 inch (10 cm) length of gold cord to serve as my loop, but you could also use a piece of ribbon or make a matching fabric loop. I folded the gold cord in half to create my loop. Pin the loop along the top edge of your main piece, just above the monogram. The loop should be facing in, as shown, and lying about 1 inch (2.5 cm) into your fabric. Machine-stitch the loop onto the piece with a 1/8 inch (3 mm) seam allowance.

    Step 7. Now for the binding. Fold your binding in half lengthwise and press. Starting in the middle of a long edge of the main piece, and leaving a few inches of slack, pin the binding in place. Be sure the binding hugs the edges as closely as possible. You'll notice the binding will bunch a bit in the corners. That's okay, as long as the binding is flat near the edges.

    Don't forget the hanger. Pin it in place under the binding and perpendicular to the bottom edge near the two lines of stitching as shown below.


    Step 8. Slowly, machine-stitch a 1/4 inch (6 mm) seam most of the way around except for the two inches (5 cm) in the center where the ends of the binding will meet. Machine-stitch the binding ends together, ensuring that there will be no slack in the binding once this is done. Trim the excess binding.

    Once again, don't forget the hanger. Pin it in place under the binding and perpendicular to the top center edge near those two lines of stitching. Finish sewing the seam.


    Step 9. Trim the edges of the piece all the way around. I removed about 1/8 inch (3 mm) of fabric from the edges.


    Step 10. Turn the ornament over. Flip the binding to this side as well. With needle and thread, baste a running stitch all the way around the very edge of the binding. Pull the ends of the thread to tighten the binding snuggly around the edges.


    Step 11. Carefully handstitch the binding in place.


    Step 12. Attach a lovely button to the bottom center of the colourful pocket, hiding your knots within the pocket.


    Step 13. On Christmas Eve, secretly place some money in the pocket and button it up. On tip toe, hang it up in the Christmas tree and let your child discover their windfall in the morning! Ho ho ho...


    Your work here is done!


    Now, as a bonus, if you recall Monday's post, I'd shown you some grooming kits I'd made as gifts? Eh? Well, if you omit the hangers from these little purses and scale up the templates a little, you can create Monday's grooming kits from this same pattern. Handy, oui?

    Okay. That is that, I think. Let me just thank Gwen for inviting me to share in her joyous event. Big hugs to you Gwen! And let me remind you to visit Gwenny Penny to have a gander at all the Haul Out The Holly goodness from this season and last.

    You have a lovely day now. I'll be back here on Saturday.  ♥M


    Monday, September 19, 2011

    Drop-Dead Denim Guest: Gwen From Gwenny Penny


    Week 3 of our little denim experiment appears to be upon us. Stunning how quickly time is buzzing by us. Luckily, my friend is here to help us appreciate what time we have left. Her name is Gwen and, well, I think I'll let her handle things from here...


    Hey, everybody! I’m Gwen, and I blog over at Gwenny Penny. I'm so flattered that Michele asked me to be a part of her clever Drop-Dead Denim event. I love to sew, but I had never sewn with denim until Michele presented me with this challenge. I bought myself a needle made specifically for sewing denim, and you know what? It wasn't bad at all! Today I'm going to show you how to make a denim round-bottom clothespin bag like this...


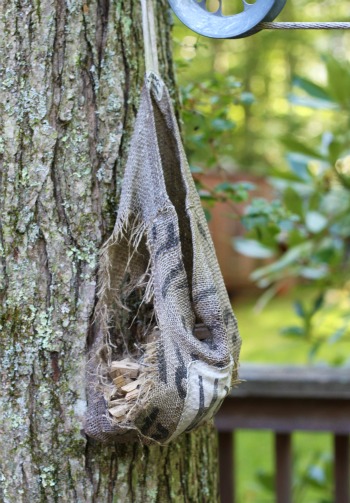
    Isn't it cute? It's really simple, too. Let me start with a little story about how this came about. A couple of years ago I bought an adorable burlap clothespin bag. It hung on a hook on a tree by our clothesline, and it looked fantastic. Over time, the evil squirrels that are slowly taking over our yard destroyed this cute little clothespin bag. And all that was left was this...


    It was in sad shape. I'm not even sure how the clothespins were still staying in the bag.


    I decided it was high time I made a new clothespin holder, and I'm hoping the denim will hold up to the squirrels better than the burlap did.

    OK, enough about my clothespin bag troubles. Want to make one? Here's the how-to...

    Materials:
    • 1 old pair of jeans
    • a few scraps of fabric
    • paper-backed fusible web (I used Wonder Under.)
    • seam ripper
    • ruler
    • scissors
    • thread
    • pen
    • iron
    Instructions:

    Step 1: You are going to use a pant leg from your jeans to create your bag. Lay out your pair of jeans and cut one pant leg 10.5" from the hem.


    Take this piece and measure the width of the leg across the end where you just cut. Write this down... you'll need it in a few minutes.


    Going back to your pair of jeans, with your jeans laying front side down, cut right up the seam of the pant leg to get to the widest area of the leg. Cut across under the pocket to open up the fabric.


    Step 2: Now you will need your pant leg width measurement from Step 1. You need to determine what size circle to cut for the bottom of your bag. This can be done using the equation for circumference, C=(Pi)d, where we are looking for the diameter, d. If you are afraid of math... don't freak out! I'm a former math teacher; I'll walk you through it. You want to know what diameter to use, so take your measurement, multiple it by 2, and divide that by 3.14. That will give you the correct diameter for cutting your circle. For example, my width measurement was 9.25". I multiplied that by 2 to get 18.5". I then divided that by 3.14 to get 5.89". I rounded that up to 6".

    Next, I took the very scientific approach of measuring every bowl I own to find one that is 6" in diameter. I traced that onto my opened up pant leg, then cut out my circle.


    Step 3: Cut out one of the pockets on the back side of the jeans. Cut as close to the edges of the pocket as possible.


    Cut off the back of the pocket. Cut as close to the seam as possible.


    Step 4: Time to decorate the pocket. The possibilities are endless, but here's what I did... I took four scraps of fabric and some paper-backed fusible web. I ironed the fusible web onto the back of my scraps, following the manufacturer's directions. I then cut hexagons from each of the scraps (I used my AccuQuilt GO! Baby fabric cutter, but you can use any type of die cutter or trace a template onto the fabric and cut the shapes by hand). I removed the paper from the back of my hexagons, arranged them on the pocket, and ironed them in place. Finally, I sewed around each hexagon, about 1/8" inside the edges. Cute, huh?


    Step 5: Lay out your pant leg piece from Step 1 with the original hem of the jeans at the top (You'll be tempted to turn it around so the hem is at the bottom... don't). Position your pocket in the center on one side of the pant leg and pin in place.


    Sew around the edges of the pocket, leaving the top open.


    I use the front pocket to hold my clothesline spreaders (those things that keep the top and bottom of the clothesline from spreading too far apart when the clothes are hanging on the line). Hopefully it will not become a storage unit for a squirrel's winter supply of nuts and acorns.

    Step 6: Turn your pant leg inside out. Take your circle from Step 2 and mark every quarter with a pin. To do this, fold the circle in half vertically and place pins at each fold. Open the circle and fold in half horizontally. Place pins at each fold. Do the same around the raw edges of your pant leg... place a pin at each seam and pins on both sides halfway between the seams.


    Match up the pins on your circle with the pins on your pant leg. Pin the two with right sides together at the four places where your pins meet up at each quarter.


    Add additional pins all around the edges, and sew around the edge using a 3/8" seam allowance.


    Your basic bucket shape is complete! This is what you should have at this point...


    Step 7: Now you need some way to hang your clothespin bag. Using a seam ripper, remove two belt loops from your jeans.


    Loop one of the belt loops around and pin it to the inside of the back of the bag in the center, right at the top.


    Loop the other belt loop around and pin it to the inside of the front of the bag in the center, right at the top. I added this loop to keep the bag closed when I'm not using it (and to discourage unwanted visitors from sleeping in it :). When I want clothespins, I just need to remove the front loop from the hook in order to get into the bag.

    Sew back and forth over both belt loops to secure. And guess what? You're done!


    I hope you'll come visit soon over at Gwenny Penny. I would love to have you stop by. Thanks so much for having me here today, Michele! Wish me luck with the squirrels :)


    Um, don't tell Gwen I said this but, honestly if I were a squirrel, I'd move all my nuts lickety-split to that clothespin bag, settle in with the wife and kids, and never leave. That is one sweet bucket of a clothespin bag! I'm impressed at Gwen's use of all the different jean parts, and how she works that π (3.14) like there's no tomorrow. She is one smart cookie, eh?

    Thanks so much for playing along Gwen. It was an honour having you and I hope we'll work together again very soon!

    Okay. For today I'm Diggin' This Denim: Denim Chair by Scrap Lab

    You have yourself a fabulous Monday now. Chris from Pickup Some Creativity will be having a go at the denim on Wednesday. And me? Well I'll see you then!

    LinkWithin

    Related Posts Plugin for WordPress, Blogger...