Showing posts with label basket. Show all posts

Saturday, March 9, 2013

Tutorial: Mini TP Roll Easter Baskets


Just in time for Easter, I'm making some tiny, wee, little Easter baskets entirely from recyclables. You in? Let's get to it!

For this craft you will need: a TP roll or two, empty cereal box OR tissue box, pair of scissors, regular hole punch, glue, pencil, ruler, exacto knife, and liquid acrylic paint and paintbrush (optional).

Step 1:   Using a ruler and pencil, find the center of the TP roll and mark a line all the way around it. With an exacto knife, cut the TP roll in two along that mark as below.


Step 2 (Optional):  Give your TP roll pieces a coat or two of liquid acrylic paint.


Step 3:  Mark a line 1/2 inch (13mm) from one edge of your TP roll piece. Using a hole punch, punch an even number of holes along this line all around the TP roll. I punched 16 holes in mine. Now punch the same number of holes along the other edge of the TP roll as shown below.


Step 4:  Take out your cereal box or tissue box, whichever you're choosing to use for your mini-basket, and cut off the end flaps. Now cut narrow strips along the length of either type of box. The strips must be able to slip into the holes in your TP roll so check to see if they fit before you continue. If you've punched 16 holes in the edges of your TP roll, you will need at least 9 cereal box or tissue box strips.


Step 5:  Gather your TP roll, narrow strips and glue. Curve the narrow strips by slowly running them between two fingers. Go slow to avoid getting a papercut. Ow.


Step 6:  At this point, note that you have a series of holes that is further from one edge of your TP roll than the other. See what I mean? The holes that are furthest from the edge indicate the top edge of the basket. Weave a strip through a top edge hole and through the corresponding bottom edge hole. Curve your strip around and weave it up through the holes on the opposite side of the TP roll. The ends of the strip should be jutting out of the top edge of the TP roll. Glue the strip to the TP roll as shown below.


Step 7:  This step is essentially the same as Step 6, but once you've woven the second strip into the holes immediately beside the first strip, you will curve it down and around the bottom and cross it over the first strip, weaving it into the adjacent holes on the other side. Repeat Step 7 for the remaining strips.


Step 8:  Trim the excess strip sections that jut out beyond the top of the basket. Take the last strip and form a handle by curving it and glueing it in place along the edge.


Every TP roll makes two mini-baskets. Make each basket unique by changing up the weave or paint colour, adding confetti embellishments, trimming the strips higher, or doing exactly as YOU please!

Come Easter morning, fill each mini-basket with a wee bag of mini-Easter eggs and hand them out to all of your favourite people.
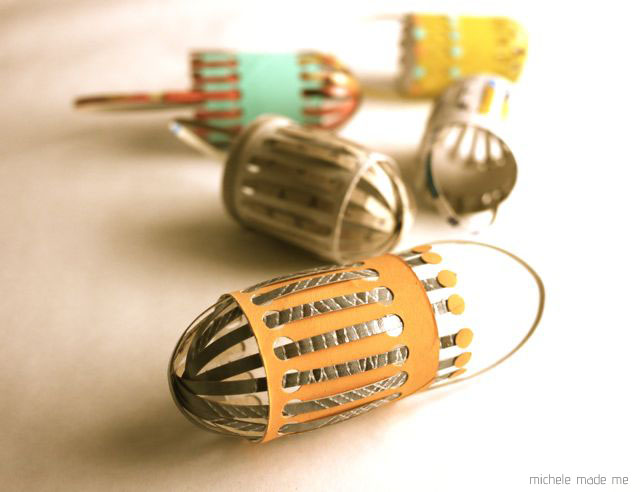

I bet they'll be egg-cited!

♥M

P.S. HERE's a whole 'nother paper Easter basket for ya!

Saturday, February 4, 2012

Juice Can Cereal Box Basket Tutorial in The Shop!


A small basket made from a juice can and a cereal box @ Michele Made Me

It's time I update my wee shop, don't you think?

Today's shop offering is a 9-page PDF tutorial for my "Juice Can Cereal Box Basket". You've probably divined from its name that it is entirely recycled. And you've no doubt correctly assumed that it is woven from a metal-bottomed, frozen concentrated fruit juice container and a cereal box. You'd be right on both counts, of course.

PDF Tutorial for baskets made from a juice can and a cereal box @ Michele Made Me

Does this mean we're on the same page, you and I, and I barely have to speak anymore? That's okay. It's good that we're comfortable. I'm happy that you "get me" you know? Darn nice, that.

Well I  am off to enjoy my weekend. You have a lovely one too.

♥M

Friday, March 25, 2011

Nest? Basket? I Do Not Know...


Is there a simpler way to ask it?
Is this nest or is it basket?
'Tis true that in its heart eggs rest.
So is it basket or is it nest?

It's made of paper, so you've guessed.
I have re-used again, no jest.
Yet I am flustered, I cannot mask it.
Don't know if this be nest or basket.

I think I may just blow a gasket.
This quest may send me to my casket.
How do I know which name is best?
Nest or basket, basket or nest?

Perhaps it's best to let it rest,
For this has surely left me stressed.
So I will leave YOU one small task:
That is to name my nest slash basket!

Thank you.

(A silly poem by Michele, March 2011)


Alright, here's the thing to make the thing...


Tutorial - Basket? Nest?

You will need:
  • Empty cereal box
  • Yarn ends
  • Scissors
  • PVA glue (the white stuff)
1. Using your scissors, cut off the flaps from both top and bottom of the cereal box.
2. Cut your cereal box around and around creating a continuous piece of cardboard "twine". One small basket will require you to cut up at least half the box in this way.
3. Begin coiling the cereal box twine around your finger. Tie it with a piece of yarn so it holds its shape.
4. Continue this coiling and tying process until you've built a flat disc-like object of the desired diameter. This is the bottom of your basket nest.


5. Now build the walls of your nest basket by coiling the cereal box twine around the edges of the disc and building up. Continue using little pieces of yarn to hold the walls in place every now and again until you've built up the walls to the desired height. Trim the yarn ends or tuck them into the basket nest.


6. The handle will require several lengths of cereal box twine. Make them as long or short as you like. Mine were roughly 16 inches (~40cm) long.
7. Twist the lengths together.
8. To keep the lengths twisted, tie the handle at regular intervals with short pieces of yarn. Trim the yarn ends. Now fasten the ends of your handle to the nest by tying them on with pieces of yarn. Nest basket done. Check.


9. Make eggs by balling up some yarn ends and rolling in glue. Let dry. Place in basket. Victory is yours! Your cute "thingie" is complete!


The finished product!


Now have yourself a fabulous day, and I'll see you again soon!

♥M

P.S. Here's a second little paper Easter basket for you!

Tuesday, May 11, 2010

Must. Organize. Yarn.


Do you think?...

It's like a bomb hit it or something. It's like a tiny tornado touched down right there, right in the middle of my yarn basket, stayed for a while, laughed, turned, and then went on its merry way. It's like the kitchen after my husband makes dinner. It is a disaster zone. A bloody mess. A quagmire. It is chaos, my friend.

I think it's time to bring out the To Do list. TO DO: Organize the yarn basket. Organize the heck out of it. Divide, conquer, make storage containers, sew some bags, make a thingy for the needles, colour code, separate the wheat from the chaff. Do whatever it takes to get the mayhem that is my yarn basket under control.

Alright then. Here I go. Wish me luck.

TO BE CONTINUED...

LinkWithin

Related Posts Plugin for WordPress, Blogger...