
A few weeks ago, Lo and I ordered dinner from a lovely locally-owned Thai restaurant. Delicious crispy spring rolls, pad thai, ginger chicken with rice. Yum. The spring rolls came in a pretty brown, cleverly-designed, cardboard take-out box. I was instantly attracted to the spring roll box. It was love at first bite. That box had my name written all over it. Once empty, I tried hard to clean it so that I might re-use it, but alas it was too yucky to be redeemed. Before I tossed it in the garbage however, I carefully unglued and unfolded it, and copied its sweet sweet shape onto a sheet of newsprint and cut it out. If I couldn't have the box, I could at least try to replicate it. I practiced folding my cut-out to see if I could reproduce the original box. Happily, I could, hee hee! Goodbye soily spring roll box. Hello fresh and clean little template box!
Yes. My relationship with garbage resides on that line between cunning and cuckoo. I know it. You know it. Let us accept it, embrace it, and move on.
In today's tutorial, I will show you how I made my new-fangled version of the box. I discovered in my exploration, that in a snap you can make your box easily reversible, very strong and long-lasting. How you ask? Well, let me show you. Step into my office, and we will begin!
Tutorial: Reversible Fabric Gift Box
You will need:
- 2 roughly 14" x 18" scraps of fabric in whatever colours you desire
- 1 roughly 14" x 18" scrap of fabric to place between the other 2 pieces (You may want to use interfacing instead. I didn't have any interfacing so I just used a piece of white cotton.)
- the box template which is provided here
- 4 pretty brads
- pair of scissors
- tool for poking holes (I used a tiny screwdriver)
- sewing machine with darning foot
- Mod Podge
- paintbrush
- ribbon and embellishments
1. Photo 1 shows you what the box will look like in the end. Pretty!
2. Blow up
this template to twice its size. Cut it out. Create a sandwich with your 3 fabric pieces with top and bottom pieces having good sides out. Ensure that the fabric sandwich is somewhat larger than your template.
3. Using your sewing machine and darning foot, free-motion quilt a stipple pattern on your sandwich. Once your sandwich is quilted, cut-out the template shape.
4. Notice that I added a line of stitching 1/4" from the edge for extra strength. You may want to zigzag the edge or finish it in some other way. I chose to leave it raw.
5. Because I didn't use interfacing, I decided to spread Mod Podge over both the top and bottom fabric layers. I mod-podged one side, let it dry, and then mod-podged the other side.
6. Once dry, the Mod Podge gives the fabric some rigidity.
7. Fold the fabric along all fold lines, according to the template.
8. Next bring two of the corners (see photo#3) up toward each other, and grab the little wedge section (see photo#3) that joins them between your fingers as in #8.
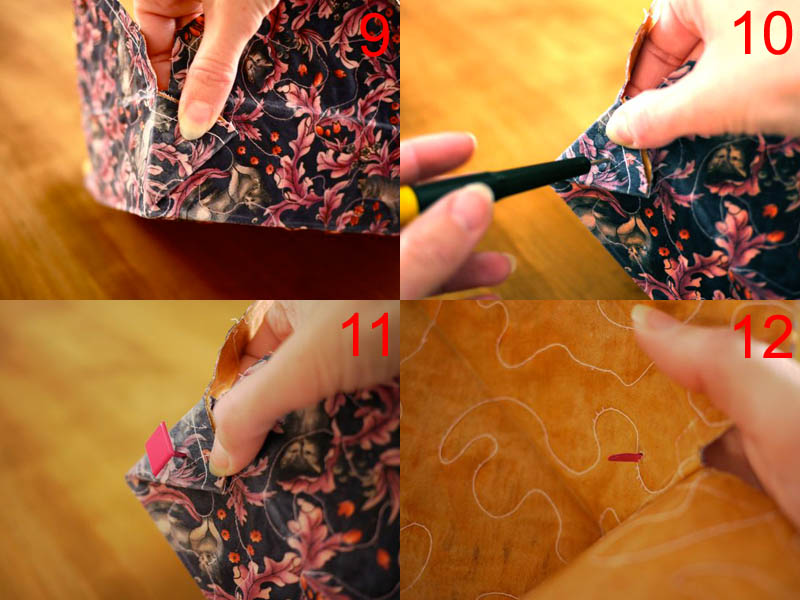
9. Fold that wedge section flat against the long side of the box.
10. Poke a hole through the wedge and through all layers. I used a tiny screw-driver as a hole-poker.
11. Now insert a brad through all layers.
12. At this point, you will see the brad end inside the box.
13. Fold down the little arms of the brad.
14. Repeat steps 8 through 13 to form all sides of the box.
15. Fold down the small top flaps of the box, followed by the large flaps.
16. And finally insert the curvy end of one large flap into the slit in the other large flap.
And that's it! You have a lovely, quilted, strong, long-lasting and reversible fabric box that renders gift wrap redundant. And you made it, yippee!
Place your gift inside, attach a ribbon and maybe an
egg carton flower, and you're off to bring joy into someone's little world!
Now this box has at least two personalities. I've devised a catchy little phrase to help you find them. It goes:
Unfold it, reverse it, refold it, behold it!
And there you have it: a whole different gift box! It couldn't be easier, could it?
This is just the little project on which to practice your free-motion quilting. Make a few and you'll soon be ready to tackle more substantial free-motion jobs. That's MY plan anyway!
Now please do have yourself a lovely evening, and I'll see you again soon!


