Showing posts with label newspaper. Show all posts

Thursday, June 6, 2013

You Guest It: Hectanooga

Welcome welcome! It's time for You Guest It! I just love this sweet series, you know? And not just because I get to be all lazy and slothful either - but also because I get to meet some really cool folks who make some pretty neat stuff. And then of course, there's the part where I get to share it all with you. That's pretty nifty too! 

Today's guest is Emi from Hectanooga. Let us see what this seriously busy woman has in store for us today...

***

Video Tutorial: Stacked Paper Bead Necklace by Hectanooga


Hello! My name is Emi from Hectanooga and I’m passionate about crafting, designing, and recycling! And when I can do all three at the same time, I’m very happy! These stacked paper beads were inspired by a necklace I saw someone wearing on television. The necklace was similar in design - it was black metal - and I immediately thought: “Hey, I bet I could make that from paper!” These beads would look lovely painted black as well, but the print is a great conversation starter, and painting them would hide their origin!

Want to know how I make them? Here's the video that shows you how. Enjoy!


There are several reasons why I like to recycle. Here are a few:
  1. Supplies are readily available, and there's no wasting gas going out to buy supplies! 
  2. It’s free. No expense for the supplies themselves! 
  3. It’s green. Making something useful from throw-aways is always a good thing! 
  4. It’s a challenge. Thinking up ways to use these things is always fun! 
  5. Middle-of-the-night crafting is possible. You can always find something to manipulate into something else! 
  6. It’s eco-friendly. It keeps things out of the land-fill. 
  7. It’s very rewarding! Making something from virtually nothing is a thrill!
    ***
    Such a simple and pretty concept, Emi. Your choice to leave them au naturel is lovely too, and what a nice complement for the black beads! Thanks so much for joining me on the blog today and sharing your tutorial with us. 

     As I mentioned up top, Emi is a do-er and a dedicated one at that. Her specialties include crochet, jewelry-making, and recycling - a woman after my own heart, eh? I don't like to compare myself to others but, honestly, I'm feeling somewhat sheepish in comparison. Not only does she have a blog, and three Etsy shops (Hectanooga, M.E.H. Art Gallery and Hat and Scarf Patterns), but her Hectanooga YouTube site boasts... you won't believe this... 595 videos. That's 5-9-5! Is that not amazing? I thought I was doing well with 3. I have some serious catching up to do apparently. So go on now and pay her a visit, won't you? I'll see you back here in 3 years.

    ♥M

    P.S. Have an idea for an eco-craft? Consider submitting a guest-post idea to Michele Made Me's "You Guest It"! Check out the details HERE.

    Tuesday, April 3, 2012

    Baby Plants, Baby!


    Back here, The Boy and I planted a bunch of seeds in our newspaper pots and as promised, here's an update! Well... some are growing. So far basil, 2 types of tomato, mesclun, cilantro, spinach, zinnia, snapdragon, cosmos, marigold, nasturtium, and a flower garden mix have all germinated and are growing nicely.

    Still nothing from the cucumber, rosemary, petunia, ageratum. All of these are older seeds, so naturally they will take longer to break out of their seed coats... We quickly planted them without special treatment, so I may have to crack open my propagation book to see if any need to be coaxed into germinating. The petunia seeds are an experiment. I harvested them myself eons ago so I have no idea if they're even viable. We'll just have to wait and see...


    The little plants are so cute. So fragile and green. At this stage, once you've got actual green babies on your hands, you have to be careful not to over-water them. You don't want them "damping-off", dear no. Damping Off is a collection of sly, shifty, and pretty much invisible fungi that flourish under warm, moist conditions and will kill new little plant babies if given the chance. How rude! Germinating seeds have to be kept moist it's true, but once germinated, ease off on the watering and the seedlings should be fine.

    Here's the link to my handy newspaper pot plant video again in case you missed it the first time.

    Edited to Add:  Please note that I've used black and white newspaper to make the pots as black ink is made of soy and safe to use around edibles. Coloured newspapers should be avoided as the ink may contain some toxins.

    Have a brilliant day!

    ♥M

    Tuesday, March 20, 2012

    Saturday Morning Sowing


    Remember my little video for making newspaper plant pots? On Saturday morning, The Boy and I actually put our pots to use by gum.

    We smooshed moist potting soil into them..


    Wrote-up some labels using old cut up mini-blinds...


    Snuggled them up nice and cozy into a couple of deep foam meat trays...


    Sowed some seed...


    Sprinkled a little soil and water on them. And finally... placed them in a sunny window.


    Now for the hard part... Waiting.

    Hrm.

    This is a true test of my patience. I like to cheer them on whenever I walk by that particular window. A little "You can do it! Grow babies, grow!" never hurt, am I right? I'll keep you posted on their progress...

    Edited to Add on 3 Apr 2012:  Please note that I've used black and white newspaper to make the pots as black ink is made of soy and safe to use around edibles. Coloured newspapers should be avoided as the ink may contain some toxins.

    You have a great day now.

    ♥M

    Friday, March 16, 2012

    Playing With Video


    Guess what... I made a wee how-to test video. Eep. It's my very first. The concept is NOT original or nothing. In fact, you've probably seen this particular idea done at least 500 times in as many ways. But I needed some newspaper plant pots 'cause seeding time is like, tomorrow. So while I was at it, I thought I'd try pulling together a video to see where my video-making skills are at.

    I was able to do all the recording myself which was good. But as things stand now, I'll be needing substantial practice where video-editing is concerned. I got a ton of help from Lo on that front, thank Pete. I couldn't have pulled off this cute first video project without his expert help.


    Lo walked me through the basics of the "Adobe Premiere" editing software. I learned how to import my video, add music, make the title card, work with fade-ins and "dissolves", and add credits. It was fun to see it come together but GOSH, there's a lot to know! Luckily Lo is a very sweet and patient man. Opposites attract don't you know. He must've answered a good 200 questions from me yesterday, poor thing.  I kinda felt bad for him sort of but not really... Needless to say, it took a little while. At the end, he did some magical data-management-type-stuff that went in one eye and out the other too. We may have to review that section twice or thrice. But, you know? I did learn stuff. And I'm pleased with my first "solo" effort.


    So here's my take on an old standard. The newspaper plant pot...

    Edited to Add on 3 Apr 2012:  Please note that I've used black and white newspaper to make the pots as black ink is made of soy and safe to use around edibles. Coloured newspapers should be avoided as the ink may contain some toxins.


    Thanks for taking a peek!

    ♥M

    Monday, July 18, 2011

    Reader Question: How Do You Make Your Newspaper Roses?


    Recently, I've received a few emails asking exactly how I made the roses for my newspaper rose wreath. First, I have to say: darn nifty that people are showing interest in this project since it was one of my very very very very very first blog posts. Second, I have to thank Pinterest for that... Thank you ever so much Pinterest.

    Credit was given in that earlier post to the brilliant Alisa Burke whose wreath inspired mine. She shows how she made her flowers and wreath here. My flowers look slightly different from Alisa's however, which is the reason for the inquiries I think. Mine are made of newspaper and they have a loftier silhouette. Yessir. They are tallish.

    How do I get them to look like that? A valid question. One which I will endeavour to answer. To the recycling bin!

    Tutorial: Newspaper Roses

    1. You will need:
    • Newspaper
    • Pair of scissors
    • Glue (PVA)
    • Acrylic paints in your choice of colours
    • Paint brush
    2. Cut your newspaper into wide horizontal strips.
    3. Separate the strips.
    4. Glue several strips together along their ends making one long strip.


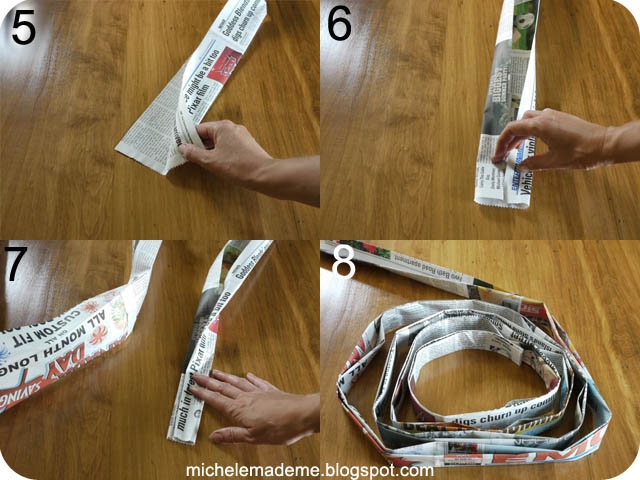
    5. Fold the strip in half lengthwise. Unfold.
    6. Fold in the sides to meet the middle foldline.
    7. Fold in half again.
    8. You will now have a long sturdy 4-ply paper strip (that looks like bias tape) with which to make your rose.


    9. Make a bud by scrunching and then coiling the start of the strip.
    10. Coil the strip flat around the bud. Every 7 inches (18 cm) or so, gently flip your strip 180°.
    11. Continue coiling the strip flat around the flower, flipping gently every so often as in Step 10.
    12. Now and then, add a dollop of glue on the inside of the strip to hold the lot together.


    13. It's beginning to look a lot like... a rose. Sing this softly to yourself as you work.
    14. Glue the end of the strip flat to the bottom.
    15. Give your rose the desired shape by squishing it in your hands.
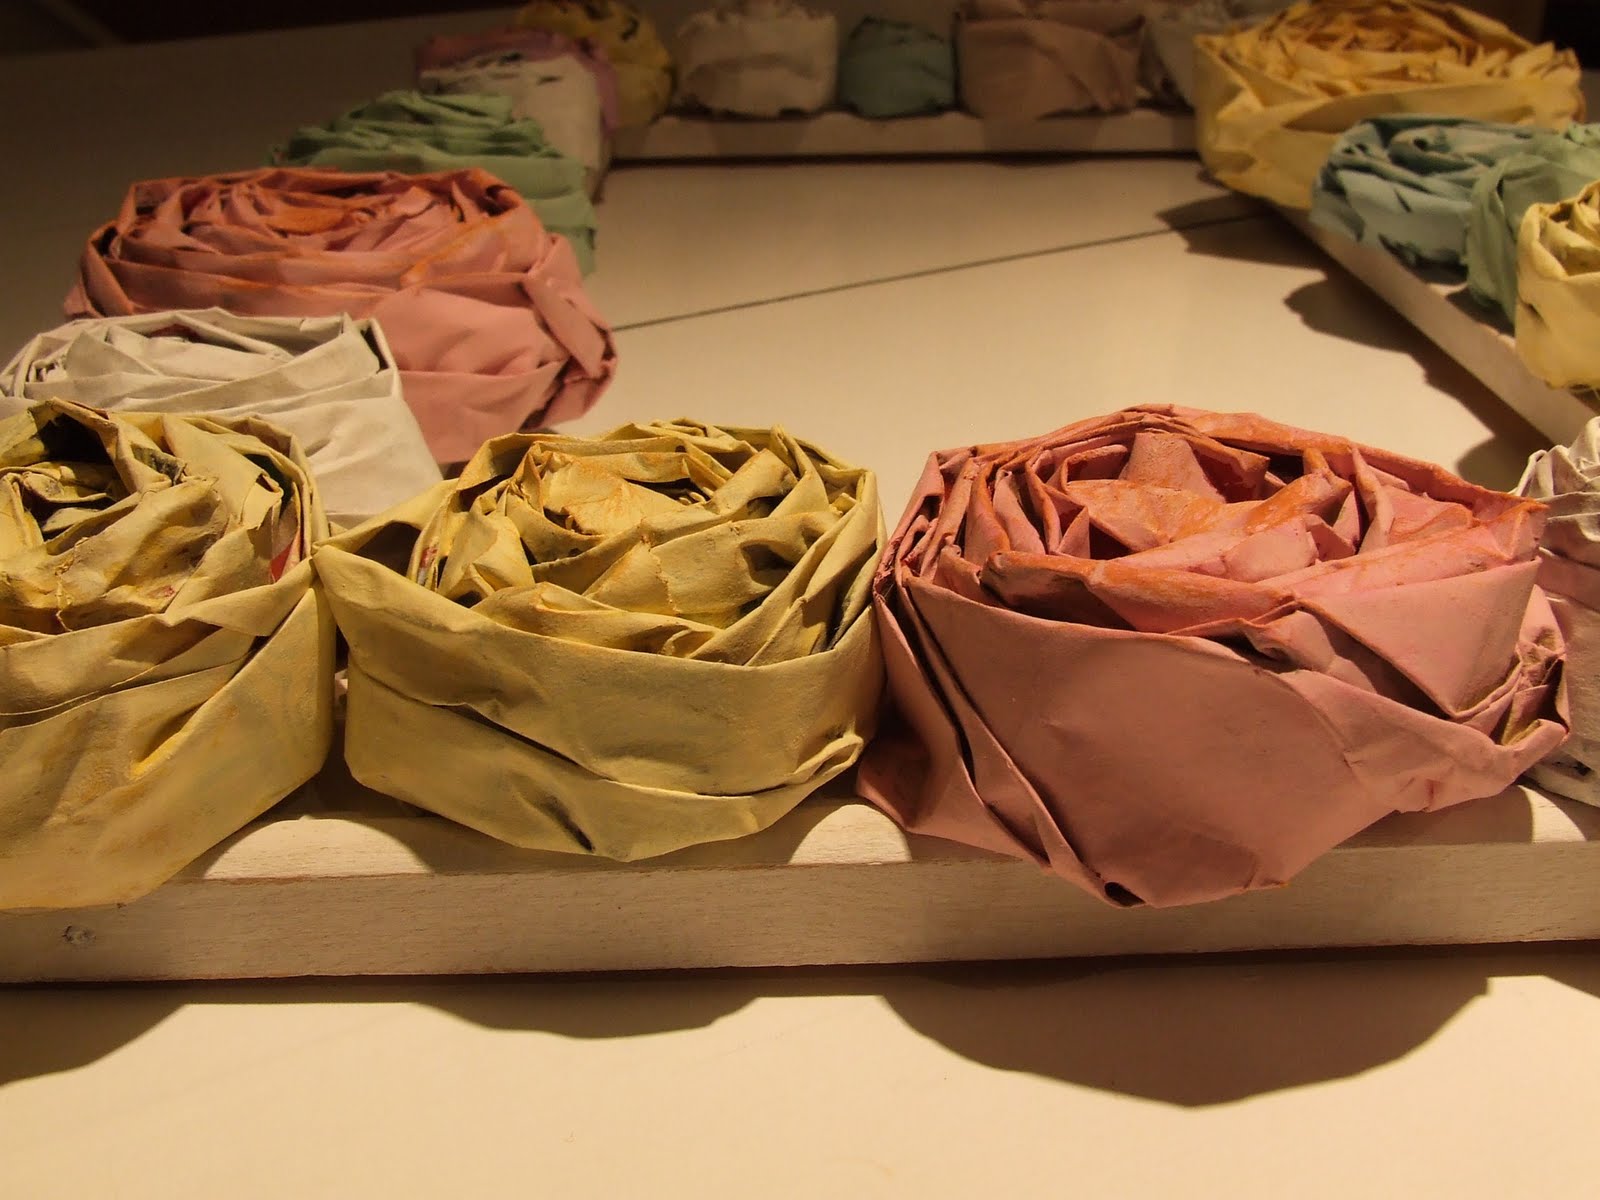
    16. Paint away! I used three colours of paint for my roses. I started with my colour of choice, say pink, and covered the flower pretty well with one coat. I let that coat dry a few minutes. I then dry-brushed just a little white onto the rose for dimension. And finally, I dry-brushed a little orangey-brown to age it a little.


    And there it is... Your newspaper rose! The key to getting this look, I think, is to keep the strip flat against the body of the rose as you work. Flat. That is the secret. Best of luck to you!


    If you have any further burning questions, fire me off an email. Again, to see the completed wreath in all its pastel glory, find it here ages ago back in April 2010.

    Have yourself a lovely day, I'll see you soon!

    P.S. Here's another paper wreath for you, in case you're interested!

    Wednesday, June 1, 2011

    Series 6: The Box Chain #4 - Ces Yeux


    Happy, um, June?... Yes, strangely that's correct. Happy June!

    Welcome to the fourth and possibly final installment (I never know...) of Series 6: The Box Chain!

    Today's offering is a piece I'm calling "Ces Yeux" ("These Eyes" in English). Mais oui.

    From a variety of recycling box papers including junk mail, newspaper, old giftwrap, used construction paper, and some old printouts, I made a slew of box chains. I then built the piece by glueing the chains (with carpenter's glue) in layers in a thrifted wooden picture frame. It took several nights of building the chains, and then playing with them on the floor, before settling on the concept for this guy. In the end, the time spent was well worth it. I'm so pleased with its subject matter, texture, and muted colours.


    If you don't yet know how to make the box chains, there is a detailed picture tutorial in this previous post.


    To see the rest of this series (or any other series for that matter), hop on over to the Series page, and scroll down to the bottom to "Series 6: The Box Chain". Again I wish to thank sweet Kapila for asking the question ("What would Michele do?) that got this series going in the first place.

    You have a great day now. I'll be back on Friday!

    Tuesday, April 27, 2010

    Newspaper Rose Wreath


    Edited to Add {18 Jul 2011}: Here's my little newspaper-rose-making tutorial to help you achieve the look of my paper roses. Hope this gets you on your way!

    I decided to make a rose wreath when I visited Alisa Burke's Blog. Such a lovely blog! I dare you not to be inspired! The tutorial for making a similar rose wreath is available at this location right here...

    Now, here's my version:


    I didn't have a wreath base for this project, so I settled on an old pine picture frame that I'd picked up at my friendly neighbourhood thrift shop a while back. Also, as opposed to Alisa who used a combination of fabric and paper in her wreath, all of my roses are made of newspaper and then painted with acrylic paint.

    It took me a few days to make all the roses. I'd make a few at a time and then move on to something else. I like working in bits like that. I find I appreciate the process so much more if I give it some breathing room. Anyway, I ramble... Essentially, this is a very simple craft, it just takes a little time...


    LinkWithin

    Related Posts Plugin for WordPress, Blogger...