

Just in time for Easter, I'm making some tiny, wee, little Easter baskets entirely from recyclables. You in? Let's get to it!
For this craft you will need: a TP roll or two, empty cereal box OR tissue box, pair of scissors, regular hole punch, glue, pencil, ruler, exacto knife, and liquid acrylic paint and paintbrush (optional).
Step 1: Using a ruler and pencil, find the center of the TP roll and mark a line all the way around it. With an exacto knife, cut the TP roll in two along that mark as below.

Step 2 (Optional): Give your TP roll pieces a coat or two of liquid acrylic paint.

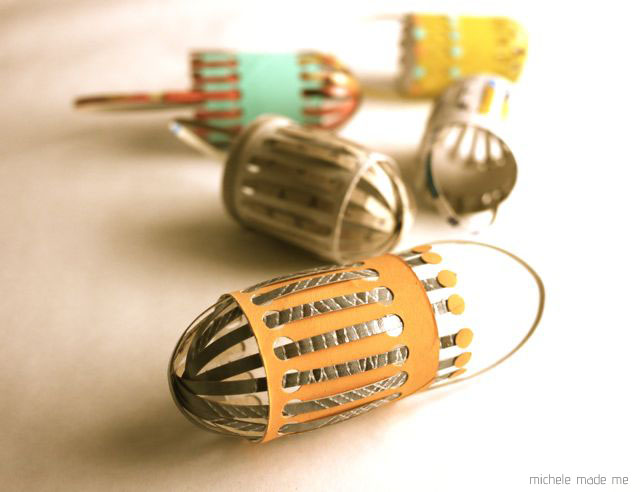
Step 3: Mark a line 1/2 inch (13mm) from one edge of your TP roll piece. Using a hole punch, punch an even number of holes along this line all around the TP roll. I punched 16 holes in mine. Now punch the same number of holes along the other edge of the TP roll as shown below.

Step 4: Take out your cereal box or tissue box, whichever you're choosing to use for your mini-basket, and cut off the end flaps. Now cut narrow strips along the length of either type of box. The strips must be able to slip into the holes in your TP roll so check to see if they fit before you continue. If you've punched 16 holes in the edges of your TP roll, you will need at least 9 cereal box or tissue box strips.

Step 5: Gather your TP roll, narrow strips and glue. Curve the narrow strips by slowly running them between two fingers. Go slow to avoid getting a papercut. Ow.

Step 6: At this point, note that you have a series of holes that is further from one edge of your TP roll than the other. See what I mean? The holes that are furthest from the edge indicate the top edge of the basket. Weave a strip through a top edge hole and through the corresponding bottom edge hole. Curve your strip around and weave it up through the holes on the opposite side of the TP roll. The ends of the strip should be jutting out of the top edge of the TP roll. Glue the strip to the TP roll as shown below.

Step 7: This step is essentially the same as Step 6, but once you've woven the second strip into the holes immediately beside the first strip, you will curve it down and around the bottom and cross it over the first strip, weaving it into the adjacent holes on the other side. Repeat Step 7 for the remaining strips.

Step 8: Trim the excess strip sections that jut out beyond the top of the basket. Take the last strip and form a handle by curving it and glueing it in place along the edge.

Every TP roll makes two mini-baskets. Make each basket unique by changing up the weave or paint colour, adding confetti embellishments, trimming the strips higher, or doing exactly as YOU please!

Come Easter morning, fill each mini-basket with a wee bag of mini-Easter eggs and hand them out to all of your favourite people.
I bet they'll be egg-cited!
♥M
P.S. HERE's a whole 'nother paper Easter basket for ya!

Que fofas! Adorei! Parabéns!
ReplyDeleteUm abraço1
Egléa
Everything you make is exquisite. I am, again, in awe.
ReplyDeleteDon't tell all your previous posts, but this post, THIS POST, is my new favorite of yours. Michele, it's beautiful!!! I esp. love the ones with the dots glued to the tops of the strips.
ReplyDeletesooo cool!!I will traing to make my own!thenks for shering
ReplyDeletegood wishes for more creative ideas!!!!
Ooooh - I bet this would work with other flexible materials such as yogurt containers too!!
ReplyDeleteDarling and simple...
You are such a genius!
ReplyDeleteOooooh! Aaaaah! Woooow!
ReplyDelete♥ adorable diminutive repetitive geometric perfection ♥
ReplyDeleteAwgh!! They are so cute!!
ReplyDeletePinning this!
So clever! We may be making a few of these today while we watch the snow fall outside!
ReplyDeleteMaravillosa idea!
ReplyDeleteAbrazos!
Thank You! So sweet and easy! Great idea!
ReplyDeleteGreetings from Germany!!!
Lisa
I love your projects that use recycled materials and turn them into something unexpected and beautiful. Also, the variation of colors and different weaving patterns is really cool. I posted two finished photos of your baskets and a link back to you on my Tumblr blog truebluemeandyou.
ReplyDeletethis project is amazing!!!! thank you for sharing Michele,
ReplyDeletexxx Ale
Oh, they are so cute! :)
ReplyDeleteOh my goodness! I love these.
ReplyDeleteAny project that is miniature is a winner with me...and made from TP tubes??!!! PERFECT.
~Michelle
Oh, this is a great idea, Michele! So beautiful and original - good for you!!! I will definitely try to make such a basket :)
ReplyDeleteHave a lovely March!
great eastercraft!! thanks!
ReplyDeleteMichele!!! WOW! I am always amazed at your ART!
ReplyDeleteBrilliant............you should put all these in a book!
ReplyDeleteThis is great!
ReplyDeleteBrilliant! Absolutely brilliant!!! I am so making at least one because the bunny I rescued from the thrift is in serious need of a proper basker. Actually maybe more than one! There is room on the easter tree for a few!
ReplyDeleteThank you for sharing your genius for thinking outside the cardboard box!!!!
Seriously? You are so darn creative!!!! I love love love these!
ReplyDeleteDonna S.
http://www.talkingalittlelesstrash.blogspot.com/
http://www.recreate.org
Vraiment très joli ! Thanks a lot for this very nice an easy easter tutorial! Sinje
ReplyDeletewonderful... as usual!!! :-)
ReplyDeleteThese are adorable! I love their design, Michele, and the fact that they are made from recycled cardboard is just wonderful! Brilliant- as always!
ReplyDelete*stands up from her chair and gives you a great big salute*
ReplyDeleteADORABLE BIZ JOJO
ReplyDeleteabsolutely adorable!
ReplyDeleteThese are so cute, you clever thing! Love :)
ReplyDelete