
My basement workspace is a mess. Still. I tidy it up. I make some headway in the organization department, and 2 nanoseconds after getting some crazy notion in my tiny brain, the place looks not unlike the epicentre of some horrific crafting disaster. Why do I let this happen? SIGH.
So much needs to be done down here. I need working doors for my closet. I need to organize my yarn. Again. I MUST gain control over the ever-growing pile of recyclables that I simply CANNOT part with! I need knobs on my credenza drawers so that I don't have to stoop down and desperately grip the drawer-bottoms with the very tips of my fingers in order to get to the craft supplies and tools trapped inside! I NEED KNOBS!!!!!!
Okay, Okay... Get a grip, Michele. Don't get your knickers in a twist. Don't I have knobs? Somewhere in this mess. Is there NOT a stash of wooden knobs SOMEwhere down here?! Think Michele, think! There is?!!! Oh yes... There is... Pardon the outburst. Here is that little knob stash!

Okay, well, I'm sorry. These knobs are lovely and all, but they just won't do. They are boring. Ordinary. Sad little knobs. We need something better.
Let's do something about it! Let's paint these babies!
Shall we begin?
Tutorial: Hand Painted Wooden Knobs
Draw circles on a sheet of paper, a little smaller than the top area of your knobs. Make some designs. Whatever you like. I happen to be partial to plants and animals. So here I go.

Once you are satisfied with your designs, gently transfer them in pencil onto some fine tissue paper (you know the kind you stuff in gift bags). Cut them out.

Now give your knobs a few coats of paint. I used liquid acrylic craft paint and put on 2 coats. Some knobs I left as is. Allow the painted knobs to dry.

Once the paint is dry, take a knob and coat the top surface with Mod Podge using a small paint brush.


Take one of your little tissue paper circle designs and, drawing side down, place it on the Mod Podged knob.

Gently smooth the tissue paper onto the knob surface with your brush. You will see the drawing appear very clearly on the knob. The drawing is protected by a fine layer of paper and therefore won't smudge.


A few things:
- You will need a couple of fine brushes as this is tiny work.
- Once you are done painting, you can (optionally) distress your knobs with some fine sandpaper.
- You will then need to apply a few coats of varnish to protect your itty-bitty works of art.
- Wait a few days to allow the paint and varnish to cure before installing the knobs.
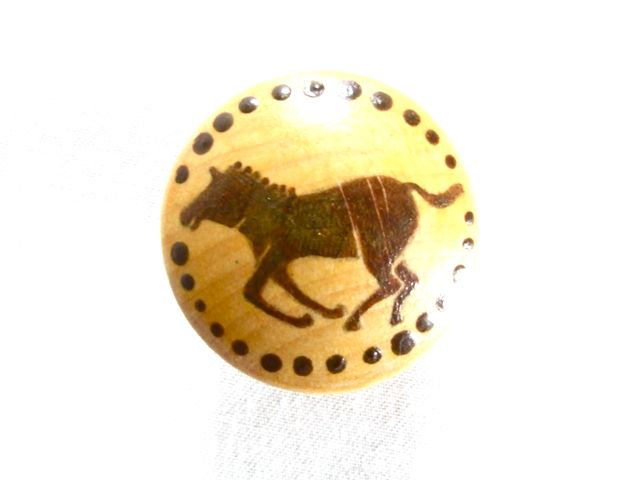
Here are some of my finished knobs! Yay for knobs! I have knobs! Woo-hoo!!!


Have a terrific day!
P.S. Linking here!

WOW! So cute! For the drawing impaired, like myself, one could print simple pictures or copy them at a very small percentage of their original size to fit and then trace on tissue paper!
ReplyDeleteThese are beautiful. Your tutorial is very easy to follow, and I love your drawings!
ReplyDeleteDenifitely a must. I'm drooling looking at the knobs on my two chests of draws and side table. Yep, there are twenty in all that should be enough to keep me going!!!
ReplyDeleteI love painted knobs! And yours are just beautiful! :)
ReplyDeleteI loved to make them because they are also sweet little gifts. But then my "swedish supply store" moved them out of their programm and I didn't find a good new shop to buy some (without any laquer and for a good price). :/
Oh these are just gorgeous!!!! I love them!!!
ReplyDeleteThese are just beautiful!! Love your artwork and the fine detail of your painting. Way better than the plain vaariety that's for sure!
ReplyDeleteLOOK how beautiful! I am loving the method, the madness and the maker! Never would have come up with that pencil/tissue paper idea, what a great notion. p.s. my workspace is exactly like that - tornado alley within 5 minutes of a new idea.
ReplyDeleteOh Michelle - those are so lovely... such tiny little designs... have you put them up all over your home?
ReplyDeleteHugz
these are so awesome! I love them - another etsy store seller I think!
ReplyDeleteSimone
You are amazing!! I wish I could paint like that!!
ReplyDeleteGénial ! Unique ! Tu réussis encore à nous étonner !!!!????????? lovely !!!! you are an artist !!!!!
ReplyDeleteThese are so hot! And without making that mocking voice, now I can have fancy knobs (and buttons) too!
ReplyDeleteThose turned out gorgeous!!
ReplyDeleteWe own a darling little leopard gecko...so I'm especially fond of your green guy. ;)
Those are so cute!
ReplyDeleteThese are great Michele, and love the idea with the tissue paper, never would have thought of that myself! Thanks so much for sharing on Craft Schooling Sunday, great to have you as always!
ReplyDeleteYour door knobs are spectacular, I love the mythological feel to them....part Celtic, part Aboriginal...xxh
ReplyDeleteI love these, just the trick for the finishing touch to my updated bedroom! Thanks for the lovely idea :)
ReplyDeleteLove them:) What a great way to spruce up any room! well done:)
ReplyDeleteWow, these knobs are awesome. You always come up with the most amazing crafts!
ReplyDeleteSo pretty! Not sure how I missed this post - just found it on Hoo's got talent? Well you certainly do :)
ReplyDeleteI was just in an high end antique store that had some amazing painted knobs and was wondering how I could do them for myself! Thanks for the tute! love it, and these are great! BTW, they were selling $8 for the large and $5 for the small. Each.
ReplyDeleteI think that these are absolutely awesome!! You have got uber talent!!
ReplyDeleteTes boutons de portes sont vraiment très beau
ReplyDeleteBravo l'idée
Gros bisous
Béa
I've been loooking for animal themed knobs for the dresser in the nursery. I couldn't find any, but now I can make them, and make them to match the curtains.
ReplyDeleteI'm getting excited about the project now!
thanks for the tips